A hammock made with your own hands will hardly leave anyone indifferent: both adults and children will enjoy spending time sitting or lying on it. Moreover, a beautiful product can decorate the site of a private house and a city apartment. In this article we tell you how to create a comfortable and stylish place to relax on your own.
Bonus: 6 Tips for Building and Attaching
There are several important points that will help you choose how to make a swing-hammock with your own hands.
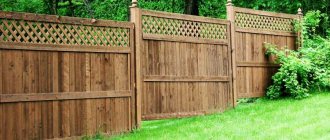
- If you like fabric models, then special attention should be paid to the material. The strength and durability of the product depends on it. Canvas, calico, teak, camouflage and canvas are suitable for this.
- It is better not to use synthetic materials. Firstly, they are more difficult to work with. And secondly, synthetics are uncomfortable to use in the hot season. It does not allow air to pass through, so you will hardly want to spend a lot of time in such a hammock.
- As for macrame, you can use both synthetic laces with polystyrene and special natural ones produced for this weaving technique.
- You can secure the finished product in the classic way between two trees, on poles or on a system that you can design yourself.
- If you decide to attach to trees, the diameter of the poles must be at least 15 cm. To avoid damaging the bark, use tubes or place fabric under the rope.
- Instead of trees, you can use support pillars, then they should be deepened into the ground. Or make a support structure with v-bars, similar to a boat. It's mobile, so you don't have to dig holes in the yard.
General recommendations for choosing the right type
The choice of hammock is made based on preferences, financial capabilities and planned use. Each variety has its own distinctive features that must be taken into account when choosing:
- Mesh construction is the most inexpensive option. It is used with a blanket and mattress because knots and ropes put pressure on the back. The mesh hammock is easy to install, remove and store. It is not designed for loads exceeding 100 kg.
- Fabric designs are the most popular. The maximum permissible load for such hammocks is 160 kg. They are not moisture resistant and vulnerable to ultraviolet radiation. With the right selection of material for making, such hammocks will suit most people.
- If they are made from polyester and nylon with the addition of natural fabrics, such hammocks retain all the advantages of fabric ones, but are more expensive. Such designs are moisture-resistant and resistant to sunlight.
Important! The hammock needs to be durable enough for all family members to use.
Plaid hammock chair
Hanging hammock chair using macrame technique – master class
I'll show you a very simple model. In fact, it is no different from a full-fledged hammock in which you can lie. But there is also a difference - this is how the strips are attached. They are not placed horizontally, but one is fixed above, the second below. Between them there are wooden slats that connect the upper and lower base and allow the structure to be stable.
A few words about the quality of the threads. The fact is that the main emphasis will be on the lower part. Therefore, the threads should not stretch too much; ideally, if it is a thin cable or dense synthetic rope, then the hammock will not stretch quickly.
What else do we need:
- Planks (1.6-2cm) – 2 pcs.;
- Reiki (0.6-1cm) – 2 pcs.;
- Rope for weaving – 125-130m;
- Clothesline for fastening – 4m;
- Screws and drill.
Making crafts.
We make 2 holes on each edge of both planks. One is at a distance of 2, the second is 3.5 cm.
We insert thin slats into those holes that are closer to the edge. And this is how all 4 wooden bases are connected.
We hang a wooden base to make it easier to weave. We cut the rope into 8m lengths (into 16 pieces).
Fold the rope in half. We leave the loop in front of the bar and fold the edges over the bar. We thread the edges into the loop.
This is how we fasten all 16 ropes.
Distribute all loops evenly over the base.
We take the first 4 ropes (from 2 loops) in our hands. We bend the rope on the far right at a right angle, place it on the 2 closest ropes and thread it under the one on the far left.
We pass the left rope behind the two that are nearby and thread it into the loop on the right, which we formed when we bent the right rope.
Lightly tighten the knot. We do this with all the ropes.
To make the second row, step back about 7cm. We skip the last 2 ropes. We take the next 4 ropes in our hands and do the same with them as we did in the previous row: we throw the rightmost one over the leftmost one; We pass the left one into the right loop.
And so the whole series. We weave until we have ends of ropes of about 20 cm.
We tie the edges tightly on the bottom bar.
The chair is ready! All that's left is to hang it up.
We cut the clothesline into 2 halves of 2m each.
We thread the ends of the clothesline into the holes at a distance of 3.5 cm from the edge.
We make strong sea knots at the ends of the ropes.
All! Let's hang up our chair! Simple, fast, and we are guaranteed a wonderful holiday!
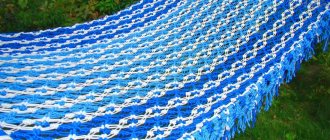
Weaving a hammock from linen thread (rope)
The clothesline has special strength and is not afraid of moisture and the scorching sun. That is, a hammock is great for a summer house; hung it and let it hang all season! This is a huge advantage of the material, namely, clothesline. But the thickness of such a rope is greater than that of a cord, and therefore it is not so convenient to weave. But it's economical! You will need less thick rope than thin yarn.
The simplest and most convenient way to weave clothesline is a net.
It's very easy to do.
- We tie a rope to the bar.
- Then we connect the ropes that are nearby. We tie them in a knot.
- We go lower and tie a knot in the ropes that are nearby, but were previously tied to neighboring ropes.
And so on to the very bottom. At the bottom we thread the rope through the holes of the plank and secure it with knots.
This hammock is made very quickly! But for complete comfort it should be equipped with pillows and bedspreads.
Tools and materials for DIY sewing
To work, you will need to prepare the necessary materials and tools:
- The base is fabric that is strong enough to support a person's weight.
- You will need cords, slats, carabiners, hooks for attachment, eyelets, threads, needles (depending on which model is chosen for production).
- You may need a special tool to install the grommets.
- Sometimes cord or strips of fabric are needed to make loops for hanging the hammock.
Wooden or metal structures can be used for fastening. You can purchase them or make them yourself at home.
On a wooden base
Choosing rattan, what to look for
Rattan is a material that is used to make wicker furniture, including hammocks. It must be remembered that it can be either natural or artificial.
The advantage of real wood is its environmental friendliness, but artificial rattan can boast of strength (the hammock can easily withstand weight up to 150 kilograms) and durability without any maintenance, as well as a cheaper cost. In addition, you don’t have to be afraid to leave it outside, since poly rattan is not afraid of any climatic conditions.
When choosing a hammock, pay attention first of all to its storage location.
Attention! Natural wood can dry out in the wrong conditions, which will lead to its rapid breakage.
Also, another point that requires close attention is the price; natural wood is expensive; it’s not for nothing that only the rich could afford it half a century ago.
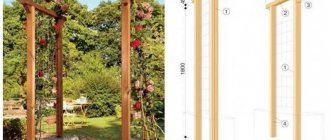
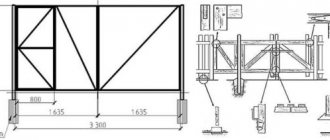
Frame manufacturing process
Most often, ash timber is used for production. The design of the simplest frame includes two braces that are attached to the base at an angle of 45 degrees. The base itself consists of a strapping of two beams. Also, the braces must be fixed with power blocks, which are also attached to the harness.
A simple, but very stable and reliable structure made of ash timber Source pointernety.ru
At a height of about 1.4 m, eye blocks are installed on the braces. They are needed for hanging a hammock. A stand for a wooden hammock should also include two beams that serve as horizontal support.
During manufacturing, first of all, the entire timber is cut to length and, after processing and polishing, is coated with antiseptics and fire retardants. Then they take one of the strapping strips, apply power supports and braces to it, pre-connected to each other. Next, another trim strip is installed on top and holes are drilled in the right places with a diameter equal to the diameter of the bolts. At least two bolted connections should be used for each joint. After this, the bolts are tightened until they stop.
The next step is to attach the eye blocks and paws. This is the process of making a stand. But after complete assembly, the entire surface of the timber can be painted and hidden with varnish for decorative purposes. This design for a hammock is inexpensive and is reliable and stable.
It’s not difficult to make a base stand for a hammock yourself Source qirarygo.ga
How to fix a hammock in the countryside on a ready-made base
Although hammocks are often attached to poles, trees, or hooks driven into the wall, they can sometimes be dispensed with. There are special structures that stand on the ground and make it possible to hang a hammock.
Important! They can be made from wooden beams or metal parts. This way, when installing a hammock, it is easier to choose the most convenient place.
Making a hammock will take time and effort. However, the pleasure of using it will more than pay for all the costs. Having made a hammock carefully and reliably, you can use it for many years, bringing joy to yourself and your loved ones.
Varieties
Modern manufacturers are trying to produce comfortable, original and aesthetic hammocks for home and garden. Products for children are distinguished by bright colors and interesting design solutions. By type they are divided into:
- Hanging. They belong to the classics and are mounted between two trees or on specially dug posts. Some models are equipped with special strips at the ends, others are produced without strips. The first option is more comfortable to use. Their advantages include: low price, compactness and ease of use. And the disadvantages of such models include the fact that children can fall out of it if they sway too much.
- Frame. Such designs are universal. They can be installed outdoors or indoors. To install the product, no supports are needed, since it has a ready-made frame. Their main advantages include: the ability to install in any convenient place, reliability in use, stability, interesting designs and bright colors.
- Hammocks - swings. They can be attached to a tree, pole, ceiling, doorway. The main thing is to find a solid point of support. Some models are equipped with canopies and mosquito nets. This makes them favorite places to play.
Children's hammocks are not much different from adults. But nevertheless, manufacturers define them in a separate category. Typically, these products:
- are small in size;
- differ in bright and flashy colors;
- are as safe as possible;
- differ in convenient designs.
In their production, safe and non-toxic materials are used: linen, cotton . Most models are equipped with protective side skirts for the safety of children. Their bottom is ergonomically shaped so that kids can rest comfortably and avoid health problems. Children's models can withstand loads of up to 40 kg.
Advantages and disadvantages of handmade hammocks
Making hammocks yourself has its advantages:
- Low manufacturing cost.
- Possibility to choose the most suitable model.
- Taking into account individual tastes during production and installation.
- It is not accessible to rats or other animals.
However, you need to remember the disadvantages:
- You'll have to spend a lot of work.
- The workmanship will be lower than that of purchased structures.
- To do this job you need to have certain skills.
To make your life more comfortable, you need to take into account your tastes and capabilities when choosing the best option.
This is interesting
It is believed that hammocks were invented by the Mayans approximately 1,000 years ago. The first hammocks were woven from the bark of the “hamak” tree, hence the Indian name for hammock. Then the Indians of Central and South America began to use hammocks, who literally lived in hammocks long before their first contact with white man. In the last 60-70 years, hammocks began to be woven from strong cotton ropes, and hammocks in Brazil and Ecuador began to be made from solid fabric.
When Columbus returned from the “New World” to Europe, he brought with him not only gold, but also several samples of Indian hammocks. Soon, many European sailors, especially the English and French navies, adopted the hammock idea and began using hammocks for sleeping. In the navy, hammocks made from linen have been used for more than 300 years. This version of the bed did not take up much space and also saved from inconvenience when rocking. Before the Navy began using hammocks, many sailors were seriously injured by falling out of their beds during heavy seas.
Hammocks were even used on spacecraft - for example, they were equipped with the lunar module in the Apollo program. And when traveling, hammocks suspended from trees provide protection from snakes and poisonous insects.
Nowadays, a hammock - like a net stretched between two crossbars - is more of a stylish addition to interior or garden design. It helps to relax the muscles of the back and neck while relaxing; swinging in a hammock is calming.
A hammock without crossbars is simply a piece of fabric gathered on both sides, called a Mexican hammock. It envelops a person like a cocoon (or like a mother’s hands - as the Indians call them), supporting every centimeter of the body and giving the opportunity to completely relax. It is extremely difficult to fall out of such a hammock. It is much more difficult to learn how to sit in it correctly!
Metal beds
Another craftsman from our portal, henc, chose metal as the material for his frame, since it is clearly “friendly” with welding. He used a pipe with a cross-section of 60×40 mm, resulting in a hammock design on a stand with the following parameters:
- The base is 2 meters.
- Hammock stands – 1.8 meters (angle about 60⁰).
- Transverse supports – 1.5 meters each.
- Jib beams.
- Hooks.
- Chain.
The resulting mobile hammock on a stand was well appreciated by this family.
hencFORUMHOUSE Member
The kids started a “fight” for a place on the hammock; by the evening they only calmed down, but they were busy and in full view.
Rol248 made a frame from scraps.
Rol248 Member FORUMHOUSE
This is what I got from scraps of old pipes and corners. Since hammocks gradually stretch and sag, we had to come up with a system for extending the posts.
henc solved this problem by attaching the hammock to a chain - as it sagged, he simply shortened the links.