Review author: Terrari School of Design
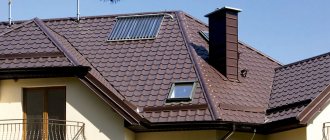
Home owners often look at photos of tile roofs and at real buildings with such a covering. And there are justifications for this, because choosing roofing material for a roof can be difficult for several reasons, namely:
- I want the roof to be beautiful;
- the material must be durable and reliable;
- the cost of the roof would be inexpensive.
All these consumer requirements are met by a material such as metal tiles. Another advantage of such a roof is its simple installation, which can be handled by a person who has no skills in roofing work.
Metal tiles are a sheet of metal up to seven millimeters thick, on which compositions for protection and decoration are applied. This is a kind of cake made from several layers and cream.
The base is most often made of steel, but can be made of copper and aluminum. Then metal tiles cost an order of magnitude more than steel tiles, and they are made to order.
This building material can be imported or domestic. The European standard allows metal tiles to be made on a steel sheet of five millimeters. Domestic metal tiles may be inferior in thickness, but should not exceed seven millimeters.
The steel sheet is covered with a protective layer against oxidation. It can be based on zinc or aluminum-zinc. The second option is more expensive, but it effectively protects the building material.
As a finishing coating, various compounds are used that are mixed with paint, which gives color to the roofing material.
The production of roofing materials is improving, and now there is Monterrey metal tile on the market, which is gaining popularity due to its qualities. It does not burst from low temperatures and does not melt from high temperatures, and water does not leak through it.
Features of the material
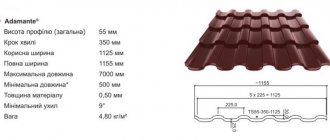
Metal tiles are steel sheets, the thickness of which varies from 0.35 mm to 0.7 mm. Moreover, the rigidity and stability of the roof directly depends on this indicator. The sheets are galvanized on both sides, the outer side is coated with a special compound, polyester or plastisol. The dimensions of metal roofing tiles are as follows: the width of the sheet is usually 1 m, the length ranges from 1 m to 8 m.
The main advantages of the roofing material in question include:
- light weight (no more than 6 kg per square meter);
- ability to easily withstand temperature changes;
- ease of replacing damaged elements;
- resistance to corrosion (subject to certain conditions);
- reliability and long-term operation (up to 50 years);
- relatively low cost;
- color variety.
The essence of the “snag” complicating installation
The main representatives of the class of hipped roofs are hip and hip varieties. They are attractive due to their interesting configuration, reduced loads directly related to the “streamlined” shape, and efficiency.
These also include half-hip Danish and Dutch structures, the structure of which contains elements of roofs with two slopes, which is why the addition “semi” is included in the technical name.
Hip roofs differ from their gable counterparts in that they do not have vertical gables or gables. All four slopes are installed at an angle to the horizon and to each other. Half-hip versions have shortened vertical components such as small pediments above or below paired slopes.
The structural specificity of roofs of this class lies in the shape of the pitched planes, reminiscent of:
- Triangle. In tent structures, all slopes are congruent and have the shape of equilateral triangles, the vertices of which are brought together at one common point. In hip roofs, triangular slopes, called hips, are located on the side of the short walls of the building.
- Trapezoidal. In hip structures, these are slopes adjacent to the ridge girder. They are located on the side of the long walls of the building. In Dutch half-hip systems, all four pitched planes are trapezoidal in shape.
The gable slope of the Danish half-hip roof is shortened. Its main brother has a trapezoidal shape only in the upper segment - in the area adjacent to the hip. The rest of the part is standard rectangular, which slightly facilitates the process of installing a metal profiled coating on it.
Arrangement rules
When working independently on creating a roof, you must strictly follow the technology for installing a metal tile roof. An inclination angle of at least 14 degrees is allowed.
When installing a gable roof, installation begins from the lower corner of the left side. The next sheet is superimposed on the previous one with an overlap of one wave. If a hip roof is meant, then work begins from the highest point, gradually descending along opposite sides.
The last metal tile sheets must be hung over the final sheathing board by about 5 centimeters. They are fastened with special self-tapping screws of the appropriate color, which have rubberized gaskets. The ridge is covered with special seals, on top of which a metal ridge element is installed.
A variety of additional roofing elements creates gaps that need to be sealed. For these purposes, silicone-based sealant and special sealing tapes are used.
The under-roof space is where cold prevails and condensation can form. Therefore, it is necessary to make a high-quality roofing cake, taking care of the proper vapor and waterproofing components, as well as ventilation.
Calculation of the amount of metal tiles
To calculate the required number of sheets of material, you first need to decide on the type of profile and the manufacturer of the metal tile - you will need the exact dimensions of the material itself, and each profile has its own. Then you need to make accurate measurements of the slopes - length, height, if any, you need to measure all the protrusions or other decorative elements that will need to be sheathed with roofing material. If the roof has a complex shape, it is better to draw a plan, put down all the dimensions and then start doing the calculations.
Number of rows
It is best to look for metal tiles not in stores or markets. It is advisable to contact the manufacturer directly. The point is not only the price - it may not differ very much, but the fact that many workshops/factories offer to cut sheets of the required sizes. The minimum sheet height is 0.7 m, the maximum is 8 m. That is, you can order the required number of sheets covering the roof slope from the ridge to the overhang (taking into account the eaves overhang).
This option is good because a metal tile roof will not have horizontal joints, which means there will be less chance of leaks. The second plus is a minimal amount of waste and a smaller amount of material itself (due to the absence of horizontal overlaps, several square meters are saved). Disadvantages: difficulties with delivery, lifting long sheets to the top, inconvenient installation.
Calculation of a rectangular roof slope
When using sheets of standard sizes, the height of the roof slope is divided by the useful length of the sheet. The resulting figure is always rounded up. The useful length is obtained after subtracting the amount of horizontal overlap from the total length - from 100 to 200 mm. The flatter the slope, the greater the overlap of the sheets is necessary so that precipitation cannot get into the under-roof space. On roofs with a slope of up to 12°, one sheet overlaps the other by at least 200 mm; with a slope of 12° to 30°, the overlap is 150-200 mm, more than 30° - 100-150 mm. The specified amount of overlap is subtracted from the total length of the sheet, this will be the “useful length”.
An example of calculating the number of rows of metal tiles on a roof . Let the length of the slope be 4.5 m, the useful length of the sheet is 2.3 m. Divide 4.5 by 2.3, we get 1.95, round to the nearest whole number - we get 2 rows. In this case, only a small part of one sheet will go to waste, but there are times when more than half is cut off. This is very unprofitable, since this piece cannot be used anywhere else.
Number of sheets in a row
Take the length of the slope and divide it by the usable width of the sheet. This parameter is indicated in the technical specifications for metal tiles. Most often it is 110 cm (1.1 m). We round the resulting number up to obtain the number of sheets in the row.
An example of calculating metal tile sheets in a row. Let the length of the overhang be 8 m, the useful width of the sheet 1.1 m. When dividing, we get 7.27 pieces, but round up to a larger integer and we get 8 pieces in one row. Moreover, more than 2/3 of one sheet will go to waste.
Features of hip roofs
Hip roofs have slopes that are triangular or trapezoidal. Here it is necessary to select the length of the sheet in order to minimize the amount of waste.
An example of the layout of metal tile sheets on a hip roof
The height is selected so that no more than half goes to waste. It is quite difficult to do this manually, and there is still a significant error - there will be 20-25% more waste than when calculated using programs. They are usually available from sellers and manufacturers. It is better to provide them with an accurate calculation, and first measure the parameters of the roof at home (or call a measurer), and then try to select the dimensions yourself. Then you can compare the amount of material needed, calculated by you and proposed.
Determining the number of additional elements
A metal tile roof requires a large number of different additional elements (additions), which form the ridge, the edge of the overhang, the sides of the slope, the passage of the pipe, the valley (the junction of two adjacent roof slopes). The more complex the shape of the roof, the greater the amount of additions required. With a simple gable roof, ridge elements and caps, cornice and pediment strips will be needed. That's all.
What types of additional elements are there for metal roofing and why are they needed?
Despite the wide variety of extras, they are all considered the same. Take the length of the surface on which it needs to be mounted and divide by the useful length of the element. It is usually standard and is 1.9 m (total length 2 m). The result obtained is rounded up.
Tools
For work you will need: a screwdriver with a bat for a roofing screw, a cutting tool, a special strip to maintain the same distance between the sheathing, a tape measure, a tapping cord, a marker, sealant, and a hammer.
Professionals do not recommend using a grinder for cutting sheets, as it will burn the edges of the cut and may leave traces of hot scale on the surface. This will subsequently lead to metal corrosion.
The necessary conditions
If the coating is installed on the roof of a residential attic or attic, it must be pre-insulated. Its scheme is standard:
- an insulating film is attached to the bottom of the rafters;
- insulation is laid between the rafters;
- A hydro and windproof membrane is attached on top.
If these steps are not followed, the service life of the metal tile coating will be sharply reduced.
If the attic is uninhabited, the roof may not be insulated.
Warm roofing cake
The layers of the roofing pie must be arranged in strict sequence. The composition of a warm roof is represented by: a rafter system, a vapor barrier film, a thermal insulation layer, waterproofing, counter-lattice, sheathing and, finally, the metal tile itself.
Rafters and additional reinforcement of their load-bearing capacity make up the roof frame. The vapor barrier releases steam from the room; it is attached to the inside of the sheathing boards. Thermal insulation is placed between the rafters, for example, it can be mineral wool.
Waterproofing the roof under metal tiles is necessary to prevent the ingress of condensation that falls on the back side of the metal. The counter-lattice presses the waterproofing layer against the rafters and creates the necessary ventilation gap between the waterproofing and the sheathing. The sheathing boards are nailed to the counter-lattice, and metal tiles are attached to them using self-tapping screws.
Installation of sheathing
This stage of work should be given special attention, since it is on the sheathing that the tiles will be attached. This design also provides natural ventilation of the internal roof space.
- Metal tile sheathing is made from wooden beams . The relative arrangement of the boards can be continuous or thinned out.
- Most often sparse structures , and the distance between the boards (sheathing pitch) is strictly tied to the distance between the lower depressions of the tile waves, since in these places the material has the greatest strength.
- The distance between the first two bars on the side of the slope should be approximately 70 centimeters less than the established pitch.
- The minimum thickness and width of the board for sheathing are 25 and 100 mm , respectively.
- The width of the board for the counter-lattice can be half as large. The first board from the edge of the roof should be 15-20 mm thicker than all the others.
NOTE!
The boards are pre -calibrated to one size to avoid future distortions and unevenness in the arrangement of the tiles.
Lathing step
Installation of the structure is carried out after completion of the installation of the waterproofing layer. The main lathing is attached to the counter lath, which is connected to the rafter frame with self-tapping screws. At the ridge of the roof, additional support boards are laid under the metal tiles.
Cold roofing pie
A waterproofing layer is spread along the rafter legs, which is pre-fixed using a construction stapler. Then the counter-lattice is stuffed. The sheathing boards are attached to it, then the metal goes on.
As in the case of a warm pie, in this case it is also necessary to ensure proper ventilation of the metal tile roof. It is achieved thanks to the counter-lattice, which provides a gap between the waterproofing film and the sheathing boards.
For the roofing pie under consideration, an additional vapor barrier layer is not required. The technology itself is used extremely rarely, since a roof without insulation produces large heat losses and does not cope well with noise. It is possible to insulate the ceiling, which serves as the ceiling in the house.
What and how to attach it to
The metal tiles are secured with special self-tapping screws and rubber washers. Just like the main material, they are made of galvanized steel, and the top is painted to match its coating. When installing, the self-tapping screw must be screwed in strictly perpendicular to the roof surface; tilting it is not allowed.
How to properly screw self-tapping screws into metal tiles
When fastening metal tiles, you need to monitor how tightly the fasteners adhere to the surface. You cannot tighten it too much, bending the metal, but you also cannot allow a loose fit - the connection will not be airtight.
Installation of the valley
The planks are fastened with an overlap of 20-40 cm. In this case, it is necessary to move from the cornice to the ridge. The end of the lower cornice strip is formed under the side. Near the ridge, a seal is made on the last strip.
Sheets of metal tiles suitable for the valley are cut approximately 7 cm from the axis of the laid plank. The valley itself is fixed with self-tapping screws, the cut edge of the metal tile is attached at the points of contact with the strip.
It is possible to decorate the edges of the cut metal tile sheet using special overlays. The latter are laid starting from the bottom of the roof, the overlap should be approximately 10 cm. The overlays prevent snow from blowing under the sheet cuts and make it easier for water to roll into the valley.
Product selection rules
The modern construction market offers a wide variety of metal tiles, differing in characteristics and configuration. At the same time, some types of metal tiles have a higher cost than others, but are not always of better quality. How to choose the right products and purchase a quality product with characteristics suitable for specific conditions? Important parameters when selecting metal tiles are as follows:
- thickness of the metal used (0.45-0.55 mm);
- galvanized layer thickness (from 220 g/m2);
- characteristics of protective and decorative coating;
- profile type;
- the configuration of the covered roof;
- manufacturer's warranty.
It is worth studying all the listed criteria together. It is recommended to start with the warranty period of metal tiles specified by the manufacturer of the product. The maximum warranty can extend for a period of up to 15 years. This is exactly the warranty period that the manufacturer provides for metal tiles, the front layer of which is made of pural. In the event that the period is only 10 years, the tiles will have a polyester coating. However, this does not mean that the future roof will only last for this period and will need to be replaced. In fact, for such a period the manufacturer guarantees that the coating will maintain its integrity, which means the material will effectively cope with its tasks.
The design characteristics of metal tiles largely depend on the overall decision in home decoration, as well as on user preferences
However, it is important to take into account the fact that a light-colored roof retains its shade longer than a dark-colored coating, which fades more actively under the influence of the sun. Having selected and purchased the material in the required quantity, you should also know what tools will be needed so that the installation of metal tiles is carried out according to all the rules
The nuances of finishing a chimney pipe
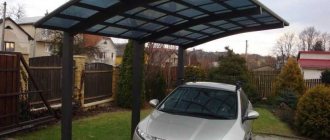
After installing the waterproofing, a special gutter is installed around the pipe and on the entire surface of the slope, which will serve as a water drain.
Interior doors in the house - which ones to choose? Review of the best models of 2022. 125 photos of new designs- Entrance doors to the house - which ones to choose? Review of the best models of 2022, design examples + 120 photos
8 by 8 house layout - the best design projects of 2022. Instructions for beginners + 100 design photos
The entire design requires compliance with some general rules:
- fixing the apron involves the use of a sealant;
- the apron itself should cover the top of the wave of the metal tile sheet;
- The inner apron is attached first and fits into the installed gutter, followed by the outer one.
A properly installed metal roof is strong and durable. If you follow the technology for laying sheets, as well as arranging the entire roofing structure, including insulation, you can get an excellent roof over your head. And your photo of a metal tile roof, posted online, will help novice builders easily cope with this stage of building their own home.
Roof with attic
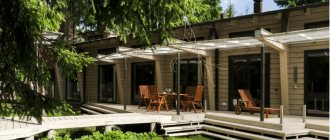
If your plot of land is located on rough terrain, it is rational to build a house that consists of multi-level living spaces connected to each other. The building layout may also include various extensions, such as a garage with an attic or an enclosed terrace.
Dormer windows are a striking accent on the facade of a house with an attic; they are often highlighted in a color that contrasts with the shade of the roof and walls.
Dormer windows in the attic can have either a rectangular or arched shape, and shutters can be used as a beautiful addition to them.
In Art Nouveau style cottages, dormer windows are most often placed in the plane of the roofing.
See also: Beautiful mansard roofs of private houses: photos, design examples