Dieffenbachia is a common houseplant. It can be found in almost every home. Dieffenbachia is used very well in landscaping offices and interiors. Since this is an unpretentious plant. Its main feature is to maintain growing conditions. Considering the peculiarity of its growth in its homeland. This is a tropical plant that requires moisture, watering and lighting. Like all any indoor plants, they need fertilizing with organic fertilizers. Sooner or later the question arises: how to propagate Dieffenbachia at home.
Dieffenbachia reproduction and care. How to care
This plant belongs to the aroid family. The plant itself, in its homeland in Asia and America, reaches impressive sizes. Among indoor floriculture, this plant is valued for its decorative qualities. The plant itself consists of a powerful stem and many leaves. They come in different sizes and colors. It all depends on the variety and type of Dieffenbachia. You can read about the types of Dieffenbachia here.
This plant prefers enough light, which should be bright and diffused. Direct sunlight can damage the plant, leaving it with sunburn. If there is not enough light, the color of the leaves may change. Decorative qualities are lost. You can use additional lamps or phytolamps.
The plant has no particular requirements for soil. Or rather, ordinary soils for indoor plants are suitable. You can add some peat and sand to them. Or choose a similar soil that contains peat.
Watering must be well organized, it must be abundant and timely. We do not allow the earthen clod to dry out, and excess moisture should be removed from the pan. Over-wetting the soil can lead to the death of the plant or infection with fungal diseases.
Requirements for soil and pots
The root system of this rapidly growing plant also grows well, gradually filling the entire pot. And this is a signal to replant the perennial. Sometimes this procedure is done twice a year. Before planting Dieffenbachia, you need to take care of the pot for the new flower.
It should be a couple of centimeters larger than before. The tropicana will not master a very large pot right away; the plant will not be comfortable in it, which can cause it to wither. Therefore, Dieffenbachia has to be replanted quite often .
The heat-loving plant prefers light, well-fertilized and drained soils.
With a lack of oxygen, the roots rot.
perennials , to which you need to add a little vermiculite .
A self-prepared earthen mixture may consist of the following components:
- turf soil - 2 parts, twice as much peat, and half as much sand;
- turf soil - the same amount as in the previous case, and instead of 4 parts of peat, leave only 1 part, but supplement the mixture with equal parts of humus, leaf soil and perlite;
- leaf soil - 4 parts, 2 parts each of sphagnum and peat, half as much charcoal and sand.
Dieffenbachia propagation options.
This plant is good because it can be propagated in various ways, which we will consider: (propagation of Dieffenbachia by cuttings, propagation of Dieffenbachia by leaves, how to prune Dieffenbachia for propagation). You can choose any one. Reproduction is usually associated with plant renewal. It can be renewed during transplantation or when its decorative qualities have deteriorated. Deterioration in decorative qualities may be caused by depletion of nutrient soil, which can be replaced during replanting.
Changes in temperature conditions and drafts can also lead to loss of decorativeness. Despite all the possible problems, Dieffenbachia can and should be propagated. Thus updating the main plant, and breeding new young specimens. This is especially true if you notice a new variety among friends and want the exact same plant for yourself. Under natural conditions, Dieffenbachia can reproduce by pollination and through seeds. Unfortunately, at home, propagation through seeds is quite problematic and it is not always possible to obtain the desired result. The plant needs to be pollinated, then the seeds should be allowed to ripen, then dried and stored. Then they are planted and germinated.
You can root the Dieffenbachia stem in water and soil.
We will consider the most reliable and proven methods of reproduction below:
Reproduction by lateral shoots
Sometimes dormant buds wake up on a bare Dieffenbachia stem and side rosettes appear. Separate, dry, and plant them in the same way as apical cuttings.
Care is no different, only the shoots are much smaller. They can be covered with a transparent cap so that the walls do not touch the leaves.
Propagation by cuttings
The most proven and well-known of the reproduction methods. For propagation by cuttings, you should choose a suitable Dieffenbachia stem. It is enough to take a stem at least ten centimeters long. The ideal time for reproduction is spring. But given the unpretentiousness of the plant itself, this can be done throughout the year. Cuttings are part of the stem of the main shoot that we cut. It must be in good condition, without signs of rotting, stains, or other diseases. If you find damage, it is better to cut it off and use the healthy part of the cutting.
You can also use the simplest method for rooting cuttings. We put our cuttings in a container with water. You can take a transparent jar. This way the light will also fall on that part of the shoot that is in the water. The water should be disinfected. To do this, you can dilute activated carbon in the water where you plan to keep the cuttings. The container should be in a warm and bright place - usually a windowsill. Given the peculiarity of this cutting method, the water must be changed to avoid its attenuation and rotting of the cuttings.
Tip: try to root one cutting at a time. It is not advisable to place several cuttings in a container with water; in close contact, the cuttings may begin to rot. You can use stimulating solutions and preparations for better rooting of cuttings.
After some time, roots begin to form on the cuttings. Don't rush to plant them, let them grow. It is enough to maintain their length of about five centimeters. Next, prepare containers for planting. Fill them with soil and carefully plant the cuttings. The roots are very fragile, so this procedure should be carried out very carefully. It is better to fill half the pot with soil. Place or position the cutting so that the roots are in light contact with the soil. And carefully add soil to the level you need.
You can also root the cuttings directly in the soil. For this process to be more successful, the soil must be prepared. Or rather, we will take peat as the basis of the soil and add perlite or vermiculite to it. Mix everything into one common mass. Everything is taken in equal parts. You can also use sphagnum when rooting cuttings. Take half of it, and half will consist of peat and vermiculite or perlite. The peculiarity of sphagnum allows you to improve the rooting process. Sphagnum provides such qualities as soil porosity, which in turn promotes the evaporation of excess moisture. The soil turns out to be loose and crumbly, this allows young roots to germinate unhindered, and its light texture provides good oxygen saturation. We also use activated carbon, as in the case of reproduction in water. This will prevent and prevent the shoots from rotting.
- — we cut the cutting, it should be strong and healthy, without signs of damage or disease.
- - You need to let it dry, a day is enough.
- — take the root and make a solution, then keep the cutting in this solution for about five to nine hours.
- - The cuttings should be planted in a prepared container, to a depth of no more than five centimeters.
- — we create a greenhouse effect, for this we use a bag or film.
Advice: the greenhouse effect is only good if you take cuttings in winter, since you need to maintain an optimal temperature. If you are cutting in the summer, then there is no need to cover the container with a bag or film.
Diseases
- Root rotting, which occurs due to excessive watering. Symptoms of this disease include wilting of leaves.
- Rotting of the stem is accompanied by a change in its color and structure. It becomes soft. This can happen from cold and waterlogging. The affected area is cleaned of rot and treated with charcoal. If this is impossible to do due to the strong spread of the disease, then the old plant is thrown away and the cuttings are cut for rooting. A new Dieffenbachia will grow from them. Reproduction is possible even from one cutting, but it is still better if there are several of them.
- If the tips of the leaves turn brown, check the hardness of the water for irrigation. She's probably too tall.
- Spraying plants in the cold causes leaf parts to rot.
- If the plant receives very little light, the stem becomes elongated and the leaves at the top become shredded.
- Symptoms of fungal diseases include the appearance of black spots on leaves and other parts of the plant. It needs to be treated with Fitosporin or another fungicide. Do not spray or water for a while, as high humidity promotes the disease.
- The edges of Dieffenbachia leaves turn brown when the soil dries out.
Propagation by apical stem
The only difference between the cutting and the apical stem is that the apical stem has leaves and an unformed shoot. This is usually the younger part of the plant. The main feature of this method is to obtain the most ornamental plant. Which already has leaves and part of the stem with a root system. This plant looks more decorative.
This cutting method can be used. If you need to improve the appearance and decorative qualities of your adult plant. Dieffenbachia tends to expose the trunk with age. This method is also good for plant diseases, especially when the root system rots. When the main plant is already on the verge of death, but the upper part is still healthy and can be used for propagation.
- - cut off the top shoot of the main plant. Select a cutting level just below the young shoot.
- — put our stem in water for a while, with activated carbon diluted in it.
- — it is necessary to create comfortable conditions, the temperature should be approximately 20-22 degrees.
- — We change the water in the container weekly, this will avoid rotting of the cuttings.
- - as soon as the roots grow (this is 3-5 centimeters), plant them in a prepared container with soil. The composition of the soil is the same as with the first cutting method.
In the cold season, be sure to cover it with a bag to create a greenhouse effect. But the package must be opened periodically for ventilation purposes.
Reproduction by apical layering
In addition to the methods described above, Dieffenbachia can also be propagated (like ficus) using aerial roots.
The order of this procedure is as follows:
- Make several small cuts on the trunk.
- Cover them with moistened moss and, wrapping them with opaque film, secure the structure with a thin rope.
- Before the roots “peck”, constantly moisten the moss.
- When roots emerge from the drainage holes, cut off this part of the stem and, removing the film, plant the segment together with the moss in the ground. As a result, you can get a composition of several fluffy bushes.
Propagated by the main stem
We use this method of propagation when rejuvenating the mother plant. In order to understand whether the plant needs to be rejuvenated or not. There are a number of signs: your plant has become too elongated and the trunk is well exposed as the lower leaves are gradually dying off. Also, the stems are quite old and over time they begin to become covered with a brown crust. The foliage in the middle of the plant begins to slowly turn yellow. In principle, the method repeats both the first and second methods of cutting. If your plant is not tall, you cut off the apical shoot; if the plant is elongated, cut the shoot to the required length and, if desired, cut it, dividing it into several parts. The principles are described above.
Propagation of a plant by part of the root
Spotted Dieffenbachia can be propagated by dividing the rhizome. This procedure is most effective to carry out in the spring. You need to remove the bush from the container and moisten the soil with the roots. Gently straighten them and divide them into several equal parts. Place all the roots in separate containers and wait for complete engraftment.
Note! This propagation method is suitable when it is necessary to rejuvenate the flower and when the old soil is depleted.
In addition to vertical rooting, the horizontal method is also used
Propagation by leaf
For this method of propagating Dieffenbachia, we use a leaf. It should be well developed, without visible damage or disease.
- — we determine the leaf that we will use for propagation and cut it off.
- - the sheet needs to be dried.
- - decide on the container and put the sheet in the water.
- - with the appearance of the first roots, replant into prepared soil and a pot of the required size.
You can also root a Dieffenbachia leaf directly in the soil, but this is a riskier option and does not always lead to the desired result.
other methods
Experienced flower growers also practice more original methods of propagating and renewing Dieffenbachia. For example, by digging in the apical shoot of Dieffenbachia. Or you can lay a whole piece of stem with buds flat and dig in. Then not one, but several bushes will sprout in a row, which looks very original.
You can also not throw away the remaining stump, cut off on all sides, but water it and in a few months young Dieffenbachia bushes will sprout again from the mother’s base.
- How to properly replant and fertilize dracaena (video)
We propagate by shoots
This method is good if the main plant has developed side shoots. Which over time began to grow, preventing the main plant from developing and growing well.
- - the young shoot should be cut so that it already has several leaves. Two or three will be enough.
- - Next we carry out the rooting process in water in which coal must be dissolved.
- - wait for the roots to appear
- — we plant the young plant in a permanent place in a pot with soil. Be sure to take care of drainage.
- — there is no need to make a greenhouse from a bag, since this is a ready-made and formed plant.
Rooting process and planting
There are several ways to root Dieffenbachia:
- you can plant cuttings and leaves directly into the substrate vertically;
- Horizontal rooting is quite common, when planting material is placed in the ground, slightly pressing it;
- roots may also appear if the cuttings are kept in ordinary water.
How to plant Dieffenbachia after rooting in a container:
- Prepare in advance a pot with a substrate made from light soil, humus and river sand.
- Cover the bottom of the container with a small layer of drainage.
- Fill a third of the volume with soil mixture.
- Place the seedling on top of it and cover it with the remaining substrate.
- Compact and water the bush.
- Place in a lighted and warm place.
We propagate during transplantation
This is the easiest way to reproduce. This method is usually used when replanting a plant. This is a good reason to divide the mother plant and separate several shoots. This procedure promotes freer development of the roots of the main plant.
- - when replanting, remove the plant. We try to preserve the earthen ball with Dieffenbachia roots.
- - to unravel the roots and understand where and how to separate them, rinse the roots with water. Or place the plant in water and carefully wash off the soil.
- - The roots should be inspected for rot and damaged roots. If any are found, we clean the roots.
- - divide the plant and dry them.
- - after a day, you can plant the plants in a ready-made pot with soil.
Reproduction by dividing the bush
The method is only suitable for species that produce root shoots, for example, Dieffenbachia:
- Variegated;
- Seguina;
- Bauze;
- Leopold.
When transplanting, the bush is carefully divided into rosettes and planted in smaller pots. The volume of the container must correspond to the underground part, otherwise the substrate will sour.
In Dieffenbachia, when propagated by dividing the bush, the root is injured. To prevent the lower shoots from starting to rot in the ground, the pot is spilled with a solution of Fitosporin.
The main mistakes when propagating Dieffenbachia.
All the reproduction methods described above are quite simple. But if you violate a number of procedures, you can fail.
- - sterility is compromised. We make sure to disinfect all the tools you use. This is especially true for knives and pruning shears.
- — when planting and rooting shoots, the wrong pots may be selected. They can be either too big or, conversely, too small. Which can lead to problems in the development of the root system or to its decay.
- - the most common mistake that occurs during division and transplantation. This is damage to young roots. They can be damaged during planting. Pressed hard or crushed. Also, the root can be damaged when dividing the bush. Therefore, planting is carried out carefully and gently.
If you follow these simple, at first glance, methods and methods of propagating Dieffenbachia. You can get beautiful and healthy plants that will delight you for a long time. You will know how Dieffenbachia reproduces. Good luck to you.
Recommendations for caring for a young plant
The flower, which has not yet matured, is placed on the western and eastern windows, providing it with diffused lighting and avoiding the burning rays of the sun hitting the leaves. The ambient temperature should be within +25…+27°C. Water the soil carefully and only after the top layer of the substrate has dried, since the roots cannot yet absorb moisture in large quantities. Once a day, spray with soft, settled water from a spray bottle.
We recommend reading a detailed article on plant care.
Suitable breeding conditions
Even a novice gardener can propagate Dieffenbachia at home, but proper care and suitable conditions for this flower are necessary. You need to pay attention to watering, the correct location of the plant, lighting and air humidity. In addition, an important factor is the soil in which the flower grows. Dieffenbachia propagation should be carried out at a temperature of 22-25 degrees. The plant should not be exposed to direct sunlight, which can harm the flower. Dieffenbachia does not tolerate drafts very well, so it needs to be placed far from doorways. The air in the room must be humidified, otherwise the plant will shed its leaves and propagation is unlikely to be successful. The water for irrigation should be settled and at room temperature; watering should be done sparingly without flooding the soil. If you moisten the soil excessively, that flower will suffer and hurt. How to properly propagate Dieffenbachia at home? One of the main conditions is the optimal breeding period. The best time for propagation is spring, because it is during this period that the plant begins to actively grow and develop after a dormant state.
Pest and disease control
Dieffenbachia belongs to those plants that clearly and visually signal the owner about problems that have arisen.
Most often this is expressed in:
- drying of leaf tips, which may indicate insufficient air humidity, increased soil acidity or the presence of drafts;
- rapidity in the fall of the lower tier of leaves, caused by a lack of moisture in the soil or the tightness of the pot;
- pale green color, provoked by excessively bright lighting or excess phosphorus content in the soil;
- deformation and crushing of leaves, which indicates an excessive alkali content in the soil;
- root rot caused by overwatering;
- thinning of the stem, indicating the old age of the bush.
Fungicidal preparations (for example, Fitosporin-M) will help get rid of many serious problems.
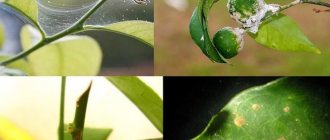
In addition to violations of agricultural practices, the plant may suffer from pest invasion in the form of:
- mealybug, which forms flakes in the form of flour on the bush and soil, and which is most effectively combated with the help of the preparations “Mospilan” or “Aktara”;
- thrips, due to which dark drying spots appear on the leaves, and which are combated with insecticides by repeatedly spraying the bush every 2 days (covering the plant with a plastic bag helps);
- spider mite, which reveals its presence by drying leaves and poorly visible cobwebs on their back side (the mite is destroyed with insecticides by spraying and covering the bush with a transparent bag for several days, repeating the procedure every week);
- aphids, which provoke yellowing of the leaves (fight with garlic infusion, a solution of laundry soap and even beer).
Important! Constantly low ambient temperatures can lead to the formation of brown spots on the leaves.
Adviсe
In the first year, it is advisable to place a young plant obtained from a cutting, layering or leaf on windows located in western or eastern directions. It is advisable to maintain diffuse lighting. The optimal air temperature is 20-25 degrees, the humidity level must be average, and watering should be carried out as needed - after the top layer of soil has completely dried.
Keep in mind that the flower is drawn to the light, so the orchid should be periodically turned to the sun in different directions - otherwise the stem may become bent and it will be impossible to return it to straightness. Feeding should be done once every 2 weeks - it is better to use complex preparations developed specifically for Dieffenbachia.
This plant really loves spraying - do not refuse it and moisten the leaves every day, and also from time to time give it a warm shower - do not forget that your green pet comes from the tropics and therefore high humidity contributes to its fastest growth and development. Do not forget that this is a poisonous plant, so you should not place it in the children's room, or in the access area of pets, especially rodents.
What is needed for the procedure to be as effective as possible?
Firstly, the plant is best propagated in spring or early summer. This is a period of active growth of Dieffenbachia. That is, the cuttings themselves will “help” you.
Secondly, if the cutting is small or you germinate it late (in autumn), it is better to root it under a greenhouse from a bag or an inverted jar.
Finally, always use the sharpest knife possible. If your tool is dull, it will crush the plant stem. Such a stem will germinate much worse.
Caring for the plant after transplantation
- Soil for a rooted flowerpot: light, nutritious, slightly acidic. A good example: deciduous soil + sand + peat + a little vermiculite.
- Choose a large pot. Firstly, Dieffenbachia will grow quickly. Secondly, the pot should be heavy so that the tall plant does not weigh down. But at the same time, it should not be quite a “bucket”, otherwise Dieffenbachia will only grow at the root.
- Drainage is required when planting, even if Dieffenbachia is still very small. In addition to expanded clay, you can also add stone/coal chips to the drainage.
How to care for a flowerpot when it grows up? An experienced video blogger will tell you, whose Dieffenbachia has almost grown to the ceiling, but still impresses with its well-groomed appearance:
Preparation for reproduction
For growing Dieffenbachia, clay pots of appropriate size for the development of the plant's root system are best suited. Those selected “for growth” are not suitable, this is fraught with rotting of the roots. As the flower grows, it is better to replant it again into a larger container.
Important! Experts consider modern plastic pots to be uncomfortable for Dieffenbachia, since the lack of pores in the plastic makes air exchange in the root system difficult, and
soil moisture is not regulated.
A drainage layer in the form of crushed bricks and charcoal should be placed at the bottom of the flower pot. Properly selected soil plays a special role in the process of plant propagation.
The best substrate is peat mixed with vermiculite (perlite), combined in equal proportions. High-quality soil is also obtained from sphagnum, peat soil and perlite (vermiculite), where half of the volume is sphagnum, and the rest is presented in equal shares.
In order to prevent rotting of the root system, it is recommended to enrich the prepared soil with activated carbon (in the proportion of 1 tablet per 0.5 liter of substrate).
Reproduction of this decorative foliage step by step
There are many reasons for propagating a flowerpot:
- it may need updating, since the old Dieffenbachia will eventually not only rest against the ceiling and begin to grow parallel to it, but will also begin to resemble a bare stick topped with a bunch of leaves;
- your flowerpot may be broken;
- From one Dieffenbachia you will need to make several for friends or for sale.
Below I will talk about the most popular household methods of propagating Dieffenbachia. I won’t talk about the seed method.
Firstly, we practically cannot get seeds, and secondly, this method is too time-consuming and unreliable. Only breeders growing new varieties turn to him.
Rare species of bush Dieffenbachia can also be propagated by dividing the bush. This is done during transplantation.
Apical cuttings
This is the easiest way - as well as the fastest, because the growth point of such plants is precisely at the top. Having taken root in this way, Dieffenbachia will grow a leaf every week, very quickly turning from a cutting into an adult plant.
Your actions:
- Cut the top so that the cutting is 10 to 15 cm in size. There is no need to cut it longer - even if a large cutting sends out roots, it will be difficult for them to “feed” such a plant by extracting useful substances in the soil.
- Milky juice will begin to ooze from the cut. It needs to be removed. Some people wash the cuttings under the tap, others rinse the cut in a glass of water (changing the water as needed), and others simply wipe it with a few paper napkins. All options are correct.
- You can root the cuttings in a glass of clean water (or mixed with energy drink - succinic acid, Epin), a wet mixture of peat and sand, or moss. There is no need to deepen the cutting very much - 2-3 centimeters will be enough. Before rooting, the cut can be dipped in Kornevin - this product accelerates the appearance of roots.
- Keep the cutting in a warm place (22-24 degrees), keep it away from direct sunlight, and spray frequently.
- If the cutting is standing in water, you will not miss the appearance of roots. Allow them to grow to 3 cm, and you can plant the plant in a personal pot.
- Are you growing Dieffenbachia in the ground? The signal about the appearance of roots will be new leaves that grow on top of the plant. If you see such leaves, you can replant the cuttings into more serious soil.
Blot the stump from any oozing juice, and then seal it with wax from a burning candle (it will protect it from rot - although this is not a necessary condition). Water the plant, and after some time new tops (one, or even several) may sprout on the sides of the “seal”.
Dieffenbachia can be left as is. But if you think that the “hemp” plant looks untidy, you can cut off all the grown tops and root it.
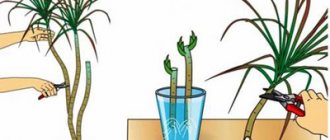
Stem cuttings
The bare trunk of Dieffenbachia will also work.
It can be dried (washed) of juice and used in two ways.
- Cut the trunk into cuttings of about 10 cm. The main thing is that each has at least one internode. Dip them on the bottom side in Kornevin (optional), and seal the top side with wax. Stick the lower part into water, wet moss, sand, sand + peat. Root them as described above.
- Place the cuttings sideways in the ground (as in the photo above). If you see buds, make sure they are on top. Cover the pot with film (transparent bag) and keep warm. In this case you need about 25 degrees. The rooting of these shoots will be indicated by the sprouts that appear on the cuttings. They can grow in a row on this cutting.
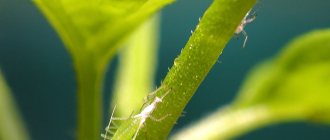
Lateral processes
Most Dieffenbachias only grow upwards. But some species also have lateral buds. I show you what they look like in the photo above.
From here, over time, a shoot will appear. When it gets stronger, you can cut it and root it like a cutting.
Air layering
An option for those who are interested. It will also help out if you need to propagate a plant, but it is still too young - there is nowhere to cut the cuttings from.
Everything is done like this:
- Make a cut in the “bark” in a circle on the trunk.
- Cover the bare “wood” with moistened sphagnum moss and wrap it with transparent film on top. If it does not hold, fix it with tape, tape, etc.
- Did you see the roots? You can cut off the top part of the stem with these roots and plant it in a pot. Don't pick moss.
- Dry the lower part of the plant; you can seal it with wax.
By the way, ficus trees can be propagated in the same way.
Propagation with twigs
The top or shoots are cut off and cut into cuttings about 10 centimeters long, so that each cutting has several internodes. If the top is used for rooting, then there is no need to remove the leaves from it. It is necessary to cut cuttings only with a sharp, disinfected instrument. After cutting off the shoot, it must be dried in air for about 3-4 hours, or more. It is advisable to treat the cut areas with crushed coal or Kornevin. After cutting, it is better to root the cuttings in water. You first need to dissolve one or two tablets of activated carbon in a jar of water, then place the jar in a bright, warm room. The water in the jar needs to be changed about once a week to prevent the cuttings from rotting. When the roots reach a length of 3 centimeters, the branches can be transplanted into the ground. The substrate for planting the top of Dieffenbachia or its shoots should be light and loose. You can use a mixture of peat soil and vermiculite in a one-to-one ratio, and some gardeners mix peat soil, sphagnum and perlite. In such a mixture, the roots grow very quickly. Some gardeners advise laying the cutting horizontally on the ground and covering it halfway with soil, thanks to which leaves will appear on the entire stem. You can also plant a shoot or cutting at an angle or vertically, it doesn’t really matter. The container in which Dieffenbachia is grown must be covered with a lid or plastic bag. Thanks to this, greenhouse conditions are created where there will be a constant temperature and sufficient humidity, where the cuttings will take root much faster. In summer, the container does not need to be covered. While the twig does not have roots, watering should be small and careful so that the cutting does not begin to rot. If there are leaves on the branch, it is advisable to spray them with water once a day, this way the branch will grow roots faster. If the lower leaves on the cuttings have turned yellow or dried out, then this is not a cause for concern; the plant is simply getting rid of unnecessary elements that require nutrition. Yellowed leaves need to be cut off. To propagate Dieffenbachia, you can use both the top and the bare trunk. It must be cut and divided into several small cuttings, 5 to 10 centimeters long, these cuttings must be rooted in the same way as branches, the main thing is not to confuse the top and bottom of the trunk. To make the planted cuttings from the trunk look aesthetically pleasing, they can be laid horizontally on the ground and deepened by half. After the trunk is rooted, it can be completely covered with soil.
Reproduction technology at home
To understand how Dieffenbachia reproduces, you need to know that the vegetative method involves the use of:
Cuttings
Young parts of a light green stem 10 cm long are used as cuttings. They take root either in water or in a substrate. When using water for rooting purposes, part of the cutting is placed in it.
The water is disinfected with activated carbon, and to stimulate the rooting process it is useful to enrich the liquid with a few drops of aloe juice. To avoid rotting of the cuttings, the water should be replaced with fresh water every week.
After about half a month, the first roots will appear on the cuttings. When they reach a length of 2 cm, the cuttings are planted in the ground, deepening them by 2-3 cm.
To successfully root cuttings immediately in the soil, you should:
- Prepare a quality cutting.
- Dry it overnight.
- Immerse it in a stimulating solution (for example, Kornevin) for 7–9 hours.
- Plant the cuttings in the soil to a depth of 5 cm.
- If the surrounding air is cool, cover the container with the cuttings with a transparent film to create a greenhouse effect.
Leaf
This method of plant propagation involves the following actions:
- Select a high-quality leaf from the plant with an intact surface and bright color.
- Cut it and dry it overnight.
- Place in a container with water.
- When root shoots (2 cm long) are formed, the leaf is planted in the prepared soil.
Top
It is also a cutting, but cut from the top of the bush just below the last bud. This method of propagating Dieffenbachia allows you to quickly obtain an adult plant with all its decorative advantages. However, the original plant can no longer be preserved.
Therefore, this method is used mainly in cases where the plant has lost its lower leaves with age, or has discovered root rot. Sometimes in this way you can save a bush affected by diseases.
In order for propagation by the tip to give a good result, you need:
- Carefully cut off the top of the bush below the top bud.
- Immerse the lower fragment of the top in a container with water enriched with activated carbon.
- At ambient temperatures below +22 °C, heat the water.
- Replace old water with fresh water weekly.
- When the roots are 3 cm long, plant the sprouted top in the prepared soil.
stem
This method is predominantly rejuvenating in nature and is used when the leaves begin to fall, exposing the lower part of the trunk, and the leaves on the middle “floor” of the plant turn yellow. To root the stem, you need to find the growth point from where the leaves begin to diverge. The stem is cut 7 cm below this point.
Then you need to:
- Dry the cut stem (about 24 hours).
- Bury it in the prepared soil.
- Create greenhouse conditions using transparent film.
- Wait for the stem to sprout (it does not sprout immediately, sometimes you have to wait six months).
By shoots
This method of propagation is advantageous in that the entire plant is rejuvenated at the same time. Side young shoots that interfere with its development are removed and at the same time used for flower propagation.
To do this you need:
- Cut off a shoot with a pair of young leaves.
- Place it in a container with water previously enriched with activated carbon.
- Changing the water weekly, wait for the root shoots to germinate (they should be 2–3 cm long).
- Plant the seedling in the prepared soil, keeping in mind that a sprouted shoot is already an almost full-fledged plant.
Dividing the roots
Since Dieffenbachia feels equally uncomfortable both in an overly spacious container and in a cramped one, its next transplant can be combined with propagation through root division.
To this end:
- Release the bush with the earthen lump from the container.
- Wash the roots in running water, while unraveling them.
- If root shoots damaged by rot are found, they are cut off, and the rest are treated with a low-concentrated solution of manganese or water with activated carbon.
- Leave the root ball divided into several parts to dry for a day.
- Plant the shoots in the prepared soil.
Plant species
The most common types are:
- Dieffenbachia is lovely. It grows successfully in rooms with central heating and is a shade-tolerant species. Huge dark green long leaves, reaching 50 cm in length, have a white striped color along the veins. Look at the photo of the lovely Dieffenbachia, and you will certainly want this flower to decorate your home. Moreover, its reproduction at home has been practiced for a long time. This dieffenbachia is very successfully used to decorate offices and residential premises.
- Dieffenbachia Leopolda (see photo) is characterized by its small size. It has a short stem up to 5 cm with a diameter of 2 cm. The petioles are pale green with purple spots and are much shorter than the leaves. The leaves are dark green in color and have a massive white vein 35 cm long and 15 cm wide. The flowers collected in inflorescences are wrapped in a white leaf-spread and have a length of 17 cm. This flower first appeared on the territory of Costa Rica. It is one of the most decorative varieties and is readily grown at home. Caring for it is quite simple.
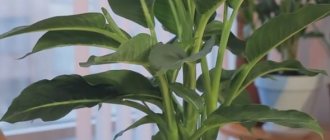
- Dieffenbachia Camilla is very loved by many gardeners. Its height can reach 2 m. South America is considered the birthplace of its growth. This is a tree-like, upright plant with large light green leaves of an elongated oval shape. The only drawback is the gradual exposure of the lower part of the trunk. Camilla, grown at home, practically does not bloom.
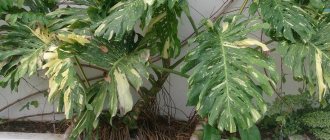
- Dieffenbachia mix (see photo) is an evergreen plant that grows in the tropical and subtropical climates of South and Central America. Today there are about 50 varieties of this variety. This light-loving plant has light green leaves with patterns of various colors. It is highly decorative and widely used.
- Dieffenbachia bush is not a whimsical plant. This is a low-growing flower, reaching 70 cm in height. It has light green leaves with a large white vein in the middle. Bush Dieffenbachia is very similar in appearance and color to Leopold's Dieffenbachia.