ShareLikeClass TweetPinSubscribeWhatsappTelegram
In order for a fence to serve for a long time, it must have high-quality supports. To do this, it is better to use screw piles for the fence. They are easy to install, last a long time, and give the structure the necessary rigidity and stability. They can rightfully be called the best option for constructing fences, especially in difficult soils.
Every property owner wants to have a beautiful, strong and durable fence. At the same time, its care should be minimal, that is, “set it and forget it.” It is desirable that the fence cost as little as possible. The best option that meets all these requirements is a fence on screw piles.
What are screw piles for a fence?
A screw pile is a hollow metal pipe with threads or blades, or a combination of both. The blades provide more reliable anchorage in the ground. This type of piles is suitable for heavy rocky and loose soils. A pile with two blades is considered more reliable, since the pressure on the pipe is distributed evenly. There are four types of screw posts: with a welded tip, cast, two-bladed, reinforced (the most reliable).
The screw tip allows you to firmly fix the pile in the ground, makes it possible to screw it to the maximum possible depth (one and a half to two meters) and eliminates subsequent displacement of the pile relative to its original position in space. Thanks to this, it ensures strength, reliability and stability of the structure.
Construction of houses
0 votes
+
Vote for!
—
Vote against!
Installing screw piles allows you to build a massive and durable foundation in a fairly quick time. It is better not to make piles for the foundation of a house yourself, but to purchase them from specialized companies. Since the highest load is placed on these elements and the service life of the house directly depends on their quality. It is quite possible to make piles for a small outbuilding or for a fence yourself. We will learn how to do this further.
Table of contents:
- Do-it-yourself screw piles: features and advantages
- Do-it-yourself screw piles video and varieties
- Do-it-yourself screw piles for the foundation - manufacturing technology
- Features of installing screw piles with your own hands
- Installation work - how to tighten screw piles with your own hands
- Do-it-yourself screw piles - manufacturing recommendations
Do-it-yourself screw piles: features and advantages
Screw piles are a steel pipe, on the end of which a blade is welded. That is, this element is somewhat similar to a drill. The main functional element of the pile is a screw-type tip, the blade of which, on one side, performs a supporting function, and on the other, transmits the load. In addition, the screw part acts as an anchor that holds the pile in the ground.
During the construction of light wooden structures, quite often the problem of soil heaving arises, as a result of which the foundation collapses. To prevent this unpleasant phenomenon, the piles are installed below the freezing depth of the soil. In this way, it is possible to prevent the impact of heaving forces on the foundation.
Screw piles allow you to build a quick, high-quality, economical foundation option. There are several sizes of piles, which are selected based on the size and material of the structure.
Among the advantages of using screw piles in private housing construction, we highlight:
- the pile foundation is erected both in winter and summer or in autumn or spring;
- the speed of construction of the building, the foundation is installed in a few days, work on the construction of the structure continues immediately after the foundation is made;
- no need to level the site for building a house;
- The pile foundation is suitable for any kind of soil with a complex relief structure.
However, foundations on screw piles also have certain disadvantages. First of all, the piles are subject to corrosion, as a result of which they collapse. The service life of such a foundation is lower than that of a concrete foundation. In addition, poor-quality processing of the material and incorrect technology for manufacturing piles also negatively affects the duration of their operation. It is recommended to use piles in the construction of a house only if the material is certified and has a number of documents confirming its quality.
The following factors reduce the service life of screw piles:
- the presence of power plants near the house;
- using a pile as grounding;
- prolonged soil heaving and the presence of groundwater near the pile;
- the presence of a railway track near the house.
Thus, if you want to choose a pile type of foundation for building a house, consider all the advantages and disadvantages of piles in operation.
Do-it-yourself screw piles video and varieties
Depending on the composition of screw piles, they can be welded or cast. The first option is more economical and has the shape of a pipe on which a pointed tip is welded. These piles are not able to withstand heavy loads and are used for the construction of gazebos and outbuildings. Welds on piles are susceptible to rapid corrosion, and poor quality welds lead to complete destruction of the pile. If the blade is not welded accurately, the pile is installed unevenly in the ground during the screwing process. In addition, problems arise when screwing the pile into rocky soil or into large roots.
This subsequently leads to uneven subsidence of the house and its emergency situation. Therefore, when choosing piles for the foundation, special attention should be paid to the quality of welded joints on the piles.
A pile with a cast tip is more reliable, but also more expensive. For the manufacture of such piles, the casting method and a vacuum sphere are used. Such tips are characterized by high installation accuracy. The cost of such piles is a quarter higher than piles with a welded connection. Cast tips can also be treated with high-quality anti-corrosion treatment and are recommended for use in the construction of massive buildings.
Do-it-yourself screw piles for foundation video:
The service life of a foundation with a cast tip is about one hundred years. However, when buying such piles, you should also exercise special care so as not to fall for a fake. The quality of the tip is determined by the precision of the factory technology. For example, after constructing a pile, it must be subject to heat treatment.
Do-it-yourself screw piles for the foundation - manufacturing technology
A screw pile looks like a hollow pipe, one part of which has a cutting part in the form of a sharp tip. During the installation of the pile into the ground, the cutting part allows the pile to move deeper. Thus, it is possible to securely fix the pile in the ground.
The structural structure of the pile allows you to install them yourself, without the use of additional special equipment. However, the lifespan of the foundation directly depends on the quality of the material from which the piles are constructed.
Before starting the manufacture of screw piles, determine their structure, which consists of three main parts:
- load-bearing element - has the shape of a pipe, with a minimum diameter of 9 cm;
- screw part - ensures screwing of the pile;
- the upper part on which the beam is fixed.
To make a pile, a pipe with a certain diameter is used. If there is an uncast tip, for the manufacture of a pipe it is necessary to use several sectors connected to each other by a welding machine. To eliminate seams, the material is straightened.
Using machined discs, the screw part is manufactured. The size of the screw part depends on the depth of the pile. Next, using a vice, the workpiece is clamped in a certain position and stretched to the desired size. After fixing it on the surface of the pile, the element is coated with an anti-corrosion solution or paint.
A part in the form of a cap is installed on the top of the pile. It is on this that the channel or beam will be fixed. The width of the pile blades is at least 3 cm greater than the diameter of the pipe.
DIY screw pile installation video:
Features of installing screw piles with your own hands
In the process of installing screw piles, you will need the following:
- fittings used for marking;
- Bulgarians;
- levers;
- welding machine;
- normal level;
- concrete mortar.
Initially, a number of preparatory work should be performed to install the foundation part. At this stage, drawings are drawn up, calculations are performed, and the length and dimensions of the piles are determined. To do this, it is necessary to study the geological features of the soil; in relation to them, the depth of piles, the number of piles for a particular building, etc. are determined.
For ease of use of the plan, it should be divided into several parts, which make it easier to control the installation location of each pile. It is necessary to make a pile field by installing piles, which are installed at the corners of the rectangle. Reinforcement is installed on the corner parts of the site. Consider the width along which the strapping is performed. In this case, the installation of piles must be carried out along the central part.
A tightly stretched rope is used to connect the reinforcement or pegs. At the intersections of the rope, the installation points for the piles are determined. Installation of fittings is carried out in relation to the drilling points. Measure the diagonal sections that result when intersecting. the piles must be installed at the same distance from each other.
It is possible to use a pit for work, but its diameter should be several centimeters larger than the diameter of the pipe. Installation work should begin from the corner areas. The interval between piles should be the same. A magnetic level is mounted on the pile, which prevents it from moving in a vertical position. The quality of the foundation being manufactured directly depends on the density of the pile field.
Installation work - how to tighten screw piles with your own hands
To screw in piles, pipes are used that act as levers. A crowbar is placed inside the pipe and the pipe is screwed in with it. Please note that this process requires special physical effort, so it will require at least two people to complete it.
There are two ways to install screw piles with your own hands. The first involves the use of a drill, and the second is based on installing a pile without a drilling rig. In the process of independently screwing in a pile without a drill, the soil underneath is compacted and the pile is securely fixed in a certain position.
Thus, moisture does not penetrate through the compacted soil and it holds the pile well. To level the pile, improvised means in the form of spacers or crowbar are also used. To eliminate small deviations, a screw jack is used.
Next, the general frame is mounted. For these purposes, you will need a laser level. In relation to this measuring device, the piles are trimmed and a concrete solution is prepared for pouring into the inside of the pipes. Next, the headbands are installed and the seams are cleaned. An element is mounted on the headrests to provide a common connection, which increases the rigidity and durability of the structural elements.
It is quite difficult to build a house on screw piles with your own hands. However, we suggest that you familiarize yourself with general recommendations that will greatly simplify this process:
- for the manufacture of steel tips, use grade 25 metal, and use cold welding;
- with an increase in the diameter of the screws, the complexity of manufacturing the blades increases, since in order to straighten the steel disks, it is necessary to apply certain physical efforts;
- if the pile is installed unevenly in the soil and has gone to the side, then to correct the situation, it is enough to cut off its upper part and install another pile nearby; there is no need to pull out the pile, since the previously loosened soil will not hold it securely;
- make sure that the solution completely fills the pipes; this process must be performed with special care;
- if there are two blades on the surface of the pile, they should be installed below the soil freezing level, otherwise the pile will be subject to heaving forces;
- All welding components must be coated with an anti-corrosion compound.
The process of installing piles is simple; however, high-quality installed piles are obtained only if the installation technology is carefully followed.
Do-it-yourself screw piles - manufacturing recommendations
Among the main structural elements of the pile, we note the stem part, the cutting element and the cone-shaped tip. If the building is made of wood, then another part of the pile is the head.
Making piles yourself is a rather complex process, the quality of which directly depends on the service life of the building under which the piles are laid. The resulting piles are determined by the quality of the steel and welds with which the elements were connected to each other.
A well-made pile is easily screwed into the soil, has high resistance to mechanical loads and easily copes with the functions assigned to it.
To independently construct screw-type piles, you will need:
- pipes made of high-quality steel with a diameter that is calculated in advance and depends on the pressure on the foundation;
- steel sheets for the manufacture of blades, screw section, etc.
The main technical indicators of a screw pile are the length of the pipe and the size of the blade. In order to build the stem part of the pile, you need to cut out triangles at the end of a previously prepared pipe with a grinder, and use a sledgehammer to form cones on them. To manufacture the screw part, special blanks with a cast tip are used. Using a pry bar, the workpiece is stretched in the form of a spiral, then connected to the pipe using a welding machine. Monitor the quality of welded joints; after constructing the pile, they are treated with a special solution.
Homemade piles are used for the construction of small outbuildings, garages, gazebos and other buildings. To build a house on a screw-pile foundation, it is recommended to use purchased pile options.
Installing screw piles with your own hands video:
What types of piles are used to build fences
The diameter of the screw fence post can be of different diameters (from 60 to 80 mm). It is selected depending on the type of soil and fencing material. The heavier the fence sections and the more complex the soil, the larger the diameter and length of the fence supports should be.
In addition to diameter, other features are also important. Piles with a welded tip and two-bladed ones are used for rocky soil; for peat bogs and sand, the option with a closed tip is suitable; piles with an open tip are suitable for any type of soil (except sandy and peat).
Welded piles are not suitable for heavy loads, unlike cast ones. For erecting a fence on ordinary soils, welded piles with double blades are impractical and will cost more. Special piles for fences are produced, where holes are provided for mounting fence spans.
Popular section types
The piles also serve as supports for the fence. Let's look at the features of fastening different sectional materials to poles.
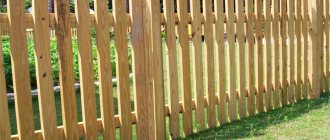
Photo: fencing with wooden picket sections
Net
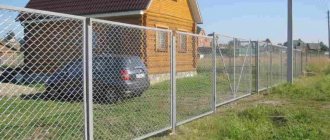
The mesh is used both chain-link and welded.
Ready-made screw posts already come with holes for fixing the guides. But to fasten the chain-link, their installation is not necessary. Pull the mesh tightly enough and secure it to the posts with metal wire or clamps.
Photo: welded mesh fencing
To prevent the chain-link from starting to sag, a tightly stretched wire is threaded through the top row.
For such material it is enough to take piles with a minimum diameter.
What is the difference between fences on stilts?
Supports in the form of screw piles are used for different types of fences. Most often this is corrugated board of medium thickness. The distance between the piles in this case should not be large, and the guides are located at the top, in the middle and at the bottom. All this will give the frame strength.
A fence made of wooden picket fence is attached at two points due to its lower weight and windage than that of corrugated board. If the pickets are mounted without distance, end-to-end, then fastening will be needed in the middle. The metal picket fence is attached in a similar way.
A fence made of metal rods is heavy, which requires additional reinforcement and reliability of the structure. A fence made of metal mesh is lightweight; you can do without guides at all by attaching it directly to the posts.
Polycarbonate
Lightweight, practical material for flying. Available in a variety of colors. The pillars are installed in increments equal to the length of the sections.
Photo: polycarbonate fence
Polycarbonate sheets are attached to guides, which are small-diameter profile pipes. For fixing, you will need self-tapping screws with a rubber washer. All metal parts are treated with an anti-corrosion compound before installation.
For polycarbonate, piles of 57 mm in diameter are sufficient.
Profiled sheet
The most popular material in combination with a pile foundation. The guides are welded to the posts. The step between the posts should not exceed 2.5 m, otherwise the structure will not be very stable. The sheets are mounted to them with self-tapping screws or rivets.
Installation diagram of a fence made of corrugated sheets
Since corrugated sheeting is heavy, it is recommended to take screw supports with a diameter of 76 mm and above.
Board
As in the version with corrugated sheets, the wooden elements are fastened to transverse joists (guides), which are welded or bolted to the posts. The planks are fixed closely or with a certain step. In the latter case, the sections are obtained with gaps. In addition to the protective treatment of the metal, the wood is coated with antiseptics.
Diagram of a fence made from edged boards 100x25 mm. The distance between the pillars is 3000 mm, the section height is 2000 mm, the diameter of the pile is 57 mm, the timber logs are 150x25 mm.
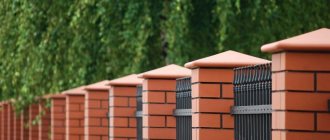
Brick
Solid brick fences on a pile foundation are rare, but brick posts in combination with forged sections or spans made of corrugated sheets are quite popular.
Brickwork weighs a lot, so the recommended pipe diameter is 89 mm. The base is installed below the freezing level of the soil.
Photo: laying brick pillars
The construction of such fences should be planned for the warm season, from April to October. Uncured concrete solution does not tolerate frost well, loses its working properties, and develops cracks.
Characteristic features of the foundation compared to a driven foundation
Installation of driven piles requires the services of special equipment, but screw piles can be screwed in manually. And although there is a technology for tightening with the participation of special equipment, site owners cope with this work in most cases without it. Although, it must be said that this will require considerable effort.
Installation of driven piles creates loud noise and vibration. This adversely affects residents of nearby houses and causes destructive processes in buildings. There is also a negative impact on the soil. When constructing near buildings of historical value, the installation of driven piles is contraindicated. The installation of screw supports does not have all these disadvantages. In terms of efficiency, their installation is much more profitable, and it is not only less expensive, but also much faster.
Video on the topic
About the pros and cons of various foundation solutions for a fence in the video:
Screw piles have proven themselves to be a reliable and quickly erected foundation not only for fences, but also for low-rise frame buildings.
The possibility of manual installation allows you to install the support in the most inaccessible conditions - near trees, bushes or between buildings where access by equipment is prohibited. Thanks to these and other advantages, this type of foundation has gained significant popularity.
Features of the foundation compared to strip foundations
Compared to arranging a strip foundation for a fence, installing screw piles is much simpler and takes less time. There is also no need for a preparatory stage, including excavation work, no need for waterproofing, no waiting time for the concrete to mature, which, I must say, is not small - a whole month. It is also attractive that the structure on screw piles can be easily transformed or extended.
A strip foundation is not suitable for constructing a fence on uneven terrain, unlike screw supports, but the structure will be more stable in any conditions. The economic aspect is also important; a strip foundation for a fence is several times more expensive than installing a fence on screw piles, and requires the purchase of a considerable number of components.
Adviсe
Before you start choosing a base, you should decide what length the pipe should be and its diameter. The ability of the fence to withstand loads will directly depend on these indicators. As mentioned earlier, the choice of pipes depends on the fence itself. The lighter it is, the smaller the diameter will be.
Expert opinion
Vladimir Ulyanov
I have been involved in fences for over 10 years, answering questions and helping people cope with the installation task on their own.
Ask a question to an expert
If it is not possible to conduct a soil test and check whether there are stones in the ground, then you can perform a test screwing.
The usual cost of one pile is up to 1 thousand rubles, so it is much cheaper to screw in one pillar than to carry out a geological procedure. Based on research, you can determine to what depth the pole needs to be screwed in.
Some products already have holes for guides, which makes installation several times easier. The guides are attached using self-tapping screws.
Features of the foundation when compared with a columnar foundation
To install this type of fence supports, a lot of building materials are required. It takes a long time to build a structure; it requires waiting for the concrete to mature and a lot of reinforcement. Concrete supports are connected to each other by metal elements, after which the rest of the fence is installed.
The columnar type of supports is not the best solution when compared with screw piles. It loses in fencing installation time, cost and durability. Besides, he looks very mediocre.
Basic elements of a fence design
A fence is a protective enclosing structure that can be made of different materials:
- wood;
- concrete;
- brick;
- block elements, etc.
There are many options, but they all form a fencing fabric consisting of the same elements:
- supporting elements (pillars) holding the canvas in a vertical position;
- technological openings, gates, wickets;
- the canvas itself, which limits access (often visibility) to the territory for unauthorized persons.
Often the support system is made in the form of a continuous foundation strip running in the lower part along the entire length of the fence. There are also canvases supported only by pillars without support from below (possibly supported on the ground). In any case, the stability of the fence and its ability to accept operational loads depends on the strength and reliability of the pillars (supports).
Features of the foundation as opposed to a slab foundation
A slab foundation is more suitable for complex soils (subsidence, heaving). Its use under normal conditions is impractical. In addition, it is difficult to install and has several nuances that must be taken into account.
One of them is that the depth of the trench must be optimal, otherwise it will have a bad effect on the foundation. Also, in addition to the basic ones, a lot of auxiliary materials are required. Moreover, the cost of such a foundation is incomparably higher than if screw piles are used, which in this “confrontation” have a clear advantage.
Rules for determining the depth of insertion of a pile
To independently determine the depth of insertion of the pile, you need to provide several nuances:
- 1) The pile must reach hard rock if the site is dominated by soft clays and mobile soils. This is necessary to hold the fence in place when the soil heaves after hardening in a water-saturated state and transfers the load to dense layers.
- 2) It is advisable to select the length of the pipe so that at least 1/3 of the total length of the pipe or ½ of the top of the pile is underground.
- 3) It is possible to adopt the length according to the depth of soil freezing. To do this, take the value for the region and add 0.2-0.3 meters to it. This method of determination is acceptable for light fences. To ensure additional rigidity and stability, the upper section of the pile exit on the soil surface is concreted.
Ideally, a preliminary screw-in is done to determine the depth. Since the soil layers are unstable in their thickness, the pipes in different places of the fence will rest against solid soil at different distances from the surface. To avoid a situation where the pipe is buried and its head does not remain above the ground, an additional pile module is inserted into the upper end.
Advantages and disadvantages
The advantages of screw piles include the following:
- The versatility of this type of supports and the different types make them suitable for different soils
- Characterized by a long service life, regardless of soil type, does not greatly affect operational characteristics and high groundwater levels
- Used for installation on slopes and difficult terrain with significant elevation differences
- Their installation does not require any specific season; it can be done all year round and in any weather.
- Suitable for constructing fencing anywhere, including in permafrost zones and marshy soils
- Easy to install. Can be installed without special equipment by screwing into the ground
- They do not require anything “extra”, such as concreting, so they are installed quickly. It takes half an hour to build one pile, so the fence can be erected in two to three days
- Their cost is affordable for most average owners of private homes and summer cottages
- They are beneficial not only in terms of speed, but also in the simplicity of the technology. No preparatory work required
- Their installation does not require “wet processes” (working with cement)
- The cost of such a pile foundation is half that of a strip or columnar one
- A screw post for any fence has a long service life (several decades), and belongs to the category of “set it and forget it”
- If treated with a special anti-corrosion agent, they will last even longer.
To have a correct opinion about these piles, the long list of advantages should be supplemented by listing their disadvantages:
- Installation in difficult soils (rocky) can result in damage to their protective coating.
- They require additional anti-corrosion treatment, without which the risk of damage to the pile material is very high
- A stable fence requires a more frequent arrangement of screw posts
Basic rules for installation
When installing the pile, adhere to the following instructions:
- installation requires high precision: the diameter of the supporting part of the pile is relatively small. The maximum horizontal deviation from the design mark is 1.5 cm. For this, it is important to maintain not only the exact positioning of the product, but also verticality when buried;
- screw piles are used on any soil except rocky ones. The most problematic ones are also suitable: swampy, heaving, etc.;
- Once installed, it is important to ensure that bare steel components, especially welds, are protected from corrosion.
It is not necessary to concrete the pile, regardless of the method of its manufacture (cast/welded).
What disadvantages can a fence made of screw piles have?
It can be noted as a disadvantage that installation is expensive when special equipment is used, and that they are not suitable for extremely rocky soils. Installation of any screw piles requires precise knowledge of the type of soil in order to select the correct type.
Installation of a pile support for a fence requires control of the verticality of its location, otherwise it will adversely affect the load-bearing capacity of the structure and its visual aesthetics.
Installing fence piles manually is only advisable for short fences. Fast, easy and high-quality installation is possible only with the use of special equipment.
Errors and installation recommendations
When performing work, it is important to follow recommendations that will allow you to avoid common mistakes. First of all, it is necessary to carry out the work together, or even better - three , since the third worker will have to control the vertical installation of the piles.
If the piles are installed unevenly, they will need to be dismantled and re-screwed in, since violating its position will lead to a significant loss of strength of the finished structure.
If it is necessary to install fence sections using self-tapping screws, it is better to give preference to roofing varieties, as they are highly resistant to negative influences.
During the work process, it is necessary to first install the corner piles, and only then the remaining ones . When choosing the length of the piles, you must be guided by the height of the future fence - if it is 1.5 meters, then you should purchase 3-meter elements.
Important and useful information about screw piles for building a fence is here.
Foundation for a heavy fence
In principle, the same foundation as for a medium-weight fence will do. You just need thicker reinforcement: 12 mm. When reinforcing, it is necessary to place the rods so that they are at least 70 mm deep in the concrete. Based on this, and the requirement that the minimum distance between the reinforcement bars must be at least 2 infill diameters, we obtain a minimum grillage width of 250 mm. This is if the concrete is filled with crushed stone of a fraction of 20-40 mm.
In addition to the usual grillage reinforcement, it is advisable to lay a layer of metal mesh on the upper longitudinal bars in increments of 5 cm. It will give the upper zone of the tape greater strength. And you can start laying the infill 2 weeks after pouring, rather than 4.
Don't forget to put waterproofing under the brick
The grillage is made in exactly the same way: with the formation of a damper layer of foam underneath it. After the concrete has gained most of its strength, it is advisable to coat it with bitumen mastic. This is necessary not so much for waterproofing, but to reduce adhesion to the soil. Since the grillage under a heavy fence is most often located in the ground, it is also affected by tangential heaving forces. To reduce them, coating is necessary.
Don't forget also about the sheet blocking access to the damping zone under the grillage. Without it, after some time the gap will silt up, which will lead to heaving under the tape, and this will lead to the appearance of cracks in the fence.
Is it possible to make a strip foundation for a stone or brick fence? Can. If you make it below freezing level, it will stand great, but it costs a lot more.