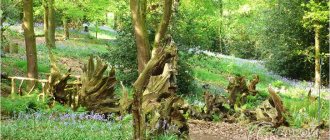
Often, old stumps and logs remain in suburban areas, taking up space without bringing absolutely any benefit. Many summer residents use the remains of former mighty trees as seats, but this, firstly, is not convenient, and secondly, it does not look as beautiful as it could. And if the logs can still be disposed of, then uprooting old stumps left from large trees is quite difficult, and sometimes even impossible.
But there is an interesting way that will help you solve this problem forever. By making original flower beds from stumps and logs, you will not only get rid of unnecessary landscape design elements, but also decorate your site in an original way. This is exactly the idea we share with our readers today. You will learn how to make original flower beds from old stumps and logs, and how to harmoniously combine them with other landscape elements.
Original flower beds made of stumps and logs
We create an original flowerbed from a stump with our own hands
An old stump is essentially a ready-made basis for creating a flower bed. You just need to free its core and fill the space with earth or install a pot with soil of a suitable size. However, in order for a flower bed made from a stump to serve you for a long time and faithfully, you should take into account some nuances:
- firstly, only a healthy stump is suitable for creating a flower garden. If the wood is affected by a dangerous disease, for example, thyrostromosis, it is better to remove it along with the root system, replacing the soil, otherwise the disease may spread to other plants;
- secondly, due to precipitation, insect pests and other external factors, the wood will dry out over time, and the stump-flower bed will lose its decorative properties. To increase the service life of the original flower bed, the stump cuts need to be well sanded and treated with an antiseptic. Oil paint can also be used as an antiseptic, which, moreover, will change the appearance of the stump;
- thirdly, an old stump, the core of which has already dried out sufficiently, is most suitable for creating a flower bed. If you want to create a flowerbed from a freshly cut tree, you will have to wait a little, because... It will be very difficult to remove the core from it.
How to make a flower bed from a stump
Flower bed from a stump photo
Beautiful flowers on a stump photo
To make a flower bed from a stump, you need to free its core as much as is necessary for the root system of the plants being planted. The easiest way is to pre-plant the plants in a pot or suitable container, and then simply install it inside the stump.
If you want to grow plants directly in the stump, first add drainage to the bottom of its recess, which will protect the plant roots from rotting.
Beautiful flower bed from an old stump
Flowers on tree stumps photo
As a rule, the depression created in the stump is not large in size, so choose plants with a compact root system to decorate it. For example, any bulbous flowers, geranium, sorrel, pansies, petunias, etc. are perfect for this purpose. Climbing plants also look very beautiful in a flowerbed made from an old stump; they will decorate it with a lush crown during the flowering period.
Original do-it-yourself flower beds made from stumps
Do-it-yourself flower bed from a stump
When is the best time to treat?
Most methods, especially chemical ones, are best carried out in the fall after harvest. Even such harmless substances as salt and urea, dissolving in the soil, penetrate into neighboring plants. Excessive amounts of fertilizer are no less harmful than too little.
If we are talking about fruit-bearing trees and shrubs, then all the chemicals penetrate into the fruits, and with them onto our table. This is if the treatment is carried out in the spring. If you do this for the winter, then during the 3-6 months of the cold season, snow and rain will wash the additives out of the soil, making it harmless to other plants.
If you need to remove the roots of a diseased tree, then carry out the treatment at any time of the year. Use salt or urea. This will prevent the disease from spreading to other plants.
Making a beautiful flower bed in a log
If there is no old stump on your site, but you are already excited about the idea of making an original flower bed with your own hands, use for this purpose an old log, which you will probably find close to your property. The advantage of creating such a flower bed is that the log can be easily placed in any convenient corner of the garden or plot; it can be moved to wherever you want, and the stump will only have to be uprooted.
The process of creating a flower bed from logs is also quite simple. You just need to clean the core of the log using an electric saw or other tool, and then clean all the cuts well. Since a flowerbed in a log is larger than a flowerbed in a stump, here you can grow several types of plants at once, combining perennials and annuals. To protect the inhabitants of the flowerbed from decay and disease, cover the resulting space with polyethylene and lay a layer of expanded clay on it.
Do-it-yourself log flowerbed
Original do-it-yourself log flower bed photo
When making a flower bed from a log with your own hands, play with its natural shape. For example, a neat rectangular recess can be cut out of whole wood, thanks to which the flowerbed will take the shape of an elongated flowerpot and become a laconic architectural product. If the log is so old that its core has completely dried out, cover it with soil and plant absolutely all open holes with flowers, which will make your flowerbed a harmonious and bright object of landscape design.
Beautiful flower beds made of logs photo
Flower bed in a long log photo
How to make a flower bed in a log
When growing flowers in a log, consider how they will look not only during the period of active flowering, but also in the off-season. Ideally, plants should be selected so that they cover the widest flowering period - from early spring to late autumn. If you want a flowerbed in a log to please you exclusively in the warm season, select a composition of plants depending on their color combinations, leaf shapes, etc.
Beautiful and bright flower bed made of old logs
Flower bed made of logs on the river bank photo
Security measures
Before you begin tree stump removal, please read these safety precautions:
- When working with chemical additives, be sure to use gloves and a mask to protect your skin and mucous membranes from burns. If possible, limit access to animals and birds. Try not to plant plants whose fruits are eaten in this place for several years. Do not smoke or light a fire near the treatment area.
- When working with fire, where flammable materials are used as a catalyst, wear safety glasses. To prevent the fire from spreading, dig around the fire site in a circle or create an earthen rampart. Do not leave a fire unattended as sparks can fly up to 10 m. Have a fire extinguisher handy. Do not stand in the direction of the wind, as the smoke contains toxic substances.
- When removing mechanically, be careful of your eyes, as chips may fly during milling.
- When working with an ax, pay attention to whether there is anyone nearby. You may accidentally hit him with an axe, or splinters may fly at the person.
When removing a stump, use a protective mask and gloves to avoid harming yourself.
Tools
First of all, you need to choose the option of arranging a flower garden on a stump. They differ in the way the soil cushion of the flower bed is formed, so you need to measure the dimensions of the stump in advance, namely height, diameter, and calculate the possible volume of soil for the flower bed.
There are three schemes that are most accessible for manufacturing:
- The simplest option is to cut out a container for soil inside the stump with a hand drill or a carpenter's chisel and hammer;
- The second option is to cut out the insides of the stump to the size of an ordinary garden pot. To do this, you will need an electric drill and an annular cutter;
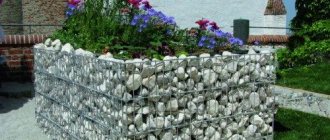
- Equipping the soil bed of a flower bed using a mesh. To work, you will need welded garden mesh, a hammer, nails and a couple of meters of soft wire.
The last option is the simplest and fastest; to make a flower bed, just cut a mesh strip 25-30 cm wide and 3.5 times longer than the diameter of the stump. Roll the workpiece into a ring, tie it with wire and lay it on the cut. The nozzle is attached to the flowerbed with nails and staples. A polyethylene mesh is placed inside to hold the soil, and you can lay an earthen cushion for planting a flower bed.
For “stone” flowers, the stump will need to be cut out from the inside
The disadvantage of such a project is the intense evaporation of moisture, so the flower bed on the stump needs to be watered frequently, but do it carefully, since overwatering always leads to the appearance of streaks on the front surface of the stump. In addition, you have to deal with grass and roots growing through the side walls of the flowerbed.
Therefore, many summer residents consider it a better solution to cut out the wood from inside the stump using carpentry tools.
What might you need?
The basis for such a house can be either a stump located in the ground or an uprooted stump. The main thing is that the material is not rotten or rotten. Also, no insects should live in it. If necessary, stump can also be purchased at a local sawmill.
Wood crafts are good because they look great even without additional processing. But some means can extend the life of the finished product.
For outdoor houses you can use:
- water-based varnish, which is applied in two or three layers for reliability;
- water-repellent impregnation;
- primer and paint to give the house or its individual parts the desired color.
To create doors, windows or steps, you will also need the remains of boards or even pieces of a previously cut trunk. When decorating, you can use decorative stones, unnecessary garden utensils or flower pots.
To make the building look more vibrant, you need to stock up on high-quality waterproof paints.
Any decorative little things can also come in handy - buttons, small garden figurines, artificial flowers, and so on.
garden furniture
The simplest thing a stump can become is a garden stool. If you place a tabletop on top of it, you get a small table. They will look very natural in the garden. The top of the stump stools is equipped with a soft seat made of leatherette and any padded material for the comfort of the sitter. Each seat made in this way can remain unique in height. Or they are made equal by cutting them down to the same size. It would be a good idea to install garden furniture in the recreation area. But it can also be placed near the garage, on the playground or in the garden. It will be equally attractive and functional everywhere.
Important! When using furniture made from stumps on a playground, make sure to fix the stumps in the ground and carefully sand all the unevenness, and treat the surface with preservatives that prevent the destruction of wood and varnish.
Making a table:
- The stump that will be used in the work must be completely dry. If the wood is fresh, you need to wait at least a month until it dries.
- Strip the bark. A hammer and chisel will help with this.
- Sand the surface. When you run your hand over the stump, you need to feel that it is smooth.
- Attach purchased legs to it using a drill.
- If you do not attach the tabletop, then treat the future table with varnish. You can install the tabletop by placing it on glue or screws. When finished, coat the product with varnish.
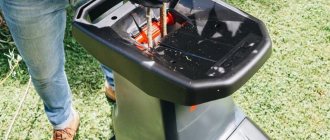
To make garden furniture you need a stump, sandpaper, polyurethane, a brush, legs, a drill and a chainsaw. The legs can be purchased as a set at a furniture hardware store. It is advisable to choose stainless steel products - they will last much longer. You can make a chair from a large stump. To do this, you should use a saw, hammer and chisel to cut out a cavity of suitable size inside - about 60–70 cm for the design of the back, seat and handles. By laying a log lengthwise and cutting out seats in it, you can create not an armchair, but an entire garden sofa.
Treatment after stump removal at the dacha
The further fate of the soil after stump removal depends on the methods. In the case of using nitrate and herbicides, the soil loses its fertility for several years. It is best to dig it up along with a lump of earth after the stump has rotted and level the ground manually or using machinery. Deliver new land to this place.
If you used urea for the winter, the soil is suitable for use in the spring. After combustion with a catalyst, the soil becomes temporarily unusable. It is better to refrain from planting for one season and apply fertilizers to restore the soil.
If you destroyed the roots with salt, water the removal area generously and often. Too much salt in the soil interferes with the growth of most plants. Water dissolves and spreads it over a large area, reducing the concentration to a safe one.
No special treatment is needed after applying other methods.
Peculiarities
Removing wood debris using ammonium nitrate allows you to carry out the procedure without uprooting. The latter method is very difficult and time-consuming, and chemical removal effectively eliminates stumps. Powerful reagents help destroy even dried parts of the tree.
Ammonium nitrate is a member of the group of nitric acid salt compounds. In appearance, it looks like small crystals that quickly dissolve in water. Ammonium nitrate and other types are also used for high-quality fertilizing. It is used for cultivating plants in various greenhouses, both industrial and private types.
When saltpeter is heated, a chemical reaction occurs that decomposes and releases oxygen. Because of this feature, nitrate becomes explosive. The crystals are similar in appearance to table salt.
Reviews of gardeners who quickly removed a stump without uprooting
Vladimir, 47 years old
For me, all these chemical and folk methods are just a waste of time. I always get rid of stumps by burning them. I make slits and pour kerosene on the stump. I wait until it is well absorbed. Then I pour kerosene on it again, build a fire and set it on fire. Fast and sure. If a tree is bothering me, then I need to remove it now, and not wait 3 years.
Kirill, 52 years old
A couple of years ago a large stump needed to be removed. They asked a lot for uprooting. I decided to add salt. I drilled holes, filled them with salt and left them. A year later I was already taking out the rotten parts from the ground. The stump was about two girths.
Maria, 46 years old
I don’t have a husband, physical strength is in short supply. My son came on vacation and cut out the garden. And the stumps are standing. It's expensive to hire people. I covered it with saltpeter. I burned everything out. Then, of course, nothing grew there. But this was a place for a gazebo, so, on the contrary, it was a plus.
Preparing the soil and planting plants
After the correct hole is ready and the drainage system is prepared, you need to think about the sequence of planting. Flowers should be matched to the style of the stump and also suit the location where it is located.
There are plants that love sunlight, and others that love shade.
It is best to fill the stump with good fertile soil so that it has all the necessary nutrients. To do this, you will need to mix regular soil with compost.
The flowers in such a flowerbed also need to be carefully cared for, constantly watered, and fertilized.