Fencing an area is necessary for many reasons, and safety is one of them. When choosing a fencing option, many people opt for a mesh fence. The popularity of this material is due to its relative cheapness, ease of installation and provision of the required level of security for a summer cottage or cottage area. We will try to understand in detail all the other intricacies of using chain-link mesh in this article.
Chain-link fencing is a simple, effective and, as a rule, the most inexpensive way to mark the boundaries of your own site
Chain-link mesh: what is it?
This material is a fabric that consists of wire-type spirals. They are tightly intertwined with each other. Thanks to this technology, individual fragments can be easily connected.
The material is characterized by a wide variety of cell sizes - from 20 to 100 mm. The height of the roll can be from 1 to 2 m in increments of 0.5 m.
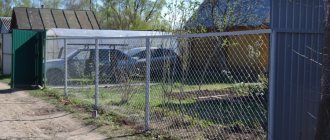
Tensile structure with additional guides
As additional structures, you can use wooden beams, metal pipes or fittings. The advantage of such devices is their strength.
The mesh does not sag over time and is not subject to mechanical stress. This type of fence can be used as a support for vertical gardening.
Types of mesh
Low carbon steel can be used to make this material. Then the fence mesh turns out to be plastic. But if stainless steel is used, then the chain-link will be rigid.
As for the decoration of the building, it is preferable to avoid bright colors, especially colors like blue or pink. The colors that houses are painted in modern cottage towns are simply surprising. There are, of course, lovers of bright colors, but the house should not catch the eye because of the color, but should attract more with its architectural solutions.
Watch the video: Installation of a chain-link fenceWhen choosing, you should also consider the size of the cells. After all, the smaller it is, the more reliable the chain-link will be as a barrier against small animals. But at the same time it will be heavier and more expensive. Therefore, it is recommended to opt for a 50x50 mm cell.
You can also choose an option based on the type of external coating:
- Non-galvanized black wire sheet. It may not be the best option as a fence. After all, its quality is very low - it begins to rust quickly. Therefore, the service life is limited and constant painting is required.
- Galvanized fence mesh is a higher quality material that will last much longer. It is moisture resistant, so it does not require regular painting. But its price will be much higher.
- The plasticized mesh is covered with a special durable polymer coating, the color of which is varied and can be matched to the design style of other elements of the country interior.
Advantages of a fence
It is advisable to install a chain-link fence to mark the boundaries of your own plot immediately after purchasing it. To build such a fence, you do not have to hire construction equipment or hire craftsmen for the work. It is quite possible for one person to build such a simple fence.
On a Sportsground
Many homeowners make chain-link fences for their dachas. A country private country house is a place visited periodically. Therefore, installing a concrete fence around the territory is not an economically feasible measure, since the price of such a fence will significantly exceed even the cost of the property inside the building.
There are many advantages to such a mesh structure:
- Affordable price. Components for fencing construction are sold at a low price. Thanks to this, it is possible to create a simple fencing of an area surrounding several acres of land without any special financial costs - this is an economical option.
- Simple mesh installation. You can secure such a fence even where there is no electricity. No complicated tools are needed for installation. The usual tools that are always at hand in the home workshop will suffice.
- Speed of fencing installation. Even without special practical skills, it is possible to build a beautiful fence from chain-link, if not in a day, then not much longer.
- Such a fence does not prevent the penetration of sunlight into the area. Thanks to this, it is convenient to plant plants right near the border of the front garden.
- Visual lightness of the grid. The transparent wire fencing does not become a visual barrier at all and does not interfere with admiring the surrounding nature. Because of this, the homeowner feels a sense of unity with the outside world, and there is no pressure from a confined space.
- Wire fencing combines successfully and effectively with flower beds and berry bushes.
- The mesh fencing is easy to maintain, replace or repair. Wire that has become unusable can be transported to a scrap metal collection site without any problems.
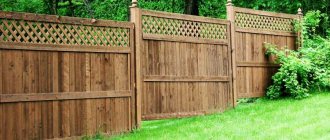
Country fence between neighbors
The durability of the fence is affected by the quality of the material used. Therefore, you should think through all the nuances in advance.
Material advantages
There are many positive aspects that speak in favor of chain-link as a material for fencing:
- high strength, as well as resistance to external influences and mechanical damage;
- allows light to pass through freely and does not shade the area;
- withstands increased load;
- ease of care;
- long service life, especially if you install a fence made of polymer mesh;
- possibility of decoration;
- low cost and availability of material;
- ease of transportation and installation.
At the same time, it should be taken into account that a chain-link fence will not hide you from prying eyes, will not provide sound insulation, and will require periodic painting and rust protection if you install non-galvanized mesh.
Fence of lemongrass and actinidia
Rarer, but very effective plants for landscaping chain-link are actinidia and lemongrass.
Alisa
It turns out just a green hedge, really very beautiful, and there are berries.
In the photo there is a chain-link fence on Alice’s property, covered with lemongrass.
In the wild, in Primorye, lemongrass reproduces by shoots and seeds carried by birds. Gardeners propagate it by layering.
viktor50 FORUMHOUSE Member
I buried the stem and after 2-3 years I got a normal bush. 4 years ago I was given a small bush of overgrowth, now I have 5 normal bushes, last year I already picked a glass of berries.
You don’t even have to dig in drops - lemongrass itself produces layering from the root collar well. And if you propagate more than one vine, but plant plants with different “varietal” characteristics, then lemongrass will produce good yields.
This is how the plant of a member of our portal with the nickname Stefan bears fruit.
The most important thing is that lemongrass needs partial shade and support around which it will curl, then it will both grow and bear fruit. Also: annually, when planting lemongrass, you need to add a layer of rotted leaves about 10 cm high, and in dry weather, humidify the air by placing containers of water nearby.
Alisa
And we must take into account that lemongrass can braid all nearby trees.
Actinidia kolomikta (northern kiwi) vines grow up to four meters and grow well in both sun and partial shade. This is a very decorative vine, and if you plant both male and female plants, it will probably bear fruit. Likes: sand (well-drained soil) and regular watering. It does not like the wind, so it is not suitable for any fence. A hedge of actinidia will attract all the surrounding cats - they simply adore this plant and will hang out on your site all the time.
Read more about how to grow Schisandra chinensis and actinidia on FORUMHOUSE.
Project Definition
At the initial stage, you should determine the installation location of the country fence, the surrounding landscape, terrain features, the length of the fence and the possibility of attaching posts. Additionally, you need to decide what type of fastening and frame will be used. The following options are available to you:
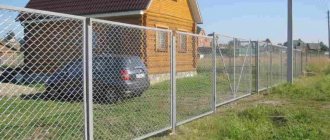
- Tensile structure. Requires the installation of supports on which the chain-link is pulled. The cost of construction is minimal, but the material will sag over time.
- Tension fencing with a wire broach. It eliminates sagging.
- The sectional option is more expensive and reliable, requiring the installation of a special corner for the frame.
Variety from manufacturers
The raw material of the product is steel wire; for which low-carbon steel grades that are resistant to repeated bending are used. But the chain-link is not all the same - manufacturers have provided some initial variety, and three types of mesh can be found on the market:
- Non-galvanized.
The most budget and most short-lived option. The material is not protected from atmospheric agents and, with insufficient care, begins to warp and rust. To extend the life of the fence, it is painted immediately after installation and the coating is periodically renewed.
Creative solution Source ytimg.com
- Galvanized.
The base metal is protected by a zinc layer. Thanks to additional processing, the product is more expensive, but is not afraid of the vagaries of the weather and does not require painting.
- PVC coated (plasticized).
PVC coating is applied to galvanized or non-galvanized metal. It contains plasticizers that increase its elasticity and frost resistance. The polymer material is chemically and biologically inert and safe for the environment.
The number of colors is minimal, most often these are shades of green or blue. This type of product is more expensive than others, which is compensated by the longest service life.
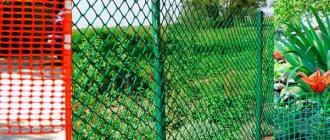
- Polymer (garden).
The product, made entirely of polymer materials, is characterized by softness, low strength, low price and cheerful colors. It is not used for fencing a site around the perimeter, only for internal zoning or for delimiting neighboring plots.
Color range of polymer mesh Source dizainexpert.ru
Design calculation
The consumption of canvas in linear meters depends, of course, on the size of the plot. Therefore, you need to take precise measurements. The length of the wire used for tensioning is taken as two lengths of the fence. And if the fence is up to 1.5 m in height, then 2-3 cuts should be enough.
The number of pillars depends on the length of the structure, and you need to take into account the step between them of about 2.5 m. When selecting the length of the profile corner, you need to take into account the perimeter of the frame and multiply it by the number of sections.
Hedge of maiden grapes
Five-leaved virgin grape (Virginian grape) is one of the best plants for landscaping fences made of chain-link and corrugated board. It creates a dense, thick, beautiful living wall that completely hides the mesh.
The photo shows a live fence of a FORUMHOUSE member with the nickname lusien2005. It rises two meters along the net and drops to the ground on the other side.
lusien2005
Every year I thin out and trim by 1-1.5 meters.
But the girl’s grapes do not grow down on their own; they like to move up and along the supports. Therefore, you will have to force it into the mesh towards the ground, and again it will rise on its own.
Its vines are large and long, they can grow up to 20 meters, the tendrils end in thickened suction cups that grow to surfaces with roughness (that’s why the girl’s grapes wrap around the walls so tightly).
In the photo is the house of our user Dima Danilov, entwined with girlish grapes that are more than forty years old.
Maiden grapes grow quickly, do not require shelter even in Siberia, are little demanding of the soil, do not get sick, do not require fertilizing, and are content with precipitation in terms of watering. Excellent propagation by cuttings. The foliage is very decorative, especially in autumn.
The most decorative forms of Virginia grapes:
- Engelman - distinguished by small foliage, the most winter-hardy. Wall - there are many branches with suckers on the tendrils; it grows well on smooth, steep surfaces. This form grows especially densely and is incredibly beautiful in the fall; it is not particularly winter-hardy, but can winter without shelter in Moscow and St. Petersburg.
- Fluffy - a form of increased decorativeness, young shoots and the reverse side of the leaves are fluffy and red, winter hardiness - like the wall form.
- Sanct-Paulii - young shoots are also fluffy, the tendrils branch widely, the inflorescences are long.
Old virgin grapes accumulate a lot of mass, the mesh can collapse under its weight, so the plant needs additional supports.
If the soil on the site is not clay or sand, and the virgin grapes are planted in a sufficiently damp place, a living wall two meters wide and five meters high will grow from the rooted shoot in 2-3 years.
Maiden grape seedlings are sold in all nurseries, in pots with a closed root system, but they are not as cheap as we would like, and for a linear meter of mesh you need 4-8 seedlings. A user of our portal with the nickname Zelenka tells how to decorate a chain-link with girlish grapes for free. The algorithm is like this:
- Find a kind person who has been growing virgin grapes for a long time.
- Ask him for several pieces of maidenhair whip up to 10 cm long (the main thing is that there is a bud on the whip).
- Place them in a root container with water for one to two weeks. Wait for the roots to appear.
- You plant rooted cuttings, and after 2-3 years you get a finished hedge.
In the first two years the vine will grow slowly, but from the third year rapid growth begins. Seedlings planted in late spring take root and survive best.
The second, simpler method of planting girlish grapes is recommended by a FORUMHOUSE member with the nickname alisa. To do this, you need to get a whole lash with roots and put it in a trench or simply spread it on the ground along the chain-link, pin the internodes to the ground, sprinkle it with earth, and water it well.
Alisa
It will take root in just one go, a new branch will grow from each bud, and no fuss!
Dima Danilov
The most successful result is if you dig up the lashes along with the roots in spring or early summer.
Almost all vines can be propagated this way.
In the first years of life, virgin grapes need watering, and in the future they can get by with precipitation alone. To prevent the chain-link from sagging under the weight of the vines, it is pruned annually.
Preparation and marking of the site
There is no need to thoroughly clean the installation site. It is enough to clear debris and vegetation directly from the fence area.
Then, in the locations of the outer pipes, you need to drive in pegs and pull the string at a height of about 100 mm. If you get a curved line with bends, then in the appropriate places you need to fix the beacons with the rope secured. Pegs are placed at the installation points of the intermediate posts, maintaining the same distance between them.
Step-by-step instructions for making a fence with your own hands
Marking the area
We clear the area for erecting the fence from debris, plants and other possible obstacles. We determine the points where the pillars will be located and begin marking the territory. To do this, you need to drive pegs into the extreme places of the fence and stretch a nylon cord between them.
Pulling the cord
You need to tighten the cord so that it does not sag or dangle from the wind. Make sure that the tensioned thread does not catch on any obstacles. Take into account the cross-section of the support pillars, taking into account the fact that they will be located inside the site, and the grid will be located on the side of the street or neighboring territory.
A stretched nylon cord acts as a beacon not only during marking of the area, but throughout the entire construction site. It will ensure linearity and control of the height of the fence along the entire perimeter. After this, we mark the places for the intermediate posts; the distance between them should be within 2.5–3 m.
Installation of posts
After all the materials, tools have been prepared and the area has been marked, they begin to install the pillars. Using pre-made marks, using a shovel or drill, make holes with a depth of 80 to 120 cm. The softer the soil, the deeper the holes should be and vice versa.
Drilling holes with a drill
Since we will use metal pipes as pillars, before installation they need to be cleaned of rust and oil deposits, and then sanded with sandpaper. Using a welding machine, weld the hooks for attaching the mesh, clean the welded areas with a grinder and prime the entire surface of the post with an anti-corrosion primer.
Leveling support posts using a level
Next, we install the supports in the holes, level them and secure them in this position with spacers. Make sure all posts are at the same height and in a straight line. If this is not the case, then by adjusting the depth and width of the holes, achieve the desired result. After this, you can safely pour concrete mortar into the holes. It is recommended to start installing the mesh no earlier than 48 hours after the concrete mixture has completely hardened.
Mesh installation
Attaching the mesh to prepared hooks
For installation, do not unwind the mesh completely; it will be much more convenient to place a whole roll in a vertical position on the corner post and hook the edges of the mesh onto the prepared hooks.
When attaching the canvas, lift it above the ground by 10–15 cm. This is necessary in order to avoid grass, branches and other debris getting tangled in the mesh in the future.
Welding steel rods
Next, we unwind the roll, stretch the mesh well and fasten it in the same way to the adjacent post. The work is best done with a partner: one can stretch the fabric, and the other can fasten it with hooks. Carry out this procedure along the entire perimeter of the fence. To prevent the mesh from sagging over time, insert a steel rod or reinforcement into the upper cells at a distance of 5–7 cm from the edge along the entire length of the fence and weld it to each post. From below, do the same, only step back 20 cm from the bottom edge of the mesh.
Manufacturing a sectional fence
Mark the area and install the pillars in the same way as in the previous case, only instead of hooks, metal plates are welded onto the pillars, departing 20 cm from the upper and lower edges. To make a section, you need to measure the distance between adjacent supports and subtract 15–20 from it cm, so we find out the width of the frame. The height will be the same as the width of the mesh minus 20 cm. Next, cut the blanks from the corner of the required length and weld them into a rectangle. Using a grinder, clean the welding areas and sand the inside and outside of the frame with emery cloth.
Making a frame for the mesh
After this, the roll is unwound and the required length of the mesh is cut off with a grinder (the distance between the supports is minus 15 cm). Next, along the entire perimeter of the cut fabric, reinforcement 5–7 mm thick is threaded into the outer cells. The welded frame is placed on a flat surface with the inside side up and the prepared mesh with reinforcement is placed in it, then the upper rod is welded to the upper corner of the frame. Next, tighten the lower side and attach the reinforcement to the corner using welding. The sides are installed in the same way.
Stretching a chain-link mesh onto a metal frame
After this, the finished section is placed between the supports and attached to pre-prepared metal plates by welding.
Installation diagram of a fence made of sections
When further installing the remaining sections, pay attention to the edges of adjacent frames; they should be at the same level. For convenience, use a level or a tight cord. After installation is complete, all frames must be primed and painted.
Installation of pillars
To install the posts with a garden drill, you need to make holes up to 80-120 cm deep. Their size depends on the characteristics of the soil - less dense soil will require more drilling. The hole must exceed the diameter of the support. A cushion of crushed stone and sand 100 mm thick is placed on the bottom.
At the next stage of installing a mesh fence, the supporting supports are attached. To do this you need to prepare the pillars:
- metal supports are cleaned of rust and stains, welding areas are cleaned, the surface is primed and painted;
- wooden poles must be treated with an antiseptic.
Supports should be installed taking into account the possibility of soil swelling in the spring. They are buried 200 mm below the freezing point of the soil. Corner supports are installed first. The support, treated with anti-corrosion mastic, is mounted in the hole and filled with concrete.
New Year in the yard: how to beautifully decorate the yard with your own hands!- How to make a modern landscape design with your own hands?
Microgreens at home
To prepare the solution, you need to mix sand and cement in a ratio of 1 to 2, mix, then add 2 parts of crushed stone, and after adding water, mix again. The supports are often first placed at 350-400 mm, and then driven in with a sledgehammer to the required depth. At the level of the base pillars, intermediate pillars are attached in a similar way.
You can also start installing the fence by filling the holes with supports with layers of rubble, soil and again rubble stone. Each layer is carefully compacted.
Preparing for the construction of a fence, calculating the area
In order to calculate the area for the fence, you first need to know the perimeter of the site. For example, let’s take a square-shaped plot of 10 acres. Since the length of the square is equal to the width (a) and has right angles, we calculate the perimeter using the formula P = 4 x a. Since the area of the site is known (1000 m2), and the formula for the area of a square is S = a2, then a = 31.63 m, so the perimeter P = 126.52 m. Now you can easily calculate how much materials will be needed. For example, chain-link mesh is sold in rolls of 10 m, so you will need 12 whole rolls plus a 6.5 m section.
What material to choose. Adviсe
Chain-link mesh also differs in the size and shape of the cells, which can be in the form of a rectangle, rhombus, square or other geometric shape. When building a fence, the shape of the cells does not affect the result of the work in any way, and its dimensions have some meaning. It is important to remember that the smaller the cell size, the stronger the fabric, but such a mesh does not transmit light well. The large size of the segment also has disadvantages, since it will not provide the necessary protection from small animals and poultry. To build a fence, use a mesh with cell sizes from 40 to 50 mm. This version of the canvas will protect the area from unwanted penetration and let in enough light for plants.
Also of considerable importance is the height of the canvas and the thickness of the wire from which it is made. As for the height, it starts from 1.5 m and reaches 3 m. The optimal height of the fence fabric is 1.5 m, and a mesh with a wire thickness of 2–2.5 mm is best suited.
If the thickness is greater, this will lead to some difficulties. Firstly, the canvas will cost more, and secondly, this will affect the choice of material for the support posts, since the weight of the mesh will increase and installation will become more difficult.
Calculation of the required quantity
Chain-link mesh is sold in rolls, the standard length of which is 10 m. To prevent it from sagging, supports are installed along the fence line every 2–2.5 m. Therefore, for one roll you will need 5 posts. The part of the support that is above the ground after installation should be 10 cm higher than the width of the mesh. The posts themselves need to be buried in the ground to one third of their height.
Based on this, we can calculate how many pillars and how long the mesh we will need. For example, we are building a fence 30 m long, the height of which should be 1.5 m. This will require 3 rolls of mesh and 16 supports, the length of which will be in the range of 2.3–2.5 m. In addition, each support is equipped with three hooks for fastening (top, bottom and middle) 48 pcs. You will also need a steel rod or reinforcement 5 mm thick in order to tension the mesh. Since it will pass above and below the grid, a total of 60 m will be required.
To calculate the required amount of concrete to fill one hole with a support column, you need to find out its volume and subtract the volume of that part of the column that is buried in the ground. Since the holes and columns have the shape of a cylinder, we make calculations using the formula:
V = ∏R2*H
- Number ∏ = 3.14.
- R is the radius of the cylinder (hole) in meters.
- H is the height of the cylinder (depth of the hole) in meters.
The diameter of the hole is 12 cm (0.12 m), and the radius is 0.12 /2 = 0.06 m. Depth (H) is 80 cm or 0.8 m.
Substitute the data into the formula:
V = 3.14*0.06*2*0.8 = 0.30144 m3 (hole volume)
For the posts we will use metal pipes with a diameter of 80 mm. The radius (R) of such a column is 40 mm or 0.04 m. The height (H) is the same as the depth of the hole - 0.8 m.
We use the same formula:
V = 3.14*0.04*2*0.8 = 0.20096 m3 (volume of the poured part of the support)
Now let’s find out how much solution is needed to install one column in the hole:
0.30144–0.20096 = 0.10048 m3
Accordingly, for 16 holes you will need: 0.10048*16 = 1.60768 m3 of concrete.
We prepare the batch based on the proportions: 1 part cement (M 400), 2 parts sand, 4 parts crushed stone. Water is added until the mixture reaches the state of sour cream.
To get 1.6 m3 of concrete you will need:
- Cement (M 400) – 480 kg.
- Crushed stone - 1920 kg.
- Sand - 960 kg.
Calculation of materials for fencing from sections
If the fence is built in sections, then you also need to calculate the number of metal corners for each frame in which the mesh is attached. It is better to use a metal corner 40 by 40 mm, with a wall thickness of 5 mm. We calculate its quantity per section: the height of the frame is the same as the height of the mesh (1.5 m), and the distance between the posts is 2–2.5 m.
Having made simple calculations, we see that each section will require 8 m of metal corner. There are 16 sections in total, so the total length of the corner is 128 m. The mesh is attached to a frame of corners using 5–7 mm reinforcement; for such a fence you will need 128 m. To install the finished sections, use metal plates measuring 5 x 15 cm and a thickness of 5 mm, 4 pcs. for internal pillars and 2 pcs. for the extreme ones, total - 60 pcs.
Tools and materials for work
- hand drill or shovel;
- tape measure, building level;
- primer for metal;
- dye;
- metal hooks;
- Rabitz;
- metal pipe with a diameter of 60 to 80 mm;
- sandpaper;
- Bulgarian;
- welding machine;
- metal corner 40×40 mm;
- sand, crushed stone and cement for mortar;
- metal plates (5x15 cm, thickness - 5 mm).
Installation of sectional fencing
Setting up fencing in sections is also quite easy, although you will need some help. The supports are placed in the same way as for the tension version. However, metal plates 150x50 mm thick over 5 mm will be used for fastening. They are placed at the top and bottom of the column at a distance of 200 mm from the edges.
After installing the supports, you need to take measurements to make the frame. Take the distance between the pillars in height and width and subtract up to 200 mm by the width of the corner. Its dimensions are 30x4 or 40x5 mm. The corners are welded into a rectangular shape, the surfaces are cleaned and ground.
The roll of fabric is unwound to the required length. The excess is trimmed with a grinder. Reinforcement rods should be inserted into the outer rows on each of the four sides, without connecting them to each other. After you lay the canvas on the frame, you need to weld reinforcing bars to it from the inside of the corner.
First, attach the first side rod, then both horizontal rods, and finally the second side rod. When installing a fence made of welded mesh, you can first secure the horizontal rods, and then stretch and weld the vertical ones.
The section must be lifted and attached by welding to metal plates on supports. It is also permissible to drill holes in the plate and secure the section with bolts. The fastening of the following links should be carried out exactly in a row, without distortions or displacements. The fence must be primed and painted.
Setting up a chain-link fence is quite simple, and you can handle this task yourself. The material is strong and durable, and the assembled fence is easy to decorate, giving it a look that matches the surrounding landscape.
Fence decoration
It cannot be said that a mesh fence is too attractive, although if you wish, you can make an original project out of such a fence if you decorate the fence in various ways. Then the result will be a durable and very attractive fence on the site.
Fence with gate
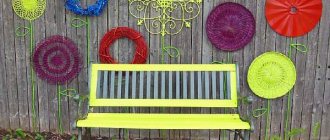
Let's look at the photo at how it is recommended to decorate the grid in an unusual way:
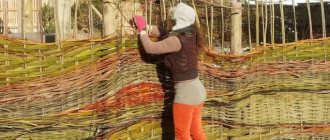
- openwork weaving. It is made from thin wire. Anyone can make such a simple pattern;
- decorative landscaping. If you plant climbing plants along the fence, you will be able to create a beautiful background around the perimeter of the site. Hanging flower pots also look good on the grid;
- if there is no time to wait for greenery to grow along the fence, decorate the mesh with decorative flowers;
- Having shown their imagination, they create funny decorations directly on the mesh.
Options for beautiful hedges