Proper and regular watering of all garden crops on the site is the key to their good growth and fruiting. Water is vital for plants; without it they will simply wither and die. But if you don’t always have the opportunity to come to your dacha and water your plants on time, then an automatic watering system will help you out. It can be purchased at the store, and is also quite easy to make yourself. And you will no longer have to ask your neighbors and acquaintances living nearby for help in timely watering - and without them, your plants will receive enough moisture.
Automatic watering system
What is automatic watering?
An automatic watering system is a special technical complex that is independently capable of providing uniform and regular watering of a certain area. The system belongs to the category of so-called landscape irrigation, which consists of special sprinklers, various valves, taps, hoses, a pump and the main control center - a small controller that determines the need for watering and acts according to the program embedded in it. The automatic watering system operates according to a specific schedule, which is entered into the control program.
Automatic drip irrigation device
On a note! The automatic watering system is also known as “smart rain”. That's what the summer residents called her. The main advantage of this design is the ability to control it.
Automatic lawn watering
Such irrigation systems have long become common in large industrial greenhouses, winter gardens and greenhouses, and parks. Now they are becoming more and more popular in ordinary garden plots, small lawns, and flower beds.
Automatic watering of a flower garden with a lawn
The reason is simple - the undeniable advantages of these structures:
- ease of operation;
- the ability to leave the garden plot without watering with personal participation - the system will cope with this task itself;
- the ability to set the required frequency and intensity of watering;
- the ability to set work at certain hours and in a certain area of the garden plot;
- the system “understands” that it is starting to rain and automatically turns off, thereby saving water and not pouring it in vain; the device reacts sharply to humidity levels;
- durability (you only need to worry about the system during excavation work; the rest of the time it will serve regularly for many years).
Automatic watering system
Automatic watering systems can be:
- drip;
- sprinklers;
- combined.
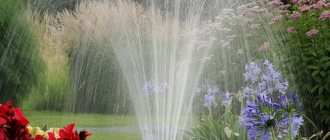
Sprinkler systems are in greatest demand because their operation is very similar to natural rain, which plants love so much. This system will allow you to do away with heavy buckets and hoses - they will be replaced by small, improvised water fountains. And its source, by the way, will be completely invisible among the plants, provided it is installed correctly - this means that the beauty of flower beds and lawns will not be spoiled by the irrigation system. Watering itself will be carried out evenly throughout the irrigated area.
Watering the lawn
Prices for drip irrigation systems
drip irrigation system
Manual watering
It is hardly reasonable to call this variety the most practical and easy to use. However, it is still common among summer residents and gardeners. This system finds its application in moistening areas of predominantly small areas.
Operation is carried out using a special hose connected to a liquid supply source, which is supplied at constant pressure.
This method is quite simple and accessible, but it is inconvenient in the following ways:
- Unmeasured hydration;
- The appearance of a dry crust of earth;
- Stagnation of the resulting moisture;
- There is a possibility that the seedlings will get burned.
Design and planning
Before you decide to purchase or build an automatic watering system, try to learn as much as possible about it. This is necessary to understand not only the main advantages, but also how to install it and how to work with it. What is an automatic irrigation system from a technical point of view and what does it consist of?
Schematic diagram of the automatic watering system
Table. Elements of an automatic watering system.
| Element | Description |
| Controller | This is perhaps one of the main parts of an automatic watering system. The controller can be called a mini-computer or even the brain of the entire device. It is thanks to him that the entire irrigation system will work. The controller will control the devices, regulate the number of waterings in accordance with the specified program, at this time it will also have a humidity sensor that is sensitive to rain and, if necessary, will turn off the system. The mini-computer can be installed both at home and outdoors. |
| Solenoid valve | A device that is responsible for the proper supply of water to pipes and sprinklers. |
| Filters | They are necessary for the system to serve for many years without breakdowns. The fact is that an open reservoir or well can be used as a source of water, which means that the liquid may contain all kinds of debris, which, if it gets into the pipes, can easily destroy the entire system. And the filters will protect it from debris getting inside. |
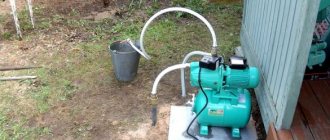
| Pumping station | Necessary if the water does not come from a water supply system. The station will create the necessary pressure in the pipes, which will operate sprinklers and nozzles. |
| Pipes | It is through them that water moves from the reservoir or water supply to the site. The pipes are connected to valves, reservoir and sprinklers. The dimensions and cross-section will depend on the location area. It is best to purchase pipes made from low-density polyethylene. |
| Sprinkler with nozzle | Roughly speaking, this is a special device for watering, a sprinkler or watering head. This part of the irrigation system is installed underground and at the moment when pressure is applied to it, it extends a nozzle through which water enters the area, scattering over a certain area in a cascade of small splashes. |
An automatic watering system works like this: the controller controls the solenoid valves, opening or closing them. These, in turn, are connected to pipes through which water will be supplied to the site. Through pipes it reaches the watering heads and irrigates a certain area.
For small areas, fan sprinklers are better suited and will do an excellent job of watering flower beds and lawns. The approximate radius of their operation is about 5 m. There are also devices that supply water only in one direction. Typically used for roadside lawns.
Fan sprinklers can be equipped with a variety of nozzles. Adjustable nozzles are the most versatile; the irrigation sector from 0 to 380° can be adjusted as needed throughout the entire life of the sprinkler
Sprinklers
There are also rotary sprinklers that rotate dynamically and easily cope with watering large areas. Bubblers are designed to equip a system for root watering of plants.
On a note! Rotary and fan heads are usually not installed in the same zone, since they have different irrigation intensities.
Automatic watering for lawn
Now you know a simplified diagram of how an automatic watering system works. But before you begin installing an irrigation system, you still have a lot of things to do.
The fact is that installing a sprinkler device involves 4 stages:
- design;
- cost calculation;
- installation;
- launch.
And the design and installation point requires special attention. What does the design stage include? It is important to take into account a large number of nuances here. This is why gardeners often hire specialists rather than start developing the entire plan themselves.
To plan the system yourself, you must clearly understand which parts of your site need automatic watering. This will be done by accurately drawing up a plan of the area where the water source is marked, and a so-called dendroplan, on which all the plants are marked.
An example of a dendroplan of a site
Types of automatic watering systems
Plants planted in any way can be watered automatically: in open ground, in a greenhouse, even on a balcony or windowsill. Just the scale and methods will be different. Water can be supplied in several ways:
- Sprinklers. Through special devices, water is sprayed over the surface, simulating rain. This method of automatic watering is most often used to irrigate lawns. The grass responds well to surface application of water. Application to other plantings may be limited due to the possibility of disease development.
One of the ways to automatically water plants is by spraying water.
- Drip root irrigation. In this case, water is supplied to the planting area and supplied in drops, sometimes in thin streams, to the area where the plant’s root system is located. This method of automatic watering is used for garden and berry crops, trees, shrubs, and flowers. It is often installed in greenhouses, vegetable gardens, and flower beds. Miniature systems can be made on the balcony or for home flowers. Because water is supplied exactly where it is needed, this type of watering is called “spot” watering.
Water is used more economically with drip feed
- Underground water application. Underground water supply is mainly organized using drip technology. The hoses are different - they must be more durable, have the features of a dropper: herbicides are introduced into the material from which they are made, which prevent plant roots from clogging the outlet holes. In all other respects the structure is similar.
Underground water supply is done using drip technology, but the volume of excavation work is large
Despite the different methods of water supply, the automated irrigation system itself is built in the same way according to the same principles. They differ in operating pressure: drip water supply can work even in gravity systems with low pressure - from 0.2 atm; for sprinklers, the pressure must be higher. Accordingly, the components of the irrigation system and its connections must be designed for different operating pressures. There are no other differences: the layout is the same.
How to draw up a site plan and dendroplan?
Step 1. Using a tape measure, measure your garden area. Mark all buildings, garden paths, fences on a piece of paper.
First of all, you need to draw up a plan for arranging your summer cottage on paper
Step 2. Transfer your sketches to graph paper at a scale of 1:100. Everything here should be accurate.
Intermediate site plan
Step 3. Divide the area on graph paper into zones and mark the places where sprinklers should appear. Carefully consider whether splashes of water will reach the house, road and other elements.
Step 4. Draw all the elements of the irrigation system on the diagram.
Step 5. Carefully draw and study the approximate radii of irrigation. In accordance with these data, you will choose watering heads. And remember - in the area where the sprinkler itself is located during watering, the least amount of water will fall, most of it will spill far from it. Therefore, when calculating the number of sprinklers, take this point into account.
As you can see, the critical point for each sprinkler is the area in close proximity to it
Using the same principle, draw up a rough dendroplan of the site, which will include the location of all plants, including bushes and trees.
On a note! Remember that you must mark on the plan the source of water and electricity, plumbing, drainage system and other elements. This will help you better navigate and correctly install the controller and tank if necessary.
Approximate diagram of an automatic watering system
Also, ideally, not only the location of sprinklers, plants, buildings should be taken into account, but also the composition of the soil, the presence of heights or differences in the area, and much more. One of the main parameters is the hydraulic load.
How to water a tree to make it dry quickly
If there is an old tree on the site with a trunk diameter of more than 30 cm, but it cannot be cut down because there are other structures or plants nearby. The only way out in this situation is to dry the tree using special chemicals.
Watering plants in open ground
Watering plants in open ground must be done correctly so as not to provoke the development of diseases. In dry and hot weather it is best to do it in the evening. At this time of day, the temperature drops slightly and moisture practically does not evaporate.
Note: If necessary, you can water the beds in the early morning, before the temperature rises significantly. To determine when vegetables need moisture, simply stick your finger into the soil. As a rule, heavy but short rain does not moisten the soil to the required depth. Much better is calm and continuous rain, which deeply and evenly moistens the soil.
There are times when plants need watering urgently. This is quite easy to determine (Figure 1):
- Leaves and buds become sluggish, gradually turn yellow, dry out and fall off;
- As a rule, at the stage of wilting, the plant can still be restored by regular, but not too abundant application of moisture;
- During drought, seedlings and plants that have recently been transplanted to a new location must be moistened.
Figure 1. The best time to water plants in open ground
During periods of lack of precipitation, it is especially often necessary to water areas with sandy soil, since it practically does not retain moisture.
Hydraulic calculation
Hydraulic calculation is necessary in order to determine the required diameter of the pipes on the site, as well as the number of solenoid valves and the working water pressure that the sprinkler nozzles can lift from the ground. It was experimentally found that the optimal diameter of the central pipe in the system on an area up to 1 hectare is 40 mm. Such a pipe has a relatively low cost; inexpensive inch valves are suitable for it. Approximately 50 liters of water per minute easily flows through such a pipe. Based on this, we can conclude that the productivity of the automatic irrigation system should be exactly 50 l/min.
By combining the sprinklers marked in the diagram with radius, irrigation sector, and flow rate into groups of 50 l/min, you can determine the required number of valves. Look: if a flow of 50 l/min enters the first valve, located in the middle of the irrigation line, and is then divided into 2 by 25, then it is advisable to further connect pipes of a smaller diameter. The pressure required and recommended by the sprinkler manufacturer must be brought to the device itself.
Automatic watering
Application and division
Currently, irrigation systems are quite popular. They have become an important part of numerous parks, flower beds, and greenhouses. They are also divided into:
- Automatic;
- Manual;
- Combined.
It’s easy to guess that the latter include the two previous methods. During their use, one part of the irrigated area is controlled using a controller, the other - by a person.
Manual systems require human participation in their activities. It should be noted that in the process of improving the first indicated type, the need for manual complexes gradually disappears.
All agrotechnical activities in the process of their activities use:
- Pipeline lines;
- Special solenoid valves;
- Elements used for filtering;
- Special vessels for storing water.
All this equipment allows workers to carry out high-quality watering of any plantings.
Reclamation equipment can be laid using underground communications or along the surface of a designated area.
Installation of an automatic watering system
After you have calculated the required quantity of each element of the automatic irrigation system and purchased everything you need, you can begin installing the system itself. Please note: you will have to dig up the area - the pipes are laid underground, so there is a lot of work to be done.
Assembly diagram of the Kapel SKO
Let's look at installing an automatic irrigation system using equipment from Hunter as an example.
Hunter automatic watering systems
Basic principles of the Hunter automatic irrigation system
Step 1. Mark the area and indicate the exact layout of the irrigation system. You can mark the places where the sprinklers will be with pegs.
Approximate arrangement of sprinklers
Step 2. Decide where the pumping station will be located (if the system is supposed to have one).
Step 3. Where the main pipes will be laid, dig a flat trench 30-40 cm deep, provided that you will not be digging or plowing here in the future. Otherwise, the pipes will have to be laid to a depth of at least 50 cm.
Digging a trench
If the system is installed under a ready-made lawn, then the excavated fragments and soil should be carefully laid on the film
Step 4. Also make trenches for the pipes supplying water to the sprinklers themselves.
Digging a trench for a pipeline
Step 5: Begin laying the main main pipe into the trenches.
Laying the main pipe
Step 6. Cut the main main pipe according to the diagram.
Main pipe cutting
Step 7. Connect both parts of the pipe using a tee splitter. This way you will get a tap to the center line. Attach the pipe that will carry water to the sprinkler.
Connecting the pipe to the tee
Pipe connected
Connecting the pipe that will lead water to the sprinkler
Step 8. Using a smaller elbow, attach a special articulated elbow to the end of the pipe you just connected, which will allow you to adjust the height of the sprinkler. Work through all water supply lines in the same way.
Installing a hinged knee
Step 9. Install nozzles in rotary sprinklers. To do this, unscrew the “glass” with the mechanism, remove the inner part, slightly compress the spring on the sprinkler and insert the nozzle into a special hole. Lightly press it and it will easily go into the sprinkler itself.
Nozzle installation
On a note! To check whether the nozzle is seated correctly, release the spring - if it (the nozzle) rises to the very top, it means it is installed correctly.
Step 10. Use a special wrench to tighten the injector screw clockwise.
Tightening the injector screw
Step 11: Attach the sprinklers to the articulated arms.
Sprinkler connected to articulating elbow
For the convenience of connecting irrigation sprinklers to the pipeline, Hunter produces special tubes of various lengths, at the ends of which there are corners with external threads that rotate in different directions.
Step 12: Fill all trenches. Leave areas immediately around sprinklers uncovered.
Trenches are being dug in
Step 13: Level the sprinklers with the ground by operating the articulated arm. Do this using a level. Please note that the top of the sprinkler should be slightly below the bottom line of the level lying on the ground. If necessary, the soil underneath can be slightly dug up.
The sprinkler is set using a level
Step 14 : Bury the sprinkler. It is important to compact the soil around it very carefully. Compacting should be done after every 2-3 shovels of soil.
The sprinkler is being buried
Step 15. Connect the solenoid valve according to the diagram. Please note that it shows a special arrow indicating the direction of water movement. The valve is installed in the direction of its movement.
Solenoid valve connection
Step 16. Connect the hose coming from the valve to the pumping station or water release system. Check the system for functionality.
Remote control for automatic watering
A control panel that does not require a separate installation space and runs all season on a 9V battery (crown)
Functionality check
How to water your dacha yourself
Regular watering ensures that the crop is saturated with moisture, regardless of whether you monitor this system or not; in rainy weather, the equipment adapts and stops automatic watering. Therefore, when you come to relax at your dacha, at any time you will receive flowering and healthy plants in your dacha.
You can control the watering of plants via your smartphone, defining the spraying of water at different times, up to a year. This system is capable of comparative savings in electricity and water, which saves not only your own energy.
Along with watering, you can fertilize the plants, which means making your work and your loved ones much easier. For proper operation of this structure, it is only necessary to occasionally check its serviceability and prepare it for winter accordingly.
Tips for use
It is best to assemble an automatic watering system either in the fall, when all the plantings have already withered and you are not afraid to damage them, or in the spring, while nothing is blooming on the site. After you have installed the entire system, all you have to do is take proper care of it so that it lasts for many years.
- Regularly inspect filters and visible elements of the irrigation system for damage or blockages. If necessary, replace the filters or clean them.
The filter needs regular cleaning
- Also pay attention to the cleanliness of irrigation nozzles and sprinklers - the water holes can be cleaned of dirt with a brush.
- Make sure that the soil in the places where the pipes lie does not sag and correct this defect in a timely manner.
- Do not forget to remove water from the pipes and drain it before wintering. Otherwise, the system will become unusable during frosts.
- It is recommended to dismantle the solenoid valves for the winter.
- Move the humidity sensors and computer to a warm room for the winter if they are installed outdoors.
When choosing equipment for an automatic irrigation system, try to choose trusted companies. You should not save money and buy dubious devices - they can quickly fail, and completely remaking the entire irrigation system is not as easy as it might seem at first glance.
Well-known manufacturers of automatic irrigation systems
In general, assembling this device according to the scheme is not so difficult, especially since all its parts can simply be bought in a store.
Procedure for developing a do-it-yourself irrigation system
First, take a scale plan of the site. If you don’t have it ready, draw it on graph paper or a large checkered piece of paper. Apply all buildings, beds, large plants.
Configuration development
On the plan, draw the irrigation zones, the water source, and its location. At the same time, you draw how the main pipeline will run. If you are going to spray with sprinklers, draw areas of their effect. They should overlap and there should be no unwatered areas.
If the plantings are planted in rows, it is more rational to use drip irrigation: water consumption is much less, as is the cost of equipment. When designing a drip irrigation scheme, the number of irrigation lines depends on the distance between the rows. For rows with a distance of more than 40 cm, one line per row is required. If the rows are located closer than 40 cm, I water between the rows and there are one fewer lines.
DIY irrigation system development
After all the sections have been drawn, decide on the length of the required pipelines, count how many and what water distribution points you have, decide on the equipment - the number of pipes, hoses, tees, drippers, sprinklers, whether or not you need a pump and reducer, it will be whether the container is installed or not, what automation should be installed and where. Now, after all this has already been thought out, right down to the diameters of pipes, fittings and adapters, the practical stage begins. The irrigation system drawn on paper begins to be implemented on your site.
Let's start building
Construction work is already underway. And the first thing you need is to decide how you will lay the pipes. There are two ways: lay the pipeline on top or bury it in a trench. They usually lay it on the ground at the dacha: here the watering is seasonal and it is dismantled in the fall. It is very rare that irrigation systems in dachas are left for the winter: even if the equipment can withstand the winter, it can simply be broken or stolen.
When creating an automatic watering system for the site of a permanent residence, they try to make everything as inconspicuous as possible, so the pipes are buried. In this case, trenches are dug with a depth of at least 30 cm. This depth is sufficient so that the pipes are not damaged during excavation work. Just remember that pipes, fittings and other equipment that is left over the winter must be able to withstand freezing.
One of the stages of creating automatic irrigation with your own hands is earthworks and laying main hoses
Branches for irrigation depart from the main water pipelines. It is advisable to make all assemblies and connections in hatches with covers: namely, in connections, tees, etc. Most often leaks occur. Digging out an entire trench to find a leak is not the most fun, and if all the “problem spots” are known in advance and relatively accessible, maintenance becomes an easy task.
When laying main pipelines underground, install connection points in special boxes
The last stage - depending on the chosen irrigation method, water distribution devices are installed in the hoses, everything is connected and tested.