Candlestick
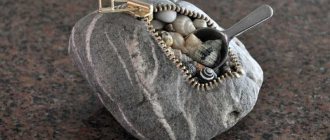
Wash a transparent glass of any shape thoroughly, put pebbles of the same color (gray or black) of approximately the same size inside. Place a large candle inside the stones. This original candlestick will decorate your interior.
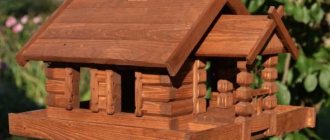
Fountain, sculpture, architectural decor and other products made of natural stone made by experienced and talented craftsmen for your garden or country house.
Application
A good idea for a craft project: The world around us made from stones. The picture will look more impressive if, in addition to stone, you use other materials. Dry twigs, blades of grass, ribbons.
If a child is making the craft, the applique can be attached to a cardboard base. An adult should try canvas. The finished panel can be placed in a frame and used as an exclusive interior decoration.
Dominoes made of small stones
- Choose pebbles of approximately the same size. They do not have to be flat, they can be angular.
- Then paint them black with acrylic paint and leave to dry.
- Using a thin brush, paint dots 1 to 6 on each half of the stone with white paint. Let adults help with the number of stones.
- The dominoes will turn out very creative, and you can even play with them!
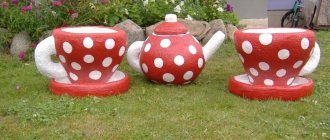
Flowerpots decorated with sea pebbles
A special maritime style atmosphere at the dacha can be created by flowerpots and flower pots decorated with pebbles. The basis for such a flowerpot will be a tin bucket. Holes must first be made in its bottom to drain water. Next, apply a gypsum solution or ready-made plaster mixture to the outer surface of the bucket using a spatula. While the solution has not dried, you should lay the mounting mesh, slightly drowning it in the solution, and fix the pebbles. After complete drying, fill the space between the stones with grout and wash it off with a sponge from the surface of the stones. The original flowerpot is ready.
Flowers in a pot made of stones
You can choose flat elliptical or round pebbles. They can easily be made to look like flowers - cacti.
Stages of work:
- For a monochrome shade, it is better to paint the stones in different shades with a can of paint.
- Using a thin brush with white paint on a green background, paint the stones with dots, stars or small lines pointing upward. These will be cactus needles.
- Place 3-4 finished painted stones in a small pot. Green "cacti" should be peeking out of the pot.
- Place small brownish stones at the bottom of the pot; they will hold the “cacti”.
Such unusual handmade stone crafts will decorate not only eco style, but also a child’s room in any direction.
Common craft material
Nowadays, people prefer to deal with unusual, extraordinary, natural things. Tired of the usual rugs, coasters, and pictures sold in any store. I want more individuality. To decorate your own home or country plot in an unusual style, it is customary to use a variety of stones. With your own hands you create all kinds of crafts, decorate interiors, bring comfort and original notes to the room.
Crafts are made from natural stone. The material belongs to the wear-resistant category and is not afraid of excessive humidity and temperature changes. Figures and paintings made from stone will retain their original appearance for a long time. The pebbles are connected using universal silicone glue.
Before starting to work with the material, it is thoroughly degreased. If necessary, add brightness to the craft, use acrylic paints, felt-tip pens, and nail polishes. Gouache is not entirely suitable for these purposes, since it tends to wear off over time, even after varnishing. The final processing of stone objects with your own hands involves coating with wax or clear varnish.
Creative stone rugs
Stones carry special energy and have been used for healing for a long time.
You can put a rug of tightly glued stones in a certain pattern in front of the front door. For example, in the shape of a wave or a spiral, where large stones are glued along the edges, gradually decreasing towards the center.
For those who love humor and creativity, you can create a rug that can only be stepped on with bare feet. Stone mats are excellent foot massagers. The feet may point in different directions.
Pick up a large oval stone - a foot, with 5 small ones attached to it (imitation of toes). The different sizes of children's feet simply glued to a wooden surface are very impressive.
Types of stones
Most people use sea or river pebbles to make crafts. The material is available and does not require financial costs. Children and adults collect it on the banks of natural water sources. Constant contact with water makes the pebbles rounded, smooth, with minimal porosity. An ideal ornamental material should have a round or oval shape.
Realistic objects are made from three-dimensional stone. This is how you get a variety of figures and animals. It is recommended to complement the masterpieces with stones of artificial origin.
Panels (pictures) made of small pebbles
Crafts made from sea stones in the form of panels and paintings look original. You can take a piece of plywood or wood as a basis.
Sequence of work:
- Come up with a drawing, it could be a forest, a fairy-tale city, a tree, figures of people or animals, a bird or a flower.
- Like a real artist, you should put your future masterpiece on paper (sketch). Select the colors of the picture.
- Select stones for the design and paint them in the desired colors.
- Use a glue gun to glue colored stones onto the base.
- Color the background of the picture.
Experiments are welcome, let the child develop creativity.
Cladding walls and floors with sea pebbles
This is an original and at the same time very economical finishing method. The process of covering walls with sea pebbles is quite simple and can be done independently with your own hands. This requires a creative mood and a little patience. In addition to sea pebbles, you should prepare tile adhesive (you can also use a solution of cement and fine river sand), a ruler, a pencil, a saw and a spatula. If wall cladding is carried out inside the house, then you may have to cut some stones that will not fit at the joints of the walls. To make it easier to cover the walls, it is recommended to measure everything in advance with a ruler, lay out the required pattern on a flat surface and cut the stones if necessary. Next, you just need to carefully transfer the embedded drawing to a section of the wall. When decorating a section of the wall outside the house, you can avoid sawing the stones, which will give the resulting picture a natural look.
Related article: Wallpaper design in the kitchen
So, after accurate measurements have been made and the pebbles have been previously laid out in the required order on a flat surface, you should apply tile adhesive or cement mortar in a layer of 6-8 mm with a spatula. Next, the pebbles are carefully laid out one after another. They should be fixed firmly in the solution, but not completely buried in it. It is important to ensure that the solution does not get on the front of the pebbles. Once the cement or glue and pebbles have hardened, you can use grout. This should also be done carefully, without getting on the surface of the pebbles. For this purpose, you can use a plastic bag, in the corner of which you need to make a small hole and secure it with tape so that the hole does not expand under pressure. Next, fill the bag with grout and, gently pressing it, apply the grout to the space between the stones. To make the stones look brighter and shinier, they can be treated with special impregnations or varnished.
To cover the floor, you will need to make a screed and then lay out the pebbles in the required order. A threshold made of sea pebbles looks great at the dacha.
Painting pebbles
The painting on the stones looks very impressive. Anyone who knows how to draw has a whole sea of ideas for decorating their garden or plot in a private house.
Designers and craftsmen offer interesting images on stone, these could be: a dog, a cat curled up in a ball, a tiger cub or a bunny.
- Angorka. What it is?
- Flowers as gifts.
Dream Island - a place for a family holiday
If the stone is large, you can paint a whole picture. These can be flowers with birds, a pond with lotuses and butterflies, ducks, strawberries, etc. To make the painting strong, the design is covered with transparent varnish.
Pebbles in garden design
The use of natural stone in landscape design is limitless. Such garden crafts are beautiful, original and, most importantly, practical. After all, the material discussed in this article is resistant to negative environmental influences. It does not wear out over time.
Just like flower pots, pebbles can be glued to garden lawns and flower bed edges. Attach the mesh to the base and place the required number of stones on the glue. If you are using medium-sized material, you need to apply cement mortar rather than glue. The method is suitable as a material for decorating well rings, bench legs, and barbecues.
Pebbles are used to decorate existing garden objects and to create new crafts. For example, a pyramid looks very impressive. It can be placed near a garden pond or in a flower bed. To make the structure stable, use flat and large stones to create the base. Then select several dozen stones of different sizes and glue them together in decreasing order to form a pyramid. Dig the finished pebble product into the ground with its base.
Mischievous ladybugs near the pond and on the site, frogs, caterpillars, snails and other garden inhabitants will help add bright colors to the garden. To make them, select stones of the required sizes and paint them with paints, apply a varnish coating over the design. You can draw strawberries, potatoes, apples and other crops on the pebbles. Fill buckets with it and place it in the garden - let your guests and neighbors admire such a rich harvest!
If you have the opportunity to purchase a large amount of pebbles, you can use them to pave garden paths or decorate the foundation of a house. Pebbles are used to create stone gardens, artificial streams and other landscape objects.
As you can see, the use of rounded stone in decorating the interiors of a home or garden truly has no limits! The main thing is to show a little imagination and stock up on free time. Experiment: it’s easy to make original and unique objects from pebbles. And to make such crafts, all you need to do is buy sea pebbles at the O. Kamen store.
We offer affordable prices, a huge variety of colors and high quality materials.
Decorative garden figures
Stone crafts for the garden or vegetable garden will be a wonderful decoration. For example, you can put strawberries (painted stones) in a clay pot.
It’s easy to pick up large stones for a fly agaric: paint the stem of the mushroom with white paint, and make the cap red with white speckles.
You can make a large basket from stones and cement, where you can pour soil and plant bright flowers.
Stone checkers
Here's a classic game, which is doubly nice! This is a game of checkers.
On a square chessboard, divided into black and white squares, small round and painted pebbles are distributed, which act as pawns.
Print chess and checkers, chessboard.
Castle-flower garden
Aesthetic pleasure - a flower garden or a fairy-tale castle made of stones. Square (round) turrets can be made from sea stones. Make a roof and small stone walls. Inside the colorful castle there is soil with lush bushes of flowers.
- Gas burners for heating metal: where to buy on the most favorable terms?
Gazelle. Why is she so popular?
Elbrus - a history of conquest.
Important! The main thing is to first level the site, then secure the selected stones with cement.
What are pebbles, what types do they come in?
A pebble is a small pebble, a rolled fragment of various natural rocks. It has a diameter of 1-15 cm and is formed as a result of collisions and rolling of stones along the bottom of a river or sea. Pebbles can be small (up to 2.5 cm), medium (up to 5 cm), large (up to 15 cm). It is used in the construction of houses and roads, beach filling, and is used for decorative purposes.
The most common shades of pebbles are:
- brown;
- grey;
- white;
- black;
- red;
- brick;
- bluish;
- greenish.
Sea pebbles
This material is the most popular and is distinguished by a variety of colors, textures, and shapes. The most common type of pebbles is white, which has a smooth surface and a flat shape. Since the stones always retain a coating of salt from sea water, they should be washed thoroughly before use.
Lake and river stone
River pebbles have a wider range of colors and are characterized by an original shape - more rigid, convex. Typically, river pebbles are smaller than sea pebbles, although the cost of materials in hardware stores is approximately the same. Lake pebbles are a cross between sea and river pebbles; they are usually ovoid in shape and generally uniform in color, without specks.
Quarry pebbles
This material is mined in special open pit mines. Pebbles of this type have admixtures of sand, crushed stone, can be heterogeneous in shape and less rounded than river and sea pebbles. The range of shades here is also less rich, but the price is the lowest among analogues.
Decorative stones
People have long learned to make pebbles individually, and such decorative material accurately imitates the structure and appearance of natural material. The most expensive types of decorative pebbles are made from marble, granite, and other types of natural stone. Pebbles based on quartz and sandstone are cheaper. The diameter of the pebbles varies from 1 mm to 17 cm, the shade can be any, since pigments are often used in the production process. Special rubberized pebbles are also produced, which are suitable for making rugs and furniture.
Photos of crafts made from stones
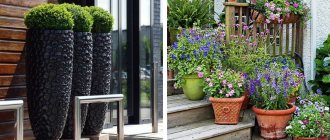
Application of material in design
Pebbles are used in different interiors, in almost all rooms, including bedrooms. More often they are introduced into bathroom design to enhance the feeling of closeness to water and the sea.
How to decorate the floor?
A self-leveling floor with pebbles is an original solution, and you can implement such an idea yourself. It is necessary to carefully level the base in advance, make it smooth, and eliminate the presence of defects. After laying the pebble decor on top, they are covered with a transparent composite (epoxy resin).
You can make the floor even more spectacular with the help of built-in LED lighting. It is permissible to leave recesses in the screed along the walls, into which larger stones can be placed, which, after pouring, looks very original.
A pebble floor can also be constructed in another way, for which you will need to purchase high-quality, reliable glue with high adhesion to concrete and stone. The adhesive composition is diluted with water according to the instructions, applied to the floor, and leveled with a notched trowel. Afterwards, the flat pebbles are glued like tiles, selecting pebbles of the desired shape and size.
This floor is ideal for a bathroom or toilet, and the work does not take much time. You can combine ceramics and pebbles, laying out only strips of the latter near the walls, lining the central area, or making another pattern.
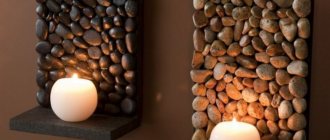
Wall decoration
This option for decorating a room or one wall looks unusual and very attractive. Usually this is how they decorate a bathroom or the walls inside a shower stall, because pebbles are moisture resistant and do not collapse from constant wetting. In addition, such surface cladding is ideal for the nautical style that is so often practiced in the bathroom.
The elements are glued using strong adhesive, liquid nails, and a cement-based tile mixture. Glue is applied to the wall in a layer 5-15 mm thick, then pebbles are laid out. It is advisable to draw a sketch of the future surface in advance so as not to get confused when laying pebbles. Recommendations for wall cladding are as follows:
- in the bathroom you can line the entire wall or half its height with pebbles;
- in living rooms, accent areas or walls 40-50 cm from the floor are often decorated with stones;
- light colors of pebbles visually expand the space, but dark ones look more stylish;
- Pebble paintings on the walls look very interesting, however, the work will be more complex and painstaking;
- The niches in the walls, decorated with pebbles, are beautiful in appearance;
- pebbles go well with other wall materials - tiles, wood, panels: the main thing is to choose the right color combinations.
Use in the kitchen
A stone apron looks the most beautiful in the kitchen, and there are now ready-made meshes with glued pebbles on sale. They just need to be straightened, cut to size and attached to the wall.
If the kitchen is made in natural colors, the pebbles can be left in their original form, although they lend themselves well to painting. If desired, buy ceramic tiles with an imitation pebble surface - they look stylish and original.
Living room
Pebbles can also be used as decoration in the living room. Typically, pebbles are used to decorate an accent wall, a separate area, or a niche. You shouldn’t overuse the material; tiling a small area in the living room is enough. Pebbles are best suited for rooms decorated in Mediterranean style and eco-style.
Bedroom decoration
By combining pebbles and plaster in the bedroom, you can recreate the effect of a real “sea” coast. To achieve this result, apply the tinted plaster in a thick layer, go over it with a textured roller, and then press the pebbles in randomly or according to the intended pattern.
If you add shells to the decor, this will enhance the style of the interior. A mirror framed with pebbles, a unique self-leveling floor, or furniture decorated with pebbles would also look interesting in the bedroom.
Bathroom
Pebbles are easy to care for and are not afraid of water, so they will be a real boon for the bathroom. The easiest way is to buy tiles made from decorative pebbles and decorate the floor or walls in the bathroom with this material. Typically, such tiles are designed in a marine style, and with its help it is easy to create entire pictures.
A more complex option is to cover the walls in the bathroom with moisture-resistant plaster and press real or decorative stones into it. Using this technique, large areas or individual areas are decorated, for example, near a faucet or sink. You can line the podium in the bathroom with pebbles or make a decorative canvas on the wall - as your imagination dictates.
Master class “Finishing a flower pot with pebbles”
To complete the task you will need cement mortar and pebbles of approximately the same size. Additionally, you can use paints. More ideas for decorating flower pots.
- For the base of our structure we use a flat boulder, on which we lay our pebbles edgewise. It is recommended to make the structure in parts so that all elements dry well.
- The resulting pot can be decorated with paints and additional decoration can be glued onto it. Flowers in such a pot will look very attractive and unusual.
Decoupage
If you manage to find a large stone, smooth and flat, on the seashore, you can decorate it using the napkin technique. It is called "decoupage".
Materials required:
- white water-based paint;
- napkins in 3 layers with a bright large pattern;
- PVA glue.
- acrylic paints.
Step-by-step instruction:
- The stone must be painted with water-based paint.
- Separate all layers of the napkin and cut out the design from the first.
- Soak the picture with glue (it is recommended to start from the middle) and carefully glue it to the stone so that wrinkles do not form.
- Wait until completely dry.
- Draw with acrylic paints, paint, if necessary, add sparkles, rhinestones, and other additional decorations.
- Varnish the surface.
- Dry for 2 days.
- Varnish the other side.
In total, up to 3 layers of varnish will be required. The finished product can be decorated with a flower pot or simply left on the coffee table.
Workplace and safety
The workspace must be properly organized.
Recommended use:
| Under | What |
| Tools and materials | desktop drawer, separate boxes possible |
| pebbles and shells | plastic containers |
| threads and ribbons | plastic bags |
| small and bulk materials | banks |
You need to cover your work table with old oilcloth or newspapers. The workplace should be provided with a light source. A work robe or apron will help keep your clothes clean. An old T-shirt is enough for a child. In summer and in the fresh air, you can work by sitting on the veranda or balcony.
You will have to use a portable box to fit the necessary materials and tools.
Special attention should be paid to safety precautions, especially if children are involved in the work:
| Job | Precautionary measures |
| With a drill | Goggles or eye protection mask, gloves (cannot be given to children) |
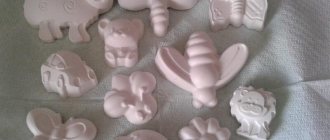
| With salt dough | Electric or gas oven (adult supervision only) |
| With varnish | Do not keep the container open for a long time. You can pour a little varnish into a plastic cup and close it again. The room should be well ventilated. After use, the brush should be washed in solvent. |
| Working with 10% hydrochloric acid solution | When working with acid, use an old toothbrush and wear gloves to protect your hands. You should protect your eyes |
Seashell flower
Materials required:
- shells;
- wire;
- frame;
- velvet fabric;
- beads and seed beads;
- glue;
- clothespins.
Manufacturing instructions:
- You need to make several flowers. For one you will need to connect 3 shells of the same size using transparent glue. Flowers may be of different colors and sizes.
- Varnish the finished products, decorating each of them with a large bead or beads in the middle.
- Glue the fabric to the frame.
- You should make a semblance of a stem and leaves from the wire and attach it to the fabric.
- Strengthen the buds along the wire in any order.
- Wait until completely dry and cover with glass.
Sequence of painting
The stones should be prepared for work - washed thoroughly with soap and dried. Then each stone needs to be primed with PVA glue and dried again. Now you can start applying the background. The color must be determined in advance, shake the paint well and apply it to the surface of the stone. After this, you should wait 15 minutes for the base coat to dry.
If it now seems to you that you will spend too much time while the stone dries, then this is not so: you can prepare several more blanks at the same time
Before making a drawing on stone, make a sketch on paper and imagine how it will look when finished. Use a pencil to reproduce the design on the stone. Check again that all the details are well drawn. Subsequent coloring will be done in layers. Each element must be dried for 15 minutes. The outlines of your painting are done with liquid paint.
It is best to dry the product on a radiator. The finished product must be coated with a layer of protective varnish. It should dry out too. After completing the painting, you can place the finished stone in its place in the garden.
And also look at the video - as they say, it’s better to see once:
Wind chimes made from sea shells
There should be a ring at the base, but this is not necessary. Forms may vary.
Materials required:
- shells, starfish, beads, corals, pieces of glass;
- jute twine or any other thread;
- wire for beads;
- willow branches;
- crochet hook;
- knitting threads;
- scissors;
- varnish;
- glue gun (you can use a drill with a small drill bit, nail scissors or a needle).
Manufacturing instructions:
- Willow branches must be boiled for 2 hours, then cooled and the bark removed.
- Form a ring from the branches, braiding some branches with others (the branches should be wet), level it and leave it to dry overnight.
- Prepare flowers using clear nail polish and wire.
- Tie the shells (let them be openwork).
- Prepare several beads by stringing each one onto a wire and securing it.
- Cut 8 ropes of 120 cm each.
- Attach the parts to a string: some you simply tie, some you glue, and tie it to the base ring, leaving the end hanging down. Do the same with the rest of the ropes.
- Collect the loose ends into a bun and tie it with a separate thread. If the ropes are unevenly loaded with parts, it is difficult to achieve balance. And this is necessary before making the craft correctly. So, when distributing beads, fragments, stars and shells along the rope, you will have to monitor your balance.
- From the resulting start, tie a braid up to 10 cm long and form a loop from it. Wrap one of the threads around the base and cut off the rest.
Willow branches can be replaced with hoops and wrapped with twine.