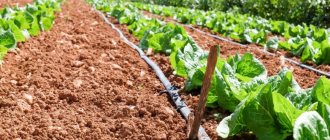
Providing water to plants and plantings is one of the concerns of homeowners. Some water the vegetable beds, some water the flower beds and lawns, and some need to provide water for the garden. In any case, the procedure takes quite a lot of time. But that’s not all: with the usual method, a crust forms on the surface, which prevents plants from developing, so you have to loosen the soil. All these problems can be solved by drip watering the plants. You can buy ready-made kits, order turnkey development and installation, or you can do everything yourself. This article will discuss how to make drip irrigation yourself.
What is it, what are the features of the sets?
The main purpose of each drip irrigation kit from Green Helper is to provide a regular supply of water to the roots of plants so that they do not dry out and receive the necessary nutrients.
Water is supplied in small portions, pointwise, which allows you to save money , since there is no expense for irrigating paths and other areas where nothing useful grows.
The peculiarity of Green Helper kits is that they can be used both in gravity systems and in pipes and hoses with pressure.
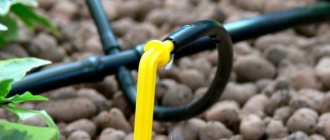
The contents of the kits vary, but each of them includes the basic parts necessary for drip irrigation:
- droppers;
- fitting;
- tube or tape for supplying water.
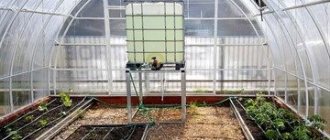
The kits are used for watering plants in greenhouses and in open ground. They can be equipped with additional elements at the request of the customer.
Any set is completely ready for use after purchase. It is always possible to set a timer, which will ensure automatic switching on at a given time.
DIY irrigation system construction
You can make an effective automated irrigation system with your own hands. Its installation will cost much less than assembling and installing a ready-made set of pipes and fixtures. In addition, applying your own strength and skills will bring undoubted pleasure:
An automated irrigation system made of polyethylene pipes can be laid openly; it is not afraid of sunlight.
It is not recommended to install pipelines from PVC pipes in open areas; it is not advisable to use polypropylene if there are sources of open fire nearby.
Have you decided to install the summer water supply system at your dacha yourself, so as not to waste extra time and effort watering the plants by hand? We recommend that you read the step-by-step guide to installing an automatic irrigation system using pumping equipment.
Advantages and disadvantages
Benefits of use:
- The soil does not become crusty and allows the air needed by the root system to pass through.
- Watering occurs automatically, which saves energy and time.
- At the same time as watering, you can feed the plants.
- Saving water.
- Can operate under pressure or by gravity.
- Simple components.
- Low price.
The disadvantages include the following:
- The tubes must be heated before use so that they straighten and droppers can be easily placed on them.
- At pressure above 2.4 atm. it is necessary to install the gearbox and secure the connections with clamps or wire.
Where and approximately at what cost can I buy it?
The cost of Green Helper kits varies depending on the specific purpose.
Thus, the GK-910 model sells for about 300 rubles, and the GN 023n set costs more than 2000 rubles . At the end of the irrigation season, the price decreases and sales are held.
You can buy it on the manufacturer’s website or from official representatives of the company. Green Helper drip irrigation is also sold in online stores that sell garden tools, equipment for the garden, and household equipment.
How to decide what to buy?
Before placing an order and paying for your purchase, please consider the following:
- For plants in pots or for the garden, purchase a set. In the first case, a not very long tube with minimal branching is enough; in the second, a larger set is chosen.
- Dimensions of the plot (beds). The length of the tube or tape and the number of droppers depend on this.
- Is it necessary to turn on watering in the absence of the owners? If yes, then it is better to purchase a kit with a timer.
- Gravity or pressure water supply system. If a water supply or pump is used, then the kit, including the timer, must be designed for a certain pressure. You may have to install a gearbox.
Drip irrigation from Green Helper does not require connection to a power line. All you need is AAA batteries or you can do without electricity altogether.
Timers for automatic watering
Devices are needed to control a branched system, monitor the operation of pumps, and start water supply to several lines simultaneously. Timers are convenient for owners of a large farm with a dozen greenhouses. There are electronic and mechanical devices equipped with a water meter.
Timers operate on batteries; mechanical spring ones do not have programs; they are adjusted manually, and the charge lasts for a day. To ensure the supply of water to the greenhouse, a simple unit will be enough; it will support the daily operating mode of the irrigation system (2 hours of watering).
Electronic - more complex devices with programs that the unit supports for a given period of time. The devices are convenient for use in gardens with various crops. For each system, a program is set that will turn irrigation on/off.
Options on the market
The design of each kit is quite simple and understandable. Water is supplied dosed through tubes to the root zone. Green Helper systems are used in open ground, in greenhouses, greenhouses, and for watering potted plants.
GN 023n
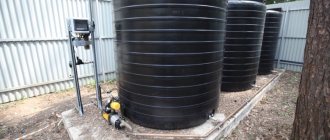
The model is designed for watering beds in systems with pressure, as well as gravity , without the use of pumps and centralized water supply (water is supplied from a container convenient for the gardener). The Green Helper GA-319N timer with a ball valve is used.
The price of the kit on the manufacturer’s website is 3,000 rubles, depending on the availability of discounts and delivery conditions. The kit is designed for watering an area of 20 m2 (0.2 acres).
Pros:
- works from 2 AAA elements;
- includes all parts necessary for watering;
- can be connected to tubes with a diameter of 16 and 20 mm, for this purpose an adapter is included in the kit;
- the timer is easy to set up and has a waterproof housing;
- you can expand the system if the length of the tubes is not enough.
Minuses:
- if connected to a water supply with a pressure above 2.4 atm, then a reducer should be used;
- you need to heat the tube to straighten it out.
The kit includes:
- fitting,
- hole puncher,
- tubes,
- filter,
- droppers.
There is an electronic timer with a ball lock mechanism. A 1 year warranty is provided.
GN 001n
A small compact set of drip irrigation for a greenhouse 2.4 x 6 m. Usually these are 4 beds (rows of plants) of 6 meters each . A 25 m slotted tape is used.
You can purchase such a set in stores for 500 rubles.
Advantages:
- easy to assemble;
- there is a connector that allows you to connect to a hose with a diameter of ¾ and 5/8 inches;
- The set can be expanded with additional parts.
Flaws:
- in case of gravity flow, the container must be raised to a height of at least 1 m;
- no timer.
GK-910
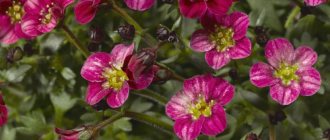
If you need to water a compact alpine garden, plants in pots or boxes, you can purchase the GK-910 system for 10 drippers. Using the connector included in the kit, it connects to a ½ inch hose. The length of each sleeve is 1 m 60 cm.
The set costs about 300 rubles, although there are offers for 500 and even 1000 rubles.
Advantages:
- simple design;
- assembles quickly;
- low price.
Disadvantages : no timer included, although it can be purchased additionally and installed. This set is used individually or as part of more extensive systems.
GN 003
The set is used in lines with and without forced pressure (barrels, other containers). Designed for 0.8 - 2.4 atm. The set includes 64 droppers. The price of such a device for drip irrigation is approximately 3,000 rubles.
Advantages:
- The set includes an electronic timer;
- economical consumption – 8 l/h;
- can be connected to any water source;
- equipped with everything necessary for installation and operation.
Flaws:
- plastic tubes must be left to rest for a long time or heated to level them;
- It is necessary to ensure the tight connection of the tubes.
As with other Green Helper devices, no electrical power is required. Just for the timer you will have to purchase two AAA batteries. Usually they last for a season.
What individual parts does the company sell?
If any spare part of a drip irrigation device is broken, lost, or there is a need to expand the system, you can always purchase a new part.
Green Helper offers:
- Drip tape of various lengths, diameters and operating pressures.
- Tube for drip irrigation and fogging.
- Droppers are compensated, adjustable, L-shaped, on a stand.
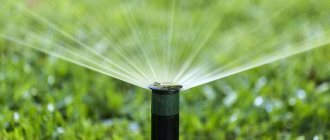
- Adapters, micro-sprinklers and micro-pipe splitters.
- Fittings for tape and tubes.
- Pipe hangers and pegs.
- Splitter for 4 outputs.
- Plugs.
- Controllers and timers, including two-channel and touch.
Green Helper also sells:
- hole punchers,
- quick release fittings,
- pressure gauges necessary to determine the pressure in the system.
There is an assortment of injectors and supply hoses for applying fertilizers.
Droppers
Droppers can be installed on plastic pipes. They are produced in several types:
- with fixed water flow;
- adjustable - with manual adjustment of irrigation intensity;
- uncompensated - the intensity of water supply decreases towards the end of the bed;
- compensated - with a membrane and a special valve, creating a constant pressure during pressure fluctuations in the water supply;
- “spider” type - with distribution to several plants.
External droppers are inserted into a plastic pipe, in which holes are pierced with an awl.
Step-by-step instructions on how to assemble and configure the system
Each type of kit has its own connection nuances , but in general the installation is simple, any summer resident can handle it. For the GN 023n model, irrigation can be organized on a strip up to 1 m wide.
The distance from the main pipe is up to 50 cm in each direction. The distance can be adjusted taking into account the fact that the kit includes 32 m of micropipe, designed to water 64 plants.
With timer (pressure)
The system installation proceeds as follows:
- You need to unwind the main tube (16 mm) and let it rest until it straightens out. You can leave it overnight. For best results, fill it with hot water or heat it with a hair dryer at a temperature of no more than 60℃.
- Lay out the watering tubes according to the layout of the beds.
- Cut the microtube into pieces of the required length and assemble individual sections - “spiders”, as shown in Fig. 1. There will be 4 microtubes coming from each splitter.
- Heat one end of the microtube with hot water and put it on the tail of the dropper.
- Heat the second end of the microtube and put it on the splitter spike. There should be tubes on each spike to make 16 “spiders”. These are separate blocks.
- Assemble the system based on the diagram in Fig. 2. The ½-inch tank outlet comes first, then the tap. A filter is placed in front of the timer. Couplings are used to connect to the tube.
- Secure the main tube with pegs (pos. 14).
- If the set is used under a pressure of more than 2.5 atm, then the tube and fittings are secured with clamps or wire.
- On the upper side of the main tube, using the hole punch included in the kit, punch holes for installing compensated droppers. The distance between the holes is twice as large as between the plants. If the hole is made in the wrong place, it can be closed with a plug.
- Place the dripper in the ground near the root of the plant. You can use several droppers for one plant if the watering regime requires it.
- At the end of each branch, install plugs on the tube (pos. 15).
- Program the watering timer according to the instructions.
- Open the water supply and set the timer to the “open” position.
- Make sure there are no leaks at the connections.
- If water does not flow, there may be an air lock. You need to pull out the plugs.
- During operation, it is necessary to periodically clean the filter.
19 – microtube 3x5 mm, 10 – L-shaped dropper, 9 – cross splitter
Without timer (gravity)
If water is supplied from the container by gravity and the ball timer is not used, then instead of compensated droppers (item 12), install a regular adapter on a microtube (item 11). Otherwise everything is exactly the same. This is shown in Fig. 3 and 4.
At the end of the season, the system is washed with water, after removing the plugs . If it is necessary to remove the remains of inorganic fertilizers, use a nitric acid solution with pH 2. The tubes are filled with the solution, left for 12 hours, then washed with clean water. Then blow with air and store in a dry, preferably frost-free, room.
Alternatives
There are other brands on the market:
- “Bug” for 60 plants, with a timer, for an area of 18 m2, at a price of about 3800 rubles.
- “Beetle” with an emitter tape, water intake from a container - 960 rubles.
- Gardena for 40 plants, 24 m2, with spray nozzles and droppers, costing approximately 3,200 rubles;
- “Mastersad-100” is designed for an area of 105 m2, with an electronic timer, costs approximately 2200 rubles.
- “AquaDusya” with a hose for underground installation, for 60 plants – 2000 rubles.
- “Signor Pomodor” with automation, for 60 droppers, for a gravity system - 5900 rubles.
- MyFazenda, works from water supply and gravity system, drip tape, ability to water 33 plants, as indicated in the characteristics, costs about 1250 rubles.
You can assemble the system yourself by purchasing separately those elements that are most suitable for a particular area.
Read about the AquaDusya drip irrigation system here.
Purpose of fittings
The system can be simply assembled using special fittings for drip irrigation.
- Start connectors for connecting drip tape to plastic water pipes. They are made with a rubber seal or a clamping nut. Holes are drilled in the HDPE pipe using a wood drill with a centering spike and start connectors are tightly inserted with or without taps. Regulation of water consumption is required if certain zones consume it less than others or for alternate watering of different areas.
- Drip irrigation fittings, angled or in the form of tees, are used to connect the tape to a flexible garden hose. They are also used for branching or turning. The fitting seats are made in the form of ruffs, which ensures tight fastening of the tubes.
- The repair fitting is used in case of a break or to extend the drip tape. With its help, its ends are connected.
- The plug is installed at the ends of the drip tape.