It can be viewed from different angles. It is thought out to the smallest detail. A master working with it must have not only practical skills, but also know the laws of composition. This is an ancient art that has not lost its significance today. All of the above is sculptural wood carving, a special direction in the artistic processing of wood. Read about how the direction developed, about the choice of material and motifs of the images, about all the stages of work on the sculpture.
Sculptural carving from antiquity to modern times
It all started in pre-Christian times - at first, people made figurines of pagan gods from wood, they worshiped them, and they sought protection from them. There is evidence of the existence of wooden sculptures in the Ancient East, in ancient Rome and Greece. Ancient craftsmen, for example, used cypress, cedar, fig, and incense wood.
Antique Slavic toys
Sculptures of gods were made from wood, which could be lined with bronze plates on top. Such statues and figurines were looked after a lot - they were rubbed with aromatic oils and wax. Wooden sculpture was achievable by rare craftsmen; the work is painstaking and time-consuming.
In the Middle Ages, wood was the main material for shipbuilding, and carved sculptures became decorations for the bow of a ship. In the 18th century, the main nose sculpture was a lion standing on its hind legs. Other parts of the ship were also decorated: monograms, coats of arms, flowers. In the work of Russian craftsmen, the development of the trend is especially evident in the northern regions, where most men knew how to process wood (and how!).
And today, sculptures made of wood are not “hello from the past,” but a trend whose style is impressive in scope. Japanese and African sculptures, art deco, country music: all this becomes a source of inspiration for masters who can choose a narrow focus of activity.
Popular animals and birds among woodcarvers
Volumetric sculptural carving is one of the most complex (if not the most complex) types of carved creativity. Decorative animal art has been developing for a very long time, and today it is even experiencing some revival. If you want to learn how to carve attentive owls and clumsy bears, peaceful ducks and nosy foxes, be sure to observe the natural behavior of animals in nature. To do this, you can simply watch programs on channels about animals. This way you will become familiar with the plasticity of animals, their characteristics, and these observations will help in your creativity.
Volumetric animals and birds
Animals carved from wood need to learn from master craftsmen who have literally honed their craft. Take, for example, the Japanese carver Mori Kono. The strength of this specialist’s skill is in the amazing detail of the figures, sculptures of carved animals that seem to be a frozen moment of forest life. The master presents a series of sculptures of badgers, raccoons, bears, owls, and rabbits. Mori always tries to depict animals in action, and this is how the work of a pro will differ from the work of a beginner.
Required tools and materials
Each master assembles his own set. But there is a minimum set, without which it is practically impossible to approach the art of volumetric carving.
You will need the following in your work:
- cutter - a knife with a short beveled blade, the tool is the main one, as it is used both in rough processing and in the formation of small parts;
- jamb - used to create ornaments on planes;
- chisels - needed for sampling material, forming an in-depth relief;
- rivets - chisels with a spear-shaped blade;
- saw – needed for actually cutting out the workpieces;
- drill - for drilling holes;
- rasps, a sander, a set of drills - all this is needed to ensure that the animal figures match the sketch and turn out as attractive as possible.
Selecting wood can be called a separate art. For example, decks will be useful for a craftsman to make simple life-size sculptures. Tree butts are needed to make future animals. And if you decide to start by shaping the figure of a cat, take a closer look at the branching trunks.
Motifs of images
The motifs are as varied as life itself and its artistic representation. Take, for example, netsuke. The carver makes a miniature sculpture, a carved keychain, which impresses with the subtlety of the image. This is a decorative and applied art with Japanese roots; the figurine itself is considered both a self-contained work of art and a decorative part of a costume. They are still manufactured today, but for the most part they are low-quality products that do not meet all the criteria of their historical ancestor.
There are, of course, netsuke masters today, but for one mini-sculpture from such a carver you have to pay $10,000 or more.
Carved wood sculpture – types:
- monumental - solves ideological and figurative problems revealed in monumental works (the proportions of the sculpture must be ideally combined with the surrounding space);
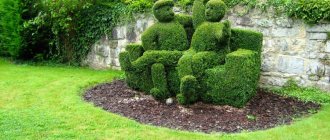
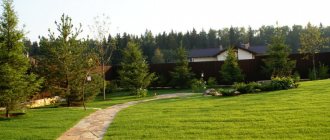
- garden - an element of design of a garden space, conceptually unified with the design of the entire garden;
- sculpture for the home - a decorative component of interior design, made in wood;
- educational figures for children - play material, environmentally friendly, popular today (recommended for children aged 6 months and older).
If you don't know where to start with figurative wood carving, then making simple wooden toys for children can be a great place to start.
Main features of the reception
The word itself comes from the Latin “arbor”, which means “tree”.
The technique differs in that various shapes are made from the trunks. At the same time, they must be grown in such a way that, as they develop, they produce the necessary sculptures. Some believe that arbosculpture is a subset of bonsai art or topiary art.
In reality, things are different; a bonsai is created by cutting and trimming leaves and branches. Arbosculpture, on the contrary, is the result of actions with trunks. At the same time, in the art of bonsai, everything is done to ensure that the plants are as similar as possible to real trees. In arbosculpture, on the contrary, the result should be something absolutely incredible and amazing the audience.
Wood selection and preparation
If you plan to make small figures, an apple tree would be a good option; birch, cypress, and hazel would be just as good. For miniatures with great detail, linden, alder, maple, aspen, birch and pear are used. Wood with a pronounced texture is not used for work with small details.
Beginning carvers can immediately try their hand at abstract work (for some this is actually easier), in which case it is better to take linden, this is perhaps the most flexible material. But aspen has to be pre-steamed in order to give the wood softness.
Log
The material is prepared in late autumn or winter, so it dries faster. Traditionally, preference is given to natural drying of wood. To do this, the logs are stacked and covered with a canopy. And they remain in this position for a year. The material that is intended specifically for carving is cut up to half a meter into logs and stored in a dry room.
But a modern master can both boil and dry the workpieces using an intensive method (infrared dryers). The bark from the trunk is removed almost completely, leaving small rings around the edges. Bags are put on these ends and wrapped with rubber bands. We are talking about a long log.
Stump
Owl family from a stump
In the process of growing and maturing the garden, some trees have to be cut down (illness, old age, bad weather). Uprooting them with your own hands is a very difficult task, and there is also the danger of damaging the roots of neighboring plants and communications. Therefore, an ordinary stump can be turned into a garden art object.
For example, owlets or baby squirrels uprooted from a stump looking out from a hollow will be interesting. But you can also uproot the stump, but later use it for garden sculpture. The bark is removed from such an object, the stump is cleared of rotten wood, and the gradual transformation of the stump into a sculpture begins. Be prepared that you will need more than one drying, painting, sanding, impregnation, varnishing, etc.
Log
The purpose, type and shape of the future product determine the choice of material.
How to choose the right log:
- its wood must have an even and uniform structure;
- the pattern of wood fibers should not be expressive;
- Wood from the middle period is suitable for carving work;
- light and uniform, suitable for face sculpture and portraits;
- dark and also uniform wood is suitable for less expressive work.
Very often, the work of a master involves the following scheme: procurement of material, boiling of blanks, initial removal of liquid, ventilation and withering.
For small works, a novice master should adhere to this scheme, since it is built according to all the classical rules for preparing material for a wooden sculpture.
Which topic should I choose?
But with the theme there is a huge scope for flights of fancy. The most popular topic is fairy-tale heroes . Russian folk tales, foreign or your own - you choose.
We recommend watching a master class that shows how to make 4 types of cartoon garden figurines:
An easy-to-execute option is a magic forest . “Living” stumps, water stumps or goblin stumps - all this can be made literally from old snags.
Another option for making figurines in the “living forest” style is painting stones. Large smooth boulders easily turn into Cheshire cats, turtles, and gnomes. Pebbles also make very beautiful houses.
Do you dream of organizing a garden in a marine style , but the climate does not allow you to grow palm trees? You can simply place marine attributes around the site: barrels and chests, a steering wheel and an anchor, a lighthouse and a mooring rope, seagulls and albatrosses, corals and other details of the seabed.
And lighthouses are built from old flower pots. If you put a lantern on top, it will also be a functional design. How to make a garden beacon with your own hands is shown in the master class below:
Build the “Secret” from the book “Scarlet Sails” by Alexander Greene or the pirate schooner “Black Pearl”, like Jack Sparrow.
There are other improvised options using improvised means.
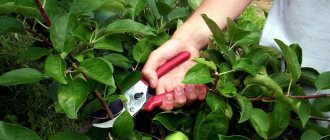
Tools
Beginners usually use only two tools - a penknife and a blunt knife. But when simple elements are mastered, it’s time to move on.
The list of required tools will include:
- hatchet for trimming;
- adze;
- cutter knives;
- chisels;
- gravers;
- nadheli.
A chainsaw will also be needed for larger jobs. To secure the workpieces, you will need a carpenter's vice. A set of sandpaper and tools for sharpening tools will be a valuable acquisition.
You will learn more about the necessary tools from the article: “Basic tools for wood carving.”
The miniature artist will additionally need claws and rivets. Japanese pros who carve elegant mini-sculptures are especially good at miniature carvings, so you can find examples of suitable tools on the websites and accounts of these artists.
Technology
Creating a sculpture from a log/stump or even a small piece of wood is not an easy task. This work is divided into several complex stages, each of which requires time and attention.
- Work begins with selecting a suitable object for further processing . Choosing the right material for a product is already half the success. The choice of wood is large and almost unlimited. For inexperienced craftsmen, linden is the best option, since it has a uniform color and is the most flexible. The material for the future product must be of very high quality.
The presence of defects in the form of cracks, knots, holes, and pest damage is unacceptable. The wood must also be well dried - the permissible humidity is 10%.
- A sketch needs to be created in most cases. Only very experienced craftsmen with good artistic inclinations can do without a sketch. For complex work, models are created from plasticine, clay or other plastic material. The master can create a model with or without detailed drawing of elements.
- The workpiece is subjected to rough processing, which includes the selection of basic shapes. The master's task is to bring a shapeless object to a certain geometric figure, which should consist of lines and control points. Initially, the projection is cut out, which allows you to remove most of the excess material from the workpiece. Next, the master restores the lines of symmetry and builds the outline of the second projection.
- The figure is cut down on 4 sides , which allows you to create a refined outline of the future figure in all projections. At this stage of execution, you should not round the figure, which is a common mistake of many craftsmen. The outline is still generalized.
- The creation of an 8-sided shape is carried out by cutting off the corners of square blanks. At this stage, the master finally decides on the position of the future creation, plasticity and dynamics.
No clarification or detailing is carried out at this stage.
- Rounding and detailing involve getting rid of edges, working out small details and facial lines. At this stage, it would be convenient to draw pencil drawings on the tree, but this would be a mistake that should not be made. Pencil marks are difficult to remove and often leave dark marks behind.
- Sanding is best done using corundum paper with a fabric backing. Fine or medium grain size is selected individually.
- All that remains is to cover the finished product with a protective layer. This can be varnish, stain or various paints. Here, unlimited possibilities open up for the master.
Sketch
If you have an artistic education, and you imagine your future sculpture in detail, then you can limit yourself to a sketch in two projections. But if the figure is complex, and its spatial visualization requires analysis, then you will have to make a model (almost always without detail).
If the future animal, human figurine or abstract figure requires a complete analysis, then a detailed sketch is made with detail and even elaborate chiaroscuro. Then, based on this sketch, you need to sculpt a model: it is needed to clarify the sketch and construct a diagram in two or even three projections.
Experienced craftsmen working with a simple form can get down to business even without a sketch, immediately by marking the wood. There are works that are easier to immediately cut out than to draw.
In most cases, you will have to sculpt a figure from plasticine or clay on a wire frame. Using stacks, a three-dimensional model is created, which will become a guide for the wizard’s further actions. It is obvious that without understanding composition, light and shadow, and the basics of modeling, it is almost impossible to take on wooden sculpture as a form of creativity: artistic training as the basis of the craft is very necessary.
Decorative figures made of polyurethane foam
Construction foam does not make the most presentable work, but you can still please children with figures, especially if after construction there are several foam cylinders left and there is nowhere to use them.
Inventory
You will need foam, a knife (preferably a stationery knife) and paint. Everything else depends on your imagination. Maybe it will be a figure that needs to be dressed or decorated with something extra.
“Snail”: step-by-step instructions
We offer a master class on making a large snail from foam. Prepare a can of foam, a liter plastic bottle, a utility knife, a plastic bucket and paints for external work. Cover the work surface with oilcloth. Next, proceed according to the scheme:
- Make the base of the snail into an oval shape with foam. After 10 minutes, apply a second coat. Insert an empty vial or bottle as a neck.
- Cover the “neck” with foam and create the outline of the head. Wait for it to dry.
- Use a utility knife to give the base of the snail a smooth outline. Decorate the horns and muzzle.
- Now let's move on to creating our snail's house. Place the foam in a mound and place a bucket in it, which is also covered with foam around the edges. Wait for it to dry.
- Use a utility knife to form shell curls.
- The foam sculpture is almost ready!
After drying, cover the figure with paint and furniture varnish. Fill the bucket with substrate and plant flowers.
Performing sculpture
Work begins with preparation. Carving a figurine on wood, a future sculpture, is the right choice of material and its preparation for processing. The next step is to create a sketch, as described above.
Further actions:
- Rough processing with a selection of basic shapes - at this stage, the initial sketch is reduced to a geometric figure of straight lines with control points. The projection with the maximum removal of material is cut out first, then the symmetry lines of the workpiece are restored, after which the outline of the second projection is constructed.
- Cutting out a figure on 4 sides - a refined outline of the figure is cut out along the front and back, as well as side faces. A common mistake at this stage is the master’s desire to round the figure. No, as long as its outline remains generalized.
- Cutting on 8 sides. The corners of square blanks are cut off, which forms 4 more edges. The position of the figure, its plasticity and dynamics are finally clarified. Error stage - clarification and detailing.
- Rounding and detailing. Finally, the time has come to get rid of the edges and work out the small details and facial features. Stage mistake - drawing on the workpiece (dirt from the pencil is difficult to remove later).
- Sanding. Corundum paper on a fabric basis, fine or medium grain, will do an excellent job with it.
The stages of creating a three-dimensional wooden sculpture are well explained in this video.
Do not rush to transfer the finished product to the garden - the sculpture must be covered with a protective layer. By the way, it is believed that the finished sculpture should be left in the shade for about a year, and only after a year can it be placed in a permanent sunny place.
Decorating the garden with tires
Do you think that decorating a garden with car tires is bad manners? But no! Take a look at these works of art and you will change your mind. True, not everyone can do this, but creative people are capable of this, if only they had patience and inspiration.
We will teach you how to make simpler figures, but anyone can make such products.
What will you need?
First of all, you will need to take car tires (tires) that have already served their purpose. Winter, summer, studded, universal tires, from a car or truck - it doesn’t matter.
You can even make a swimming pool out of a large tractor wheel. And small but very interesting designs are made from old bicycle tires. Tires from wheels from a car or a children's bicycle will also find their use.
You can cut tires with a grinder (the thickest ones), with a sharp knife, but best of all, with a jigsaw. Fasten with self-tapping screws, bolts, staples - it all depends on your tools, experience and the type of figure chosen.
"Swan": step-by-step instructions
A tire swan is one of the easiest figures to make yourself.
You will need for work:
- tire (one tire per swan);
- electric jigsaw or other sawing tool;
- wire for frame;
- chalk;
- colors - red for the beak and black/white for the eyes and plumage.
Manufacturing scheme:
Procedure:
- Using chalk or a white rubber marker, draw a sketch on the tire. You can work even without a stencil - apply the pattern directly to the tire.
- Cut along the contour with a jigsaw to get the outline of the swan's body in a spread, as shown in the picture above.
- Turn the tenderloin wings side up.
- Insert a wire frame into the body to help the swan hold its shape.
- The swan's beak should be red. If desired, paint the body white. Choose paint for exterior use. Dry the product.
- You can also use a tire as a stand.
The process of creating a swan from a tire with your own hands is shown in the video below:
Painting the sculpture
Painting is carried out only on dry wood. This means that for some time (at least a week) the figure should stand without finishing. And it is advisable that before painting the sculpture is already covered with primer, which closes the pores of the wood. Before painting, it is enough to dry only the top layers. If you prime the wood and then paint it with alkyd paints, the sculpture will be less likely to crack.
It is better to paint and varnish a sculpture for a garden, or prime it well and cover it with stain. For carved figurines for the home, paints are needed less often, but you can make the figurine colored: if you subsequently coat it with varnish, then virtually any paint can be used. For example, acrylic compounds are often used today.
Wooden figurines for children are often painted with regular gouache and coated with high-quality varnish (glossy, for furniture). The most environmentally friendly toy will be one coated with linseed oil.
Make a figurine yourself? Why not, it just takes a fair bit of preparation. Start with small toys based on preliminary drawings and sketches, so you will understand whether wood carving, miniature sculpture and all the intricacies of this craft attract you.
Other interesting ideas from scrap materials
Let's look at a few more ideas for making figurines for garden decoration from simple scrap materials.
Pebble figurines
All you need is pebbles and paints. Select stones of different sizes, degrease them and coat them with paint, following the color scheme of the ladybug - in a black and red palette. The designs can be anything from cats to entire paintings: such stones always look stylish and appropriate.
Vegetable sculptures for Halloween
The most short-lived, but such a bright and seasonal option for decorating your own garden.
It’s a good idea to spend part of the pumpkin harvest preparing for Halloween and carving fancy creatures out of them. The most popular figure is the Jack-O-Lantern. What you need: pumpkin, knife, candle.
Instructions:
- Wash the pumpkin thoroughly and rub with a soft cloth until shiny.
- Cut off the top and remove the seeds with pulp. Don't throw away the hat with the ponytail - it will come in handy.
- Using a marker, draw holes - mouth, nose, eyes.
- Use a knife to cut holes along the outline.
- Place the candle inside the pumpkin, set it on fire and cover the melon with a “lid”. Jack Lantern is ready!
You can create absolutely any face from a pumpkin.
Ice sculptures
During the cold season, it’s easy to decorate your yard with more than just a snowman! Make spectacular ice balls.
You need balloons, empty bottles, water, a funnel, food coloring (experienced craftsmen suggest gouache) ... well, you need frost. If you have a freezer, freeze in it, and when there are severe frosts outside the window, about -20, feel free to use natural temperatures.
It is better to make balls with a diameter of 10-15 cm per 1.5 liters, because large 3-liter balls may not withstand frost and burst (although then you will get hemispheres, which are also useful).
Manufacturing process:
- Dissolve a standard jar of gouache from a regular children's paint set in 0.5 liters of water. This way you will get a bright concentrate.
- Pour the solution through the funnel into the ball “to the brim.”
- Place the ball on the water tap and get the required amount of water if there is not enough water.
- Tie the ball and freeze it. If there are a lot of balls, it is better to freeze them in their natural environment - by spreading the balls in the snow.
- Leave it overnight. In the morning, remove the “wrapper” and decorate the area with balloons!
If there are no paints, then inside the balls you can put glitter, New Year's tinsel, dried flower petals, berries and fruit slices, spruce branches and small cones, and grain. Fill the balloons with water and freeze. You can also use medical gloves, silicone muffin tins, plastic cups, etc. instead of balls.
Advice from the experts
Mastering figured wood carving is a complex but fascinating process. For beginning craftsmen, we have collected expert advice that will help in this difficult task.
- Sculptural carving in wood requires a good command of all other types of woodworking. All these skills will be useful during work.
- The master must clearly imagine the result, outline all the details of the future figure and see it in all projections. Therefore, you need to create models, and from them transfer the idea to the tree.
- During processing or drying, cracks may appear on the product . No one is immune from this. To seal a crack, you need to make an impression, prepare a plug suitable in shape and size, and insert it along the contour. Small cracks can be filled with clear varnish.
- You need to work with wood carefully and carefully . With strong pressure, large cracks may appear, which will ruin the entire work.
Wood carving is presented in the video below.