In the modern world with an abundance of technological innovations and innovations, communications via the Internet and the ability to learn all the news in real time, designs such as mailboxes remain relevant. Looking at a photo of a mailbox with an exclusive and unusual shape, with a bright and attractive decor, made from all kinds of materials, you can choose the best idea for arranging a summer cottage and decorating the local area.
What to consider when choosing an idea for creating a useful craft
Often, a mailbox is placed outside the yard and is necessary for timely receipt of mail; decorative structures can be used to decorate the courtyard or complement the landscape design composition, and it is important to take into account the following factors:
- correspondence between the style of the box design and the design of the local area;
- a set of performance characteristics of the materials used for its manufacture;
- ease of access to the interior of the mailbox and ease of installation.
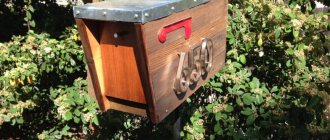
Decorative mailboxes can be used as universal storage systems, providing an increased level of moisture insulation; stylish and beautiful designs help to emphasize the overall style of the site’s design and become its bright accent.
Made of metal
This design is the most durable and durable, but it is much more difficult to make. To do this, you will need minimal skills in processing metal structures. So, to build such a product you need to prepare the following tools:
- a metal sheet;
- Bulgarian;
- jigsaw or saw;
- welding machine;
- anti-corrosion impregnation;
- dye.
The workflow looks like this:
- The first step is to take a sheet of metal and cut a piece of it measuring 23x23. Next, using a saw, we remove any snags and roughness from the edges. This fragment will serve to construct the upper arch and side walls.
Metal mailbox diagram
- Next you need to make the bottom. The shape of this fragment is an even rectangle. The dimensions should be 9x21.
- Then we bend the top cover to create an arch shape. To do this, you can use any durable rounded object - for example, a large diameter pipe, a barrel, etc.
Bend the sheet into an arched shape
- After this, you need to attach the lid to the lower fragment. Make a ¾ bend on the bottom sides of the top rounded part at a 90 degree angle.
- We take the lower fragment and place it inside the arch. Using spot welding, we solder both elements to each other.
Bend the edges of the sheet and weld
- Now it's time to make the back of the box. Trace the panel on a piece of paper with a pencil. Add another ¾ to the drawing. This gap will be needed so that the part can be bent on the sides.
- We weld the bent ends to the back side of the panel in the same way as the previous soldering process.
- The front of the box will be almost the same as the back wall. However, it must be provided with a hinge to open and close the sash.
- Finally, we treat the assembled structure with a special anti-corrosion compound and paint it in the desired shade.
Cover the box with an anti-corrosion compound
An American mailbox will require more effort to operate, but will be stronger and more durable
The best materials and their properties
To install a beautiful mailbox on a summer cottage or in a private house, you don’t have to buy a ready-made structure; you can make it yourself using various materials and selected ideas, be sure to take into account the advice of the experts:
- wood must be treated with an antiseptic to prevent destruction and rotting;
- metal and forged products are coated with a layer of paint to preserve their attractive appearance;
- The plastic of the mailbox requires periodic care and cleaning, which prolongs its service life.
To simplify the process of manufacturing a practical product, you can use not individual materials, but ready-made designs; they can be decorated and converted into mailboxes, decorating it in a certain style.
Manufacturing Instructions
You can make and install a mailbox for a private home with your own hands from metal or wood. But the technological process of each option differs in complexity. In order for the result to be not only strong, but also a reliable storage for letters and newspapers, in the process of developing your own drawing or processing a ready-made one, you need to adhere to the following rules:
- To assemble a mailbox from wood, additionally buy metal corners. Due to them, they increase the strength of the box and simplify its repair if necessary.
- The placement of the door for removing letters is a complex issue - much depends on the overall design of the box. For traditional boxing, it is better to choose a hinged bottom. It is convenient to remove letters through such a hatch, but it is better to immediately expose the bag or hands.
- The slot for correspondence, regardless of its location, must be covered from precipitation with a visor. Even in the holes on the side of the box, drops or snowflakes will fall into the holes in a strong wind.
- A lock on the mailbox is only needed in cases of outdoor placement. When making it yourself, it is better to choose the mortise option. A padlock is useless - they often get torn off.
Attention!
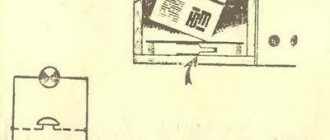
Some craftsmen, for their own convenience, implement an alarm system into a street mailbox - they install photos and LEDs on different walls and connect them to a light bulb in the house. If a letter blocks the light, the warning light lights up.
Tools and materials
Before starting work on making your own correspondence box, you need to first prepare materials and tools. Depending on the choice - metal, wood or masonry, the set of fixtures will differ. Example - for a free-standing cabinet in the English style, all you need is brick, mortar and a trowel. For a standard wooden mailbox you need the following set:
- screwdriver or screwdriver;
- jigsaw;
- hacksaw;
- drill;
- vice;
- clamp;
- wood screws (length up to 10 mm);
- sandpaper or fine-grain paper;
- anti-corrosion impregnation for wood;
- paint or varnish for exterior use;
- epoxy glue for wood (polyester resin);
- small lock for mortise;
- stainless steel hinges (card, heel or piano);
- block 7.5*5 cm, length from 1 m;
- thin (3 mm) plywood or veneer – 65*65 cm;
- plywood 9 mm – 65*43 cm.
Wooden blocks and plywood sheets must be carefully inspected before purchasing - there should be no knots. You can choose any type of wood - just go to a hardware store and buy the pieces of lumber you need. Self-tapping screws are selected according to the slots in the hinges - only the thickness of the plywood is taken into account. Additionally, you can take a clamp to attach the finished box to a pole - it is fixed on the back wall when installed in a permanent place.
Stylistics and design of the box
Having chosen the appropriate style for arranging the local area, it is important that it is repeated in the decor of the post office structure, which guarantees the creation of a harmonious and aesthetically emphasized landscape design arrangement.
The products are characterized by country and Provence styles, traditional design will complement the loft or rustic style, and original and practical boxes with an exclusive design are perfect for a modern cottage and home.
Additional decor that can be used for decoration
A wooden and plastic mailbox can be decorated with hand-created and effective decor, voluminous compositions made independently, using waste materials, plastic bottles or bottle caps.
Practical decorations include small flower beds laid out on mailboxes; be sure to think in advance about how the postman or owner will open and close the structure without damaging the delivered mail, newspapers and magazines.
Types of structures
The idea of a mailbox as a closed metal or wooden box hanging on a wall, door or gate is very outdated.
Of course, privacy and the need to secure content are still important, but these goals are achieved in different ways.
- The box may have a door at the front or a hinged flap at the bottom or top; it can be hinged, built-in, mounted on a special podium or rod.
- The American tradition offers boxes with a rounded top, fixed on a special support. Correspondence is placed in them horizontally, rolled up (except for envelopes).
- The English version is a welded metal or brick cabinet or house model. They are quite convenient due to their strength and durability.
Based on these traditional options, it is worth developing your own exclusive design design.
Original ideas and available materials
In addition to traditional wood materials, metal and plastic, all sorts of containers can be used under the mailbox, having previously used all kinds of decor and finishing materials to decorate them.
Such products are distinguished by a recognizable design, but fit perfectly into the overall and conceptual composition of the landscape composition, matching practical and aesthetic functions, which is important for owners of beautiful and attractive homes.
Advantages of plastic
Plastic boxes, bottles, buckets can be stored for up to 100 years. This is practically one of the longest decomposing materials. Other advantages:
- wipes off dust easily;
- the material does not break;
- accessibility for everyone;
- does not get wet;
- not afraid of frost;
- does not pose a risk of injury (in case of cutting and assembling the product);
- any paints can be applied to the surface.
What the material is afraid of is strong compression pressure. The bottle may become wrinkled. Prolonged thermal exposure can melt plastic.
School bag or backpack
An unusual and stylish mailbox in a country house can be made from an old satchel; to do this, just cover it with paint and varnish and securely fasten it to the fence; you can decorate the structure with an abstract or original design.
When decorating a mailbox with your own hands, you can use all kinds of materials and create amazing compositions that will appeal to neighbors and household members; such unusual boxes will decorate the area and emphasize the individuality of the composition.
Mounting options
There are different ways to install a mailbox. For example, American samples are made free-standing, on the edge of the site with their own support. The traditional format for the CIS countries is to fix the correspondence box on the wall, but in some cases you can see boxes on dedicated poles. The following options for installing a mailbox are common:
- Mounting on a gate or wicket. This method can be considered simplified - the box is fixed with bolts from the inside or outside. If the box remains outdoors, then it is not necessary to make a cut in the canvas - you just need to prepare the attachment points.
- On the fence. Depending on the type of fence, it needs to be installed in different ways. If it is a metal sheet, then the same as for the gate, and if it is a picket fence, use strong steel wire (wire rod). In the second case, fastenings are made or holes are drilled on the back wall of the box.
- Mounting to masonry. The mailbox can only be mounted on a wall or fence made of brick (cinder block) using anchor bolts and dowels. The method and strength of fastening depends on the thickness and fragility of the wall material.
For separated mailboxes, a post is simply dug in and mounted on a clamp or welded. When the door opens directly onto the street, you can consider options with a box inserted directly into the door leaf, with the ability to pick up correspondence from the inside. If the hole is slit-like and the mail box is hidden, then it needs to be provided with a protective visor and highlighted - painted in a contrasting color or made with a bright inscription with a pointer.