A garden bench is not just a structure that allows you to sit down and relax while enjoying the surrounding nature, but also an element of landscape design that complements your garden plot. Of course, you can buy ready-made benches, but it’s much more interesting to make it yourself. Wooden structures are very popular, because they do not require special skills and equipment, the benches are light and mobile. However, if you want to create a truly durable and beautiful structure, then it is better to pay attention to metal benches, which will captivate with their appearance and original design.
Advantages of a metal bench
- The metal structure is able to evenly distribute the load, unlike the models presented above. Withstands constant and variable loads. This is considered its main advantage.
- The backrest can be attached in different ways, the main thing is that all actions meet certain requirements. In addition, in the event of a sudden defect, you do not have to worry about further suitability for use. Even in such conditions, the structure is capable of fulfilling its purposes.
- In addition, there is the opportunity to “swing” in terms of creating a design. But do not forget that in every device, sooner or later, shortcomings can be discovered. Here they are expressed in large dimensions and low complexity in reproducing the design.
- The manufacturing process requires a minimal amount of material. All you need to buy is a solid board, metal sides and a support piece. Its thickness should be 40 millimeters and its length up to two meters. As for the width, the desired figure is no more than 45 mm; the use of metal fasteners cannot be neglected.
Design features and options
Regardless of the material used, the mechanism for transforming such a bench is the same: the wide seat is divided lengthwise into two narrow benches, they slide apart, and the back turns over and turns into a tabletop. The reverse transformation is just as simple - when the benches are moved, the tabletop turns and becomes the back of a comfortable garden bench.
The peculiarity and advantage of this design is that it does not have complex mechanisms, and 4 simple hinge joints are responsible for the shift and rotation - 2 on each side. Before making a transforming bench, you need to think about how to make such nodes. These can be regular bolted connections with locknuts or clamps with studs.
This photo clearly shows the moving joints Source dg-home.ru
When making transformable furniture, accuracy and precision are one of the most important conditions. All parts in it must have dimensions, angles and radii strictly defined by the design, otherwise when moving they will jam, touch each other, and not fall into place, thereby making the structure unstable and unreliable. Or simply inoperative. Therefore, if you lack design skills, you should not invent something yourself. On the Internet and specialized literature there are ready-made projects on how to make a transformer bench with your own hands, drawings from which can be used, modifying and changing them if necessary.
However, it is better to leave the supporting part unchanged so as not to affect the load-bearing capacity of the product. It will not suffer if you increase the width of the bench or the length of the table top, especially if you add additional jumpers for strength. But even here it is advisable to know when to stop and not make the total length of the transformer more than 2 meters. This will increase the load on the hinges and make the furniture too heavy.
Since you want to make a transforming bench with your own hands that is not only comfortable and beautiful, but also fits well into the surrounding exterior, experiments with its design are also allowed: using other materials for seats and backs instead of boards, adding carved or forged elements to the design, etc. .
The canopy will make the bench even more comfortable Source ytimg.com
See also: Catalog of companies that specialize in garden furniture
Metal bench - bed
There are free bench plans to help you build a bench for any room in your home or outdoor patio or deck. When you're finished, you'll have a high-quality bench that will cost you less than a store-bought one.
The free plans contain everything you need to plan and complete your metal bench plans. Drawings, step-by-step instructions, cut lists, materials lists and diagrams will guide you through this beginner metalworking project.
You can build a garden bench made of metal, with or without a backrest. The bench is constructed from metal and various types of wood, some painted and others not. With all these options, find the perfect bench plan for your home.
The built bench can be used to store shoes. This storage bench has been designed to easily accommodate four large storage drawers. This adds plenty of storage space for shoes, hats and gloves, sports equipment and anything else the family needs quick access to.
This bench can be used alone or together with a dining table, farm table or picnic table.
What you need to have for work
Of course, desire comes first, but in addition to it, you need to prepare tools and equipment. We will give practical advice on nomenclature, while we will try to use the minimum and most budget-friendly set.
Table 2. Tools for making a bench.
| Tool name | Technical characteristics and purpose |
| angle grinder | A very popular tool in any household, it is used for grinding hard-to-reach places, cleaning and grinding various materials and products made from them. Popularly called a grinder. For an angle grinder, you need to have a set of accessories: diamond discs for cutting, abrasive wheels of various thicknesses for grinding metal, brushes for cleaning rust, special rubber wheels with a set of emery cloths. This tool is mandatory, without it it is impossible to make metal benches. |
| Drill | Also available in all tool sets. For this you need to have several sets of high-quality drills for metal, concrete and wood. If you do handicrafts often, then you need to buy special drills for drilling complex holes with different diameters and depths in one pass. |
| Bending machine | If almost everyone has the first two tools, then only real masters have this machine. You can buy it ready-made, which will be quite expensive, or make it yourself. The first option is suitable for professional craftsmen, for whom making various objects with their own hands is not a hobby, but a full-time job. For amateurs, it is enough to have a simple homemade device; if desired, it can be done within one day. |
| Welding machine | Today there are quite cheap, reliable and economical semiconductor devices available. They are easy and safe to work with and produce excellent quality seams. Many people have such a unit; it is not worth buying it to make one bench. You can borrow from friends or rent. If you plan to increase the volume of welding work, you will have to purchase your own equipment. |
There is no need to list measuring tools, screwdrivers, pliers and other small items.
Required Tools
- saw (for cutting wood if it is too long);
- screws;
- roulette;
- manual grinding machine;
- pencil;
- eye and ear protection.
Assembly instructions
Select bench legs and buy a piece of wood for the seat. A quick search online will help you find a place near you that sells the seat! When it comes to bench supports, opt for thick steel legs. You can find a store and order legs with the exact width and height! Attach the legs to the wooden board using furniture screws. To do this, you will have to drill holes in the metal legs and in the board.
After the bench is ready, the wood can be stained with a color stain (there is a wide choice available). The metal legs should be coated with black paint.
Note!
Blinds for gazebos: wooden, metal, bamboo. Instructions for installing blinds yourself
Adding a terrace to your house with your own hands: step-by-step instructions on how to easily and quickly add a veranda or terrace (100 design photos)
How to attach a veranda to your house with your own hands - step-by-step instructions from A to Z + photos of new designs
Instructions if you decide to make a bench without buying ready-made legs:
- It is better to take square pipes and cut them according to the drawings or personal preferences. You should consider who the bench is being created for (for a family with children, only for adults, for tall people, for very overweight relatives).
- Solder the pipes: two large squares serve as bench legs and armrests. A long pipe is soldered between them, onto which a wooden board for sitting will be attached.
- Solder the back of a square pipe (in the shape of a rectangle, plank or other shape) to the squares.
- Screw the board to the seat and cover it with colored stain.
- Paint the metal parts of the bench with black paint. All!
Video description
In the following video, the master shows in great detail the process of making folding garden furniture on a metal frame from bent elements, indicating all the dimensions and methods of connection:
If you calculate the cost of such a bench, made by yourself, and compare it with the price of similar products sold on construction markets and through Internet, then it will be almost three times lower. The benefits are tangible, and you can choose the most suitable design for yourself, rather than buying what is on sale.
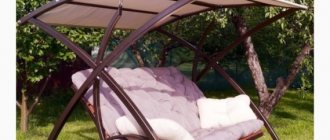
Hanging bench for rest
It looks like there is a hook screwed into the ceiling. On it hangs a bench suspended from ropes. If your vision of the perfect summer involves sitting on the porch with a cold lemonade and a good book, you'll want to add a fun hanging relaxing bench to the equation. With just a few metal pipes, canvas fabric, strong rope, and a support hook, you can build this stylish rocking bench in no time. It's the perfect place to relax in the summer, read magazines and sip lemonade.
What you need:
- 3 metal pipes 1.5 meters long and about 10 cm wide;
- two wooden sticks 5 cm wide and 1.5 meters long;
- rope (make sure the weight limit is at least 300 kg);
- hook (make sure the weight limit is at least 300kg);
- canvas, which is used as a seat;
- drill;
- tape measures, scissors.
How to do it:
- Cut five metal pipes 1.5 meters long and about 10cm wide. If you want more color contrast from the canvas, paint all five metal pipes.
- Cut a piece of thick fabric measuring 2 x 1.3 meters. Fold the shorter edge of the fabric over and stitch so that you can thread the pipe through. Do the same on the other side of the short edge of the fabric. Thread the two tubes into the fabric (at the short edges). You should have a seat: fabric with pipes inserted along the short edges (one pipe from each edge 1.3 meters). Now, for the stability of the structure, we thread two more wooden pipes perpendicularly into the metal pipes. To do this, you need to make holes in the metal pipes, stepping back 10 cm from the edge. We insert a wooden stick into these holes from the left side. We screw it to a metal rod. Now do the same on the right side. The seat is ready. At the top and bottom there are metal pipes threaded through fabric, and on the sides there are wooden sticks for stability of the structure. Now the seat needs to be hung.
- Drive a metal hook into the ceiling.
- Hang the rope in the hook: thread the 6 meter rope in the middle into the hook. The ends should be 3 meters on each side.
- Tie a third metal stick under the hook: tie ropes down from the hook at the ends of the stick. Place the ropes down and hang the top of the seat around the edges.
- Tie the lower part of the seat on each side to the third stick under the hook. All is ready. The bench is ready.
- Trim the excess rope (you can leave some rope hanging again if you like). The ends of the hanging rope can be unraveled and fluffed for decoration.
Selection of construction raw materials
The main material required for the manufacture of a metal bench is profile pipes. They can have any shape, but the bench frame is best made from profiles with a square or rectangular cross-section. Pipes with flat outlines can be easily connected to any parts. It is desirable that metal profiles be cast from carbon or low-alloy steel - the most durable raw materials.
Square pipes are a suitable material for creating a bench.
In addition to pipes, the materials for creating a bench are:
- timber beams with dimensions 50x80 mm, from which the back and seat are constructed;
- screws having a diameter of 7 +/- 1 mm and a length of about 10 cm;
- self-tapping screws fixing wooden elements;
- enamel and primer that protect metal products from rusting;
- antiseptic composition;
- finishing agent for wood and metal (for example, varnish and paint).
A woman can make a bench out of metal
The goal is to independently build a collapsible metal bench.
Instructions:
- Draw the bench we want.
- We order a forged base (seat, back, armrests). The base should look like part of a collapsible wrought-iron bed. You can buy ready-made forged sidewalls with drilled holes for the seat. When purchasing, you should consider the length of the bench. For long benches, you should buy more than two supports.
- We fold the bench.
- We sew the seat for the bench ourselves or buy a ready-made mattress. The seat filler can be sawdust scented with lemon oil.
The bench is ready!
Note!
Do-it-yourself columnar foundation for a gazebo: detailed instructions from A to Z + photo
DIY economy class garden gazebo - instructions on how to build quickly and cheaply. Photos, diagrams, drawings, layout and design
Do-it-yourself garden path using a mold: a review of original and inexpensive ideas + step-by-step instructions with photos
Benefits of the bench:
- soft seat, unlike wooden benches;
- collapsible bench (for the winter you can assemble and hide the entire bench).