Garden swings at the dacha or in the garden add variety to the relaxation of home owners. This relatively simple design pleases not only children, but also adults, who happily spend their free time on them, swinging in the fresh air. There are many ready-made options on the market - both simple and original, but if you look at the drawings of a garden swing made of metal, you can make them yourself. The main thing here is to familiarize yourself with the basic subtleties of the process and adhere to the manufacturing technology.
Features of metal models
The metal structure is the most durable.
The following structures can be distinguished by frame type:
- welded or stationary, where the elements are secured by welding;
- collapsible - this design is easy to disassemble and move to any place.
According to the supporting configurations there are:
- A-frame support. Consists of two logs connected at the top. The crossbars are connected by a jumper to give the frame rigidity.
- U-shaped frame. The support pipes are connected to the crossbar in the shape of the letter “P”. It is the simplest to construct. To make the structure more stable, it is necessary to bury the pipes and fill them with concrete mortar.
The stationary swing is installed on a foundation; strong wooden beams are used for the structure.
A hanging swing is a simple design that consists of a double or single seat suspended by cables, chains or ropes from a crossbar or tree.
Preparation
To make a swing you will need tools:
- welding unit;
- level;
- Bulgarian;
- hammer;
- vice;
- saw;
- roulette;
- shovel.
Building materials required:
- metal pipes;
- steel corner;
- bearings;
- cement;
- tree;
- dye;
- sand;
- crushed stone
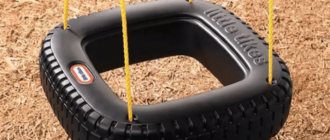
But not all swings require such preparation - hanging ones can simply be attached to a strong branch of a large tree Source pinterest.ru
Instructions for work:
Markings are made in the selected area. Using a garden drill, make four holes in the ground. Supports are installed in them. Particular attention is paid to this stage; the safety of the entire structure completely depends on the strength and reliability of the frame.
A grinder is used to make pipe blanks of the required sizes: side posts - 4 pcs., for the crossbar - 1 pc., for stiffening lines - 2 pcs. All parts need to be processed, bumps removed and sharp edges cleaned.
The swing stands are welded to the base itself, and a crossbar is placed at the top.
Two triangle-shaped posts are attached to a large rectangular base Source pinterest.com
The base is carefully covered with crushed stone and filled with concrete. The cement should harden within five days.
After this, brackets for the moving mechanism are installed on the crossbar.
It is better to make the seat from wood; sanded timber is suitable. The base is made of metal.
The chair must be secured on four sides; it is installed on suspensions.
The entire completed structure is reliably protected from moisture using paint.
You can make a visor and stretch strong fabric over the frame.
See also: Catalog of companies that specialize in garden furniture.
Swing drawings
Currently, on the Internet you can find a large number of design drawings for metal swings.
You can make a metal swing portable or stationary.
For children's games, you can equip a special playground at your summer cottage.
Portable swing
When mounting and installing a portable swing, 4 reinforcement pins are used to secure the legs. The ends of the pins can be easily bent with a vice to ensure that the swing is stable and prevents it from tipping over.
When installing such a swing, the pins are driven into the ground, and if they need to be moved to another place, they are simply pulled out of the ground.
Garden swings are welded for safety, and gussets are welded at the joints. Gussets are metal triangles that are welded at the corners of the connection between the crossbar and the supports.
They ensure the rigidity and reliability of the swing design. Portable swings are also very convenient because they can be put away for the winter so that they do not rust from the snow.
Stationary swing
They are convenient to use on areas that have a large area.
According to safety rules, when operating a swing, there should be about two to three meters of space behind and in front of the structure.
22fc6df727a5bdcf5ec654080abc2ba2.jpe
Helpful advice! After you install the swing, you must paint it with any metal paint. This will make your swing more attractive and protect it from rust.
Pros and cons of products
First of all, let’s look at the positive aspects of homemade products:
- designs can be made unique, which will add harmony and comfort to your summer cottage,
- a handmade product costs much less than in a store.
- metal swings are durable,
However, there are also disadvantages:
- the metal frame is quite rigid, so you should be wary of possible injuries and bruises;
- To avoid corrosion, special treatment of the material is required.
One of the most reliable materials is a metal profile pipe.
It has the following advantages:
- high resistance to mechanical damage;
- the quality corresponds to the profile of the casting, while this material is much more affordable;
- not subject to corrosion after special treatment.
- long-term use;
These are the main advantages of a metal profile pipe, but there are no ideal materials, so there are also disadvantages:
- difficult to fold;
- it is mandatory to use paints and varnishes or galvanization; without this, ferrous metal is susceptible to rust and destruction.
Do-it-yourself swing from a profile pipe
To create a swing for a summer house with your own hands from metal, you need to provide the following components:
- quadrangular frame (it should become a load-bearing frame in the finished swing);
- A-shaped sidewall. It is made by welding several crossbars;
- one long tube. It will become the basis for attaching the swinging bench.
A cover of this design can be plastic, wood or canvas. PHOTO: sadovyrai.ru
Next, you need to act according to the step-by-step algorithm.
How to make a swing with your own hands from metal
The process of installing a swing for a garden with your own hands consists of the following steps.
- Using a grinder, we cut the material into separate fragments. To do this, you need to have a preliminary diagram according to which you can make blanks in accordance with the dimensions.
- We sand the boards using a special machine or manually using emery.
- We connect all the necessary parts together using special fasteners, bolts or welding seams.
- We dig 4 holes in the ground, install a metal swing for the cottage and fill it with concrete. Next we paint the structure.
The design and design of the product can be anything. The more complex the frame design, the longer the swing will take to create. PHOTO: krainamaystriv.com
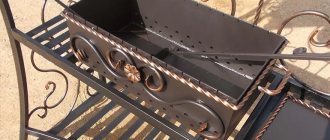
As a result, you get an individual forged swing for the garden. For such a product it is necessary to have a preliminary diagram indicating all dimensions.
Bench swing
This is a rather complex and painstaking option, but the finished swing is very beautiful and elegant. It is perfect for adults because it is more spacious and can withstand more weight.
You will need:
About 0.2 cubic meters of wood for the frame and bench, hooks, brackets, slats, bolts and nuts, chain.
How to do it:
First, select a suitable drawing - they are quite the same type, so choose by size. All boards must be cut, cleaned and treated with a special primer. You will need bars of different thicknesses - it’s easier to see in more detail in the video.
First of all, assemble the frame with the crossbar and cut off all the excess, and then assemble the bench with the back. The chain is inserted into wooden washers, which need to be cut out separately. Before assembly, sand and paint all parts with special paint for wood.
Sofa swing for a summer residence
Country sofa swings are in great demand. If it is not possible to buy them, then they try to make them themselves. Metal options are highly durable. And if it is also properly processed, it will not be afraid of moisture.
Tools and materials for manufacturing
For production you will need metal profiles, a welding machine and seating material. Typically, wood is used for such purposes. In addition, you will also need material for the roof. Those who plan to use polycarbonate should know that it is quite hot under it in sunny weather, and it is not practical during hail (the material begins to crack). It is ideal to take a tension awning.
How to make a garden swing with your own hands from metal: instructions with photos
Let's start following the instructions for assembling the garden swing.
| Illustration | Description of action |
| We weld the frame. You can take your own sizes. It all depends on how much material you have. As a result, you should get a base like the one in the photo. | |
| We weld the frame for the swing to which the sofa will be attached. Next, we bend the arcs from the metal profile. They will play the role of armrests | |
| We hang the finished part on carabiners. Next we prepare the tree | |
| The finished version should look like this. The swing folds out into a sofa. The upper part of the frame is attached to the frame using strong chains. All metal parts must be primed and then painted |
To make the bed soft, it can be covered with a special fabric or periodically laid on top of a mattress and pillows for relaxation.
Dear readers, if you do not understand enough about the question of how to make a garden swing with your own hands, do not hesitate to ask questions and share your opinion. Our team will definitely contact you as soon as possible.
df229d53ba1e4c70efa4a4ca0e2d3f45.jpe 4e6b3aed843bfeb2b8188c66d060b0a7.jpe
Hammock swing
The hammock swing essentially resembles a cocoon and is made in the same way on a ring. It only takes a few hours and you don't have to drill, saw or bend pipes.
You will need:
Metal ring with a diameter of 1 m, thick strong fabric, a roll of wide belt, padding polyester.
How to do:
Tie the ring with padding polyester so that it is softer and does not put pressure on the back, and with a cloth. Cut a circle from fabric for seating with allowances of 20 cm to form a dome. The video shows how to decorate a ring as beautifully as possible so that it is as inconspicuous as possible. Attach the belt to large carabiners, and to change the length use regular adjusters from old backpacks.
Garden swing with supports
What do you need
- Beam 100 × 100 mm;
- timber 50 × 50 mm;
- galvanized chain;
- board 25 × 100 mm;
- bolts;
- mounting plates;
- screws;
- sanding paper;
- hacksaw;
- jigsaw;
- roulette;
- pencil.
How to do
Photo: YouTube channel “Mikhail .MD. Deryvedmid"
1. Cut four racks with a height of 195 cm from 100 × 100 mm timber.
2. Assemble two supports in the shape of the letter “A” with upper and lower jibs from 50 × 50 mm timber. Drill through the parts and connect with bolts.
3. Cut a 1.8 m long cross member from a 100 × 100 mm beam and secure it to the upper supports of the racks, tightening them with bolts.
4. Cut six boards 120 cm long: three for the back and three more for the seat.
5. If desired, cut out a pattern on the top board of the backrest with a jigsaw. Sand everything well with sandpaper.
6. Attach three boards with screws to pieces of 50 × 50 mm timber - this will be the seat.
Do the same for the back and join the two pieces together at the desired angle.
7. Cut out armrests from two boards and attach them with screws through the beam to the seat and back.
8. Drill holes in the beam for the bolts and install them through the chain link. Secure it on top with a nut, and to prevent it from falling into the wood, place a metal plate or washer of large diameter.
9. Make holes in the seat beams, insert bolts into them and secure the ends of the chains.
10. Adjust the length of the hangers to the desired position.
What can be changed
- For greater strength, you can add another cross beam along the bottom of the rear of the supports.
- If desired, build a canopy made of polycarbonate or tarpaulin to protect from the sun and precipitation.
Children under 6 years old
Children are lightweight, which allows you to create a swing that is simple in design. At the same time, do not forget about the correct level of security, which should be as high as possible. For such a swing, a pipe with a diameter of more than 50 mm is suitable. Before you begin assembly, you should take care to draw up a detailed drawing.
In this case, an L-shaped structure with a height of 1.5 to 2 m is quite appropriate. It is optimal if the swing is implemented in a portable version, which is achieved by welding a square base.
Next, a metal rod is used, which is bent so that it takes the shape of a hook. The length of such a segment should be about 1 m, taking into account the fact that about 50 cm of the rod will be underground. To ensure acceptable stability, it is enough to fix the swing at four points.
We install a garden swing with our own hands
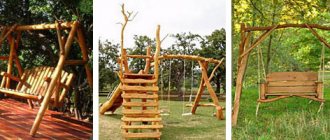
Making a garden swing device on your site with your own hands is not difficult when the preparatory stage is completed in good faith. Wooden models offered for installation require a flat surface. It is advisable to do the work with a partner to make it more convenient. We begin to assemble the elements of the garden rocking chair from the prepared material:
- We make the base in the shape of the letter “A”, for this we take prepared logs with the parameters: 2.5 meters by 120 millimeters thick - 2 pieces, and 2.1 meters long by 90 millimeters thick - 1 piece. The transverse log is superimposed on the main one, taking into account the indentation.
- At the intersection of the logs, it is necessary to drill holes, then we tighten the entire structure with prepared bolts. Using a grinder or a hacksaw, you need to cut off the remaining length of the bolts for aesthetics and safety. We also assemble the second part of the swing device.
Making a bench
Comfort and convenience will depend on how this assembly of garden swinging devices is made. It is necessary to select a seat angle that is comfortable for all family members; it is necessary to conduct a survey, especially with children. What is the bench angle? If you do it at a right angle, then the ratio of the back to the seat will not provide comfort and relaxation.
If you just increase the angle by just 10 degrees to 100 degrees, you will immediately feel that you can lean on the back of the bench. You need to take prepared bars of 60x60 millimeters, and laying them on, spread them to the required angle, it may not be entirely accurate, you will get an obtuse angle of 95-100 degrees. Using a pencil, we make marks on the bars, get our size, and places to select with a chisel. Sampling is necessary for better connection and a beautiful appearance of the bench.
Work must be carried out in the following sequence:
- We take a chisel, a hacksaw and do the following: use a hacksaw to cut down the pencil marks, use the chisel to select the wood inside the cuts. We try the bars on to each other and work with a chisel.
- When we have achieved an ideal connection, we drill a hole in the center for a bolted connection, in two bars at once, then it is advisable to cover the holes with PVA and connect everything with a bolt. We cut off the excess length of the bolt with a grinder.
- We attach the armrests to the made bases (logs: length 100 centimeters, diameter 80 millimeters). Using a hole made with a drill, we connect them with bolts, after putting on the chains.
- The resulting triangular structures must be connected with boards 1.8 x 0.14 x 0.04 meters. There can be no difficulties here. Using self-tapping screws, the boards are attached to the bases of the future bench. After the work done, we will see the finished element of the garden swing, a bench.
Making a roof
We prepare the beams for the rafters, take the prepared timber 60x60 with a length of 900 millimeters and 60x60 with a length of 500 millimeters, assemble 3 triangles with the parameters: 560x560x960. A swing rope made of a log 2.8 meters long and 140 millimeters thick must be placed inside these triangles.
Choosing a site for construction
Before installing a garden swing, you need to decide on the place where it will be placed. A few tips to remember:
- do not install iron swings near communications (power lines, water supply);
- If there is a road nearby, you need to install a fence.
- It is better to place the swing near the house;
It is important that groundwater does not come close to the surface and that the ground is not swampy. A swing on a small slide would be an ideal option.
How to equip a swing on a tree?
The simplest type of garden swing is its installation on a tree branch. If there is a sufficiently mature tree in the garden at the dacha, the branch of which can be used to attach a rope, the issue of their arrangement is solved simply:
The classic version using a plank and a pair of nylon ropes for fastening
For these purposes, we pay attention to fastening the cables, using the safest knot. We drill holes in the board and pass a cable through them, which is attached to a tree branch. It is better to use oak for these purposes, if you have one.
If not, you need to take action: inspect the branch on which they will be attached; it should not have cracks or be diseased.
If chains are used for reliability, they must be wrapped in a plastic tube so that your fingers do not get caught in the chain links.
It is necessary to check the condition of the branch on which the gurney is attached weekly for safety. When kids want to ride them, check them out yourself first.
dd84985189385bccd404a41087ba3f90.jpe
Seat fixation options
To hang the seat, you need to strengthen a special device:
- clamps of a suitable profile (round, square) with a hook for hangers;
- You can also drill holes in the crossbar and thread anchor bolts with a loop at the end for attaching a rope or chain;
- connection using bearings is the most reliable, but requires constant lubrication, otherwise squeaking cannot be avoided.
The seat is suspended on a synthetic rope, chain, or metal cable with a cross-section of 7 mm. A rope for transporting a car or a cord for climbing equipment is suitable. Chains will rust when exposed to the environment. Painting them is problematic; it is safer to take galvanized ones.
It is better to make the seat from wood - it is a warm and pleasant to the touch material. If the drawing provides for a large seat in the form of a bench or chair, the seat is reinforced with a metal frame.
Basic requirements
Before you begin, you need to familiarize yourself with a number of requirements, compliance with which will allow you to create a high-quality product. Since garden swings are considered quite dangerous, it is necessary to take proper care to ensure that no funny situations spoil your vacation. All elements must be reliable. And during operation, there should be no objects nearby that could become an obstacle to the maximum movement of the swing.
As a rule, children love to swing. But sometimes adults don’t mind relaxing after hard working days. When deciding how to make a swing, you should definitely provide for high load capacity and maximum dynamic load. Having a strong swing frame is an important safety feature.
Depending on where the swing will be installed, you choose what to make it from. Most often they are used in the garden, outdoors. Building materials, accordingly, must have weather-resistant characteristics. Then they will last a long time. We should not forget about appearance. In order to give your homemade garden swing a neat look, you need to choose materials that are easy to care for.
After analyzing all the requirements and deciding on the parameters, you can choose the type of product. According to the installation method there are:
- Mobile. If there is no exact place for their installation, then it is better to opt for a portable model for the dacha. Then the swing can be moved to any convenient place.
- Stationary. When creating a swing with your own hands, the installation location is determined once, it remains unchanged throughout its entire service life.
According to the principle of the device, they are distinguished:
- Hanging. The seat is attached to the frame using hangers.
- Frame. They are characterized by a solid frame welded from pipes or made from wooden beams.
As for building materials, the most popular are DIY garden swings made of metal, wood, or a combination of both. All of the above designs meet the requirements to one degree or another. However, if you put safety first, then the best option would be a stationary frame swing made of metal. They have greater stability and load capacity compared to other options.
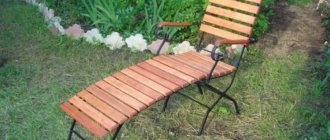
Curiosities, but to the point
Since we are talking about funny swings, let’s touch on some more of them, but they are quite suitable for their intended use. For example, hammock swings, on the left in the figure, although the hammock itself is already a recumbent swing. There is probably something about swaying with additional degrees of freedom that owners like. In any case, there will be no harm.
Children will probably like the device in the center, but it is impossible to name it without sinning against Russian grammar. A swing, not a swing. And the author posted a photo of the one on the right with a note: the easiest way to recycle an old car. The comment was in English, so it is quite possible - in many Western countries, delivering a car to a landfill or selling it for scrap costs a lot of trouble. And here the great inertia of the heavy rocking chair allows you to swing for a very long time, the canopy is created by itself, and the soft sofa will not reduce the comfort.
Not those, but the swing
Finally, about swings, direct descendants of children's pendulum swings, but quite adult ones. And not for entertainment, they help cope with arthritis, osteochondrosis, radiculitis without expensive treatment. Reviews from doctors are positive.
We are talking about Yalovitsyn's swing, see fig.
Although this is already medical equipment, it is essentially the same swing. And most importantly, Yalovitsyn’s swing is one of the few types of medical equipment that you can make yourself and use yourself at home. Of course, after consultation with a doctor and according to his prescription.
***
2012-2020 Question-Remont.ru
Display all materials with the tag:
Go to section:
Assembling a swing
We assemble the frame. It's better to start with the sides of the swing. Take measurements and cut the pipes according to the drawings using a grinder. Check the identical dimensions of all four elements from which the sidewalls will be assembled. Using a welding machine, connect the prepared pipes in pairs, making two identical structures in the shape of the letter L.
Then the sharp upper end of each structure should be sawed off at the same level, preparing platforms on which the horizontal beam of the swing will rest. It is better to carry out work according to a pre-prepared template.
The short sides of the support frame must correspond in size to the distance between the lower ends of the resulting sidewalls. They are connected by welding to long base elements, the size of which corresponds to the drawing. The sidewalls and the upper horizontal pipe are welded to the supporting frame. Assembling a metal swing requires checking the geometry of the structure at each stage: the side planes must be positioned strictly vertically, and the beam for hanging the bench must be parallel to the base. Use a building level to check.
Bench. To make the frame, it is most convenient to use a steel corner. For the bench to be comfortable, the backrest should be positioned at approximately 120 degrees to the seat. A triangular cutout (60 degrees) on one of the shelves will help you bend the corner correctly. The frame can also be made by welding from a rectangular pipe of a suitable cross-section. The sidewalls are connected by horizontal jumpers along the edges and at the bend of the structure. If desired, you can make armrests of a suitable shape.
The seat and back of the bench are made of sanded boards or bars, cut to size. To fasten wooden elements, holes for bolts are drilled in them and in the frame. It is advisable to completely drown their heads in the wood, making appropriate recesses. Before assembling the bench, the wooden elements are impregnated with an antiseptic and varnished, the metal elements are primed and painted.
Install eye-bolts at the corners of the bench frame; chains will be attached to their eyes for hanging using carabiners with a latch or a threaded coupling.
The same eye bolts are mounted on the upper beam of the swing - above the edges of the bench or at the corners of the structure, at the junction of the side frames and the horizontal element. In the second case, the bench will practically not sway from side to side.
Instead of eye bolts, special blocks for hanging swings, equipped with bearings, can be attached to the horizontal beam - this system is more comfortable to use. The blocks are bolted through through holes in the horizontal beam. The chains are adjustable in length so that the bench is parallel to the base with a slight inclination towards the back.
We make a visor. It will protect people sitting on the swing from precipitation and the scorching sun. A rectangular structure made of a metal frame with jumpers and a sheet of cellular polycarbonate is mounted at a slight angle so that precipitation flows freely to the ground. The frame of the visor is welded from rectangular tubes of small cross-section. The canopy is then welded at an angle to the top of the swing frame. After all work is completed, the entire structure is primed and painted.
The cellular polycarbonate covering is attached to the frame with special self-tapping screws and sealing washers. The ends of the sheet material should be covered with a polymer profile to protect against dust and insects.
It is advisable to securely attach the finished swing to the site. If the structure is installed on dense soil, the frame can be fixed with several clamps made of reinforcing bars. The ends of the clamps should be pointed and extend into the ground about half a meter. The swing is attached to the concrete platform using anchor bolts pre-installed in the right places. After screwing the nuts, the protruding threaded part is cut off with a grinder.
Video on the topic “do-it-yourself garden swing made of metal”:
Design
Before you start designing, it is advisable to decide on the type of frame, which can be folding/prefabricated (using bolts and nuts) or welded. If we talk about the first type, the assembly principle is to make parts of the appropriate length and calculate the correct pipe diameter for the bolts and nuts.
The welded structure is stronger and more stable; welding equipment is required for its manufacture. If you do not want to make an original, but completely standard product, drawings are not needed; you can use a ready-made diagram on the Internet as a basis.
To draw a sketch of a swing, you will need to consider the following dimensions:
- the seat height should be about 60 cm;
- for a mobile structure, it is necessary to maintain a distance between the support posts along the edge of the seat from 16 to 42 cm, it all depends on the type of fastening (cable, chain).
- square seat 55 cm;
Dacha grace
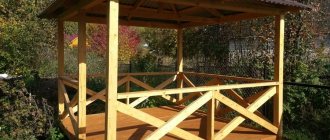
Outdoor and yard swings are placed wherever there is space. At the dacha, too, in general, there is not an abundance of it, but for yourself it’s worth figuring out how to collect dacha pleasures into one eden: you save space, and, if you really want to relax, then there are beds that make your hands callused, your eyes didn't cause calluses. Here, as usual, everyone is their own boss. However, there is a very good universal option: hang a garden swing in a pergola, see fig. If it is, of course, strong enough for this. Dig up and arrange a decorative pond nearby - and you’re ready to create a piece of paradise with your own hands on less than 1 acre.
Country swings in pergolas
Homemade gas heater
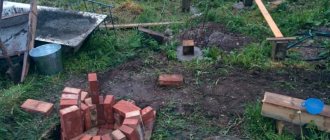
The main advantage of this model is that its production requires a minimum of parts, which can always be found in the household of any craftsman.
This economical source of heating is not too expensive; the costs of its production and maintenance are completely absorbed during operation
Preparation of materials and components
To make a gas heater for the garage, you need to prepare in advance:
- burner with valve;
- tin sheet;
- metal scissors;
- drill with a thin drill bit;
- rivets;
- riveter.
To make the grille, you will need a piece of fine-mesh metal mesh. It’s great if you have a regular wire colander sieve on hand, it will act as a protective grid.
The main element of the device is a gas-filled collet cartridge with a capacity of 450 milliliters, used for refilling lighters
Collet cylinders are convenient because when using them, you don’t have to use up all the contents at once. The presence of shut-off valves allows the devices to be used repeatedly.
If desired, the heating structure can be made using not only disposable cans used for refilling lighters, but also using a small refilled cylinder.
Cutting blanks and assembling the structure
When making the structure, the first thing to do is fix the heater to the burner.
The selected household sieve of the appropriate diameter is applied to the galvanized sheet and outlined along the contour with a marker
Four rectangular ears are added in the direction of the four sides of the workpiece applied to the galvanized sheet. One of the ears should be made twice as long as the others. The blanks are cut along the intended contour, trying to make smooth, burr-free cuts.
The burner is screwed to the cut-out tin blank using bolts. The ears located on four sides of the workpiece are bent in the opposite direction and used to fix the strainer.
The strainer attached using the ears of a tin circle has a dome shape, thanks to which it will perfectly dissipate heat to the sides
To attach the second protective mesh, take another piece of sheet metal and cut out a circle of exactly the same size from it. Elongated ears are added to the workpiece, necessary for attaching the mesh.
Stepping back half a centimeter from the edge of the circle, drill 10 through holes along the circumference. A strip is cut from a piece of fine-mesh metal mesh, the length of which corresponds to the diameter of the cut tin blank.
The ears located on four sides are bent and used to fix the wide side of the fine mesh strip, the second piece is fixed on the opposite side
The bent ears of round tin blanks are fixed to opposite sides of the mesh strip using a riveter and rivets. When assembled, you should get a cylinder with mesh walls and tin ends.
At the final stage, all that remains is to turn on the gas water heater and check its performance. The heat produced by this small device is enough to heat a small room or garage.