Who doesn't want to have a swimming pool on their property? There are probably not many of them, because everyone likes to swim on a hot day. Children especially love to do this! However, not everyone can afford such a pleasure, and sometimes there is simply nowhere to place large structures, so you have to come up with alternative options. Today we’ll tell you how to make a budget pool at your dacha with your own hands from scrap materials. Let's consider several options of varying degrees of complexity.
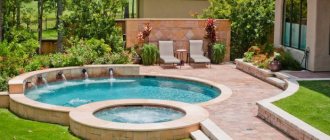
All you have to do is build in a jacuzzi, and life is good
Choosing the right place to build a swimming pool
It is recommended to build a pool no closer than 8 m from other buildings.
The choice is determined by many factors. If there is a full-fledged residential building on the site, the territory includes a vegetable garden, a garden, a recreation area, a playground and a bathhouse, it is preferable to build a permanent structure. If the dacha is used only in the summer, and the suburban area itself is small, temporary inflatable pools are installed.
For a stationary pond, you need to choose the right location. Requirements:
- The pool evaporates a lot of water. In mid-summer this is not particularly important, but in cool weather the reservoir provides a high level of humidity. Therefore, it is impossible to build it close to a residential building, garage, or other outbuildings. Minimum distance – 8 m.
- It is recommended to place the pond within sight of the house, especially if there are children in the family.
- For the tank you need to choose a flat area without roots or holes. The distance to medium-sized trees should be 3 m, to tall trees - at least 5 m. Shrubs can be planted at a distance of 1–2 m.
- It is prohibited to install the structure next to the fence. Removal of at least 3 m.
- It is not allowed to build a homemade country pool on loose soils, near a cliff, or near highways or railway tracks.
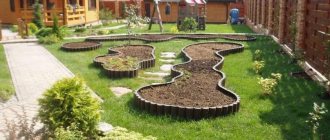
If the site is large enough, aesthetic criteria are taken into account. It is better to make a pond an element of an active recreation area. There is no point in decorating it by turning it into an analogue of a natural lake.
Where to install
The place should be sunny and windless. If you are embarrassed by the views of your neighbors, you can put a light frame around it for climbing plants or stretch a camouflage net. Often the pool is located next to the bathhouse or sauna so that you can freshen up after a hot room.
To improve the area, a flooring made of decking boards, wood or other materials is installed. It is important that the coating is non-slip. Nearby you can place sun loungers, beach umbrellas, and garden furniture.
If the pool is intended for children, there is a playground nearby. The space must be clearly visible so that adults can ensure the safety of children on the water.
Preliminary design
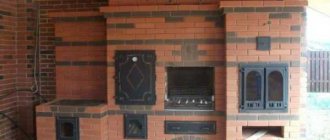
A swimming pool with complex utilities - water heating, cleaning, filtration.
A do-it-yourself pool at the dacha is a complex design. In order for the water in an artificial reservoir to always be sufficiently fresh and clean, it is necessary to plan the correct drainage and supply of water, liquid purification, the possibility of carrying out disinfection procedures, and much more.
Designing a reservoir includes several stages.
- Architectural - determine the size and shape of the bowl, the location of the pool. They think through the filtration system and plan the placement of service equipment. It is important to develop a general design, select finishing and decorative materials.
- Calculations - taking into account the characteristics of the soil on the site and its topography, a pool design is chosen - frame, frameless. The type is determined by the parameters of the building material and the installation method.
- Structural - at this stage, the design of load-bearing parts is developed, the method of waterproofing, finishing, and protection is chosen. The pool bowl is subjected to enormous pressure; an error at the design stage leads to deformation of the bottom and walls.
- Design of communications - calculate the length and cross-section of inlet and outlet pipes, pump power, filtration and power supply systems.
The result of creating a sketch of a reservoir is a package of documents, including drawings of the pool and all the main elements, a technical description of the components, a review of installation recommendations, and a list of materials. The list also includes an estimate of the work.
The project includes a survey and assessment of the selected installation site.
Types of swimming pools for summer cottages
Stationary summer pool
Before deciding how to make your pool, you need to choose its design and determine how many people will use it and for how long. There are stationary, frame and inflatable models.
Stationary
Such a structure, when heating water, can function all year round. The structure is heavy, very durable, made of concrete. It is possible to install a thicket made of plastic: this option is cheaper, but not as durable and much more demanding on water quality.
A stationary pool is not removed for the winter, but is completely emptied. This design is served by its own water supply, sewerage, and cleaning systems. Periodically during use, the pool must not only be cleaned, but also disinfected.
Frame
Frame collapsible pool
Collapsible design. The basis is a frame onto which specially treated PVC fabric is stretched. Sizes and shapes are varied. Small ones do not need cleaning or even water circulation: if they become dirty, the water is simply scooped out and fresh water is poured into the tank. If the reservoir is large, a water supply and drainage system is installed, and cleaning filters are installed.
Frame structures are easy to install and much cheaper than stationary ones. Disadvantage: service life is no more than 5-6 seasons.
Inflatable
The simplest option. The film bag is filled with air using a pump and placed in any convenient place on a durable surface. It is recommended to make a concrete platform for it, but this is not necessary. Water is poured into the inflatable pool from a hose. A filtration system cannot be installed here, so cleaning and disinfection have to be done manually and somewhat more often. Typically, inflatables are not too large, so cleaning does not take much time.
You can make a pool in the courtyard of a private house with your own hands from a variety of materials. Their size and functionality will not be as great as their stationary counterparts, but mini-ponds will be able to please children and adults in the summer heat.
Available materials
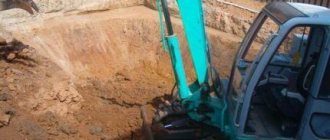
Pit for a swimming pool
A standard drawback of a temporary structure is the need for frequent changes of water. If this is not scary and the area is small, the option of scrap materials is quite suitable.
- The simplest option is a pit covered with polypropylene film. In any suitable area, dig a trench of the required depth and width. The bottom is lined with construction cardboard to make walking softer, the walls are covered with bags so that the film does not tear. Then the pit is covered with a waterproofing film, and its edges are secured with stones, at the same time finishing the artificial reservoir. The disadvantage of this solution is the limited size of the pond, since the film cannot withstand high pressure.
- Frame version made of pallets - the pool bowl is constructed from 9 pallets, fastening them with slats and screws. A pit is not needed for this model; the pond is placed on a flat surface, covered with a thick tarpaulin. The inside of the “bowl” is covered with greenhouse film, and then with old bedspreads and blankets. This gasket ensures soft walls. At the last stage, the pool is covered with a bright-colored waterproofing film and glued to the sides with adhesive tape. Disadvantage: the size is small, and it will not last long.
- In addition to pallets, you can use old wooden or plastic boxes. They are assembled into a rectangular structure on slats and additionally wrapped around the perimeter with plastic tape. Install the pool on a tarpaulin or banner film. The disadvantages of the model are the same.
- An interesting idea is a hay pond. The bottom of the proposed reservoir is covered with hay, and the walls are constructed from dense hay bales. The structure is tightened with belts, lined with cardboard or tarpaulin to prevent damage to the main film, and then covered with a waterproofing sheet. Such a pool can be quite large, but its depth is small. Disadvantage: he is not at all attractive.
A frame pool for a summer residence is also made by hand. The structure is welded from profile pipes and lined from the inside with a waterproofing film. You can install such a pond on any flat area.
There are other options, for example, a children's pool can be made from a large car wheel.
Frame options
In addition to the described wooden frame made of timber and boards, you can use a homemade welded or prefabricated frame made of rolled metal. It is best to use a rectangular pipe with a cross-section of 20x40 mm for racks, a corner or strip for piping and struts.
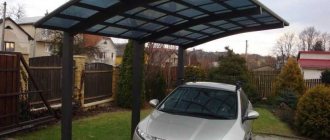
By raising the posts 1.5...2 m above the pool level, you can stretch an awning over it or install a polycarbonate canopy.
Another practical and inexpensive option is a pool made from pallets.
Pallets installed along the contour are tied into a single structure with boards or timber; metal plates can also be used. In this case, there is no need to install racks buried in the ground - the connection between the enclosing elements is sufficient. Installation inside the fence of an additional protective layer of thick plastic or rolled material (roofing felt, old linoleum, any other flexible flooring) is not necessary, but it significantly increases the strength of the structure.
Tools for work
Polypropylene film for soil waterproofing
Materials and tools are selected based on the type of pool and design. You will need:
- shovel, pickaxe, if you plan to dig a trench; if the pit is large, you need to rent special equipment;
- frame material - pallets, boxes, metal pipes, reinforcement for a concrete bowl;
- tools for processing materials - plane, jigsaw, hacksaw, saw, etc.;
- measuring instruments - tape measure, plumb line, level;
- fasteners - screws, nails, metal corners, tape, etc.;
- waterproofing film;
- concrete if a permanent pool is being built;
- finishing or cladding materials – paint, varnish, tiles:
- maintenance materials - pipes, nozzles, flanges, pump, skimmer or storage tank if the pool is drained.
Additional materials and equipment: concrete mixer, screwdriver, construction stapler, felt and so on.
Calculation of required materials
The pit for the pool can be lined with bricks.
If we are talking about mini-reservoirs made of car tires or straw, you can handle the calculations yourself. If a concrete bowl is being built, the calculations are much more complicated. It is better to entrust them to a specialist.
Please take into account:
- Number of users. On average, for swimming 1 person, a depth of 1.5 m is required, and the length of the pool is 5 m. The more users, the larger the size of the bowl. At the same time, the depth remains unchanged. Although for large sizes it is recommended to make the reservoir at different levels.
- The deeper and more voluminous the bowl, the greater the volume of water pressing on the bottom and the thicker the walls of the pool should be. The value is calculated based on the strength indicators of the material used.
- The more complex the configuration of the reservoir, the more complex the calculations. The easiest way to build a round or rectangular home pool.
- It is necessary to accurately determine the placement of incoming and outgoing pipes. If something was missed at the planning stage, holes for communications will have to be drilled in a concrete bowl, which is difficult and expensive.
The design of the pool and the thickness of the walls are also influenced by the nature of the soil, the groundwater level, and the topography of the site. Assessing such factors requires special knowledge.
What if there is an unevenness?
A number of plots in any garden cooperative have a difference in ground heights in the range of 0.5 - 1.5 meters. Typically, summer residents do not like such geography: they are afraid that rain runoff, especially storm water, will destroy the beds and destroy either the plants or the crop.
This is partly true. Those who have such slopes put retaining walls under them to level the area. In the case of building a swimming pool, the disadvantage will turn into an advantage: there will be less excavation work and the natural overflow of water to clean the bowl will be better.
Stages of arrangement
How to make a stationary pool with your own hands depends on its design. The step-by-step guide includes several required steps.
Preparing and digging a pit
Work begins with marking the site and determining the location of not only the bowl, but also communications.
- It is better to dig a pit for a pool using an excavator.
- The walls of the pit are given a slight slope to prevent the earth from collapsing. The bottom should also have an angle of inclination - 5–7% towards the place of water drainage. In the center of the bowl, additional insulation is dug under the drainage well.
- The well is filled with crushed stone and compacted. Then the design of the drain is determined.
- 20–30 cm of sand are placed at the bottom, and then 10 cm of gravel. The sand cushion is compacted.
Work on digging and preparing a pit is carried out only in dry weather.
Concreting the bowl
The pool bowl can be made of concrete using formwork.
To fill the bowl, use a concrete mixture of grade M400 or higher. You can make concrete yourself from crushed stone, cement, river sand and water.
- Concreting can be done in 2 stages or in 1. In the first case, a 5 cm thick screed is first poured. Then a frame is constructed and the next portion of concrete is poured. In fact, you can do it simpler.
- A reinforcing frame is assembled from iron rods or wire with a diameter of 6–8 mm. The cell size is 15–20 cm, the rods can be welded or fastened with thin wire.
- Place the frame on the bottom and walls on supports made of brick or stone. There must be at least 5 cm between the ground and the reinforcement.
- Concrete is poured into the bottom of the pit so that the material covers the bottom and reinforcement.
The next stage can only be started after the concrete screed has completely dried.
Construction of walls
Before pouring concrete, it is necessary to install inlet and outlet pipes.
Before pouring concrete into the walls, it is necessary to lay inlet and outlet pipes or provide mounting holes for them. The attachment points of any other formation are also determined in advance. Step-by-step instructions:
- The formwork for the walls is made of boards 30 mm thick. They take slabs, unplaned boards, and the remains of old structures.
- The formwork is reinforced with ribs made of timber with a cross-section of 50*50 mm. The pitch between the ribs is 50 cm.
- If the project includes a concrete staircase to the pool, a separate formwork is made for it.
- The walls of the reservoir are subject to only slightly less load than the bottom, so they also need to be reinforced. However, this is done after pouring the first portion of material. The reinforcement cage is immersed in the material while it is still wet.
- Concrete is poured into the formwork in layers until it is completely filled.
The formwork can be removed after 4 days.
Waterproofing and finishing
After the concrete has completely dried, finishing work begins.
- The tank is waterproofed. Roofing felt, PVC membrane, bitumen mixtures, and liquid rubber are suitable for this. It is recommended to sand the concrete surface before waterproofing, especially if a liquid material is used.
- Check the quality of waterproofing: fill the pool with water and leave it for 10–12 days. If the water level changes only due to evaporation, the bowl is ready. If not, waterproofing needs to be done again.
- The walls and bottom of the pool are plastered. At this stage, filters are installed.
- Most often, an artificial pond is finished with tiles. It is recommended to make wide joints between the tiles to compensate for deformation under water pressure. For grouting, mixtures with high elasticity are used. The finishing of a complex-shaped pool is done with mosaics.
- The sides of the reservoir and the surrounding area are also decorated: they are laid out with tiles and stones.
For permanent pools, the best option is an overflow system. It allows you to clean a pond with minimal effort and is very economical: when there is no movement in it, clean water does not flow; when there is, dirty water splashes out over the side of the pool, and clean water is supplied through a pipe.
Useful additions
Since it is extremely difficult to fill even a small pool manually, renew the water in it and drain it, a pump should be a mandatory addition to the swimming area. The choice of a specific equipment model depends on the volume of the pool, the desired pumping speed and other nuances.
Also useful are filters, installations for heating water, illuminating it, and so on. The photo below shows a water heating system from a solar collector.
In addition to equipment, other devices will also be useful - for example, a sliding or regular canopy.
And, of course, relaxation near the pool cannot be imagined without a comfortable place to relax - sun loungers, sun loungers, umbrellas and so on.
Have a good holiday!
Tips for care and use
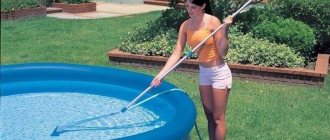
Film to protect the pool from debris
The rate of water contamination in the pool depends on many factors. Therefore, care procedures are performed based on water indicators. If the water becomes cloudy, let alone bloomed, urgent measures need to be taken.
- Large floating debris is collected manually. You can use a net.
- In a frame pool, if a skimmer filtration system is installed, debris is removed by connecting a filter pump.
- In large stationary reservoirs, underwater vacuum cleaners are used. The device sucks up debris and small organic particles that serve as a breeding ground for bacteria.
- If the water begins to bloom, resort to disinfection. For this purpose, various chemicals are used: oxygen, bromine, chlorine. Coagulating agents give very quick results. It is allowed to use UV lamps and ionizers.
- Once a week - at least, the filters must be cleaned.
For the winter, the pool should be preserved: drain the water, treat the surfaces with disinfectants, refill and rinse all pool equipment using reverse flows. Then the water is drained again, the systems are repaired, and the bowl is covered with tarpaulin or polycarbonate.
Which frame to use
Manufacturers of frame pools prefer a frame made of steel profiles - pipes of round or (more often) oval cross-section. The metal base absorbs and distributes the load from the weight of water poured into the pool well and dampens vibrations. However, such a frame is quite expensive.
It is cheaper to use wood with appropriate processing, and it is not necessary to take an edged board or timber; both a shalevka and a half-edged board will do.
You can also use panel materials - thick plywood, chipboard, OSB and the like. However, timber and boards will still be useful, at least as racks and struts.
Important: the wooden parts used to create the pool frame must be impregnated with an antiseptic and protected from water with special coatings (varnishes, paints).
If you plan to build a pool with a podium around the entire perimeter or part of it, you should also use wood. However, in this case it is advisable to take a planed board or deck board (decking). They also need to be protected from water and microorganisms.