People have been gardening for a very long time. Gardens allowed people to stay in one place rather than travel to find plants they needed to survive. The earliest known plan for the garden dates back to 1400 BC. in Egypt.
Urban flower gardens are especially important today, as cities now occupy space once occupied by plants and animals. They provide food for pollinators. Why is it important?
Pollinators such as bees and butterflies transfer pollen from one plant to another, allowing them to produce fruits and seeds. Without pollinators, plant species would die out - and we would have no food.
Do you want to draw a flower garden? This simple step-by-step guide will help you. All you need is a pencil or pen and a piece of paper.
If you liked this tutorial, see also the following drawing tutorials: Cherry Blossoms, Tulip, and Lily.
Determining the shape
Perhaps the most popular shape of a flower bed is a circle. But flower beds can also be square, rhombic, triangular, in the form of silhouettes of various animals - crab, crayfish, fish, starfish. In a word, there is room for imagination, and you can always come up with something of your own. Think about the angle from which you will draw the flowerbed. Usually a passer-by looks at her from above from a certain angle. The angle depends on the height of the person and the distance at which he is located. The shape on the plane changes. A circle seems to be an oval, a square turns into a rectangle, the silhouettes of animals seem thinner than they really are. If you are just starting to learn how to draw, choose a simpler form and draw the flowerbed step by step.
There are also multi-level flower beds. Before you start drawing them, learn how to draw simple ones.
How to draw a flower bed step by step – Draw a flower bed step by step
Did you like my drawing lessons? Get more on YouTube:
Click HERE to save the tutorial to Pinterest!
People have been gardening for a very long time. Gardens allowed people to stay in one place rather than travel to find plants they needed to survive. The earliest known plan for the garden dates back to 1400 BC. in Egypt.
Urban flower gardens are especially important today, as cities now occupy space once occupied by plants and animals. They provide food for pollinators. Why is it important?
Scroll down to download a PDF of this tutorial.
Pollinators such as bees and butterflies transfer pollen from one plant to another, allowing them to produce fruits and seeds. Without pollinators, plant species would die out - and we would have no food.
Do you want to draw a flower garden? This simple step-by-step guide will help you. All you need is a pencil or pen and a piece of paper.
If you liked this tutorial, see also the following drawing tutorials: Cherry Blossoms, Tulip, and Lily.
Earth and flowers
Flowerbeds are rarely planted with flowers of the same species.
As a rule, they are compositions from different plants. For example, you can plant lilies along the edge, and lupins, peonies or other tall flowers in the center. Using a hard pencil, mark a strip on which the lilies will grow. Don't forget that it will not be the same in width; the widest part is the one closest to the viewer. Draw lilies. First, outline the contours of the bushes - these are irregular circles, evenly spaced along the entire contour. Draw the flowers with long, quick strokes. For lupins, also first mark the spot, then draw the vertical stems, then the cone-shaped outlines of the inflorescences. In each cone, which on the plane turns into a triangle. Draw flowers using circles.
Flower bed - pencil drawings for children to sketch: photo
Drawing is extremely useful for children at any age, as it develops:
- fine motor skills
- fantasy
- Creative skills
- attention to detail
- perception of objects in all their brightness and completeness
In addition, the process of depicting the world around us is a fascinating and interesting activity. But some children refuse to draw difficult things for fear of failure. Arouse your child’s interest in drawing and self-confidence using our tips:
- ask your child what flowers he wants to display in his flowerbed
- teach him to draw a flower from the middle, and then draw a stem with leaves
- explain that when coloring a drawing, the paint or pencil strokes should not extend beyond the outline
- stop working when you see that the child has lost interest in the activity. Don't force him to draw if he doesn't want to.
- praise his work and hang the drawing in a visible place so that the child knows that you like the result of his creativity
To make it easier for a young artist to draw a flower bed, we offer several options for sketching.
Flowerbed in pencil
For sketching
How to draw a flower bed step by step – Draw a flower bed step by step
Did you like my drawing lessons? Get more on YouTube:
Click HERE to save the tutorial to Pinterest!
People have been gardening for a very long time. Gardens allowed people to stay in one place rather than travel to find plants they needed to survive. The earliest known plan for the garden dates back to 1400 BC. in Egypt.
Urban flower gardens are especially important today, as cities now occupy space once occupied by plants and animals. They provide food for pollinators. Why is it important?
Scroll down to download a PDF of this tutorial.
Pollinators such as bees and butterflies transfer pollen from one plant to another, allowing them to produce fruits and seeds. Without pollinators, plant species would die out - and we would have no food.
Do you want to draw a flower garden? This simple step-by-step guide will help you. All you need is a pencil or pen and a piece of paper.
If you liked this tutorial, see also the following drawing tutorials: Cherry Blossoms, Tulip, and Lily.
Drawing a bouquet of flowers in a vase - an interesting master class on video
Many famous artists depicted bouquets of beautiful flowers in a vase in their paintings. With the help of our video master class, you will discover the basics of drawing flower still lifes.
So, on our pages you will find simple step-by-step master classes with photos and videos for children on drawing different flowers - bells, chamomile, tulips. How to draw a beautiful picture - a flower in a vase? Our pencil and paint drawing lessons will be useful for beginning artists taking their first steps in understanding the art of painting. Inspiration to you and successful drawings!
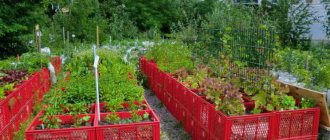
Do-it-yourself flowerbed in the garden - what is important to consider
Once you have decided on the location for the flower bed and the types of plants, you can begin planting, taking into account the characteristics of each flower.
But first, read these tips to help avoid possible difficulties:
- determine for planting a space large enough to fit all the plants and get the desired effect of changing shades;
- group flowers with similar flowering periods;
- create seasonal compositions for a smooth change of flowering;
- plant groups of plants tightly to maintain the integrity of the composition;
- low-growing flowers for a flower bed, blooming all summer, (for example, dwarf aster, aquilegia, Carpathian bell) are best placed in the foreground of the flower garden, and tall ones (mallow, sunflower, amaranth, etc.) - in the background;
- leave enough space between plants, do not plant individual groups too close to each other, so that the overall picture remains clearer and more attractive;
- During the growing season, pick off faded flowers and weed the weeds to keep the flowerbed looking neat;
- Every year, carry out “spring cleaning”: renew plants and remove those that have lost their decorative value;
- to make it more convenient to care for a large flower bed, it is worth providing small paths and platforms, first sprinkling them with sand or fine gravel;
- do not forget about feeding and spraying plants against pests;
- to add zest to the composition, use boulders and stones, pots, figurines, but do not overdo it with decorative ornaments - the flowers should remain the main thing.
And don’t forget to observe how the plants develop in your area, write down all changes to take them into account next year.
If you are a beginner gardener, use low-maintenance perennials. Limit yourself to a few plants of the most familiar species, which will become the basis, and then gradually plant new varieties in accordance with the developed scheme. At the same time, keep in mind that it is worth planting plants in the foreground that retain their decorative effect even after flowering.
You can extend the decorative effect of a flower garden by planting small shrubs or conifers next to the flowers.
And remember that flowering does not begin and end at the same time. When creating a flower bed, consider the stage of bud emergence, the height of flowering and the time when individual flowers may still appear.
How to draw a flower with a pencil - a step-by-step master class for beginners
Materials for a master class on drawing a daffodil flower with a pencil
- sketch paper
- simple soft and hard pencils
- eraser
- colour pencils
- white pastel
How to draw a daffodil flower with a pencil – a step-by-step master class for beginners
- Place the sketch sheet horizontally on the table. Visually divide it into three vertical parts. In each of their parts, mark the stem of a flower. The central one will be straight, the rest will be inclined in their directions. Draw a semblance of a tubular core and outline the direction of growth of the six petals.
On the right side, schematically draw another small daffodil. Outline the growth area of the petals of each flower with an oval. The outline of the figure will help to draw the petals of the same length and choose their correct direction.
On a blank sheet of paper, practice drawing individual parts of the flower from different angles.
After a good practice, draw the petals of the narcissus flower in the sketch. Delete the auxiliary lines.
Pay special attention to the stems and leaves, they have pronounced distinctive features. The stems of daffodils are divided between the bends by small compactions. Visually, they seem to be divided into separate zones.
At the end, draw long and thin leaves, drop-shaped retracted buds, and stamens inside the perianth. Use elongated strokes to depict curves and add relief with white pastels. Daffodil flower in pencil according to a step-by-step master class for beginning artists is ready!
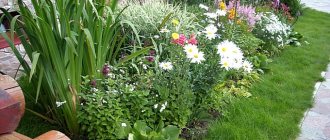
Neutral composition
If you are a fan of bright accents, you can make a discreet, eye-pleasing flowerbed in neutral colors - white and green, green and pink or green and blue. Such a flowerbed can visually make the space lighter or dilute bright colors where necessary.
Choose snapdragons in a white or light yellow shade or cornflowers as your main flowers. In combination with tall molucella smootha, you will get a very interesting, discreet flower bed.