Topiary (“tree of happiness”) is a popular decorative decoration. Its history goes back thousands of years and it began with the usual trimming of bushes. There is an opinion that topiary brings good luck to the owners of the house. Some decorate the tree with coins and banknotes to attract financial success. An artificial tree is a universal decorative element that is relevant in any interior, throughout the year and especially during the holidays. You don't have to buy it in a store. Your own creativity will “transform” unremarkable objects into details of a beautiful design. Topiary in the form of a shiny multi-colored tree is appropriate in almost any room, regardless of the functional purpose and style of execution. This decorative item is not only beautiful, but also practical - it will not break with one blow. A homemade topiary is a great birthday gift.
Topiary: history of origin
The Ancient era is considered the initial stage in the development of topiary art. Gardeners of wealthy residents of the Roman Empire were among the first masters of this decorative genre. They were called that - topiaries. They made patterns, animals and abstract shapes from the crowns, which was unusual for that time. The historian Pliny claimed that the first topiary gardener was Calvenus, one of Caesar's courtiers. However, modern scientists have an assumption that the Romans adopted skills from the masters of Western Asia and Egypt. For several centuries after the fall of Rome, art did not develop. The creators of the Renaissance took it to a new level. From landscape design, topiary gradually “transitioned” into decorative and applied art. One of the alternative names, “European tree,” indicates the focus of masters of the topiary genre.
"Angels"
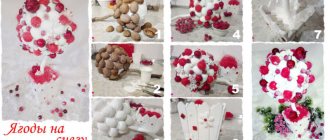
A more complex option is a do-it-yourself wedding topiary; photos can be found on the Internet. This original and beautiful decoration for the celebration will appeal to all newlyweds, and in order to make topiary on a glass with your own hands, you will need:
- actually, a wine glass;
- cardboard;
- scissors;
- foam ball;
- stationery knife;
- gun with glue cartridge;
- a string of beads and half-beads, a figurine of angels, hairpins with rhinestones, roses made of foam rubber, artificial leaves.
Let's get creative:
- Cut out two circles from cardboard that match the diameter of the glass bowl.
- We glue the angels into the center of the circle and decorate it with half beads around the base.
- Apply glue along the edge of the workpiece and press the glass tightly against it with the stem up.
- We decorate the glued edge of the glass with a string of beads.
- From the base ball we cut off a part with a diameter slightly smaller than the stem of the wine glass.
- We glue roses to the rounded part of the ball, working from bottom to top.
- We fix the leaves to the edge of the cut.
- We decorate a bouquet of roses with hairpins.
- Glue the cut to the stem of the glass.
- Its base can be covered with a thread of beads.
Basics of making topiary
You can prepare the product using such components as wire, floral material, a foam ball (can be made of another material), a bamboo stick (a wooden stick, the stem of a plant), alabaster, a flowerpot and decorative ornaments. In the process you will need pliers and scissors. Artificial flowers, braid, beads, and decorative stones are used as decoration. To secure the tree, it needs to be fixed in a flower pot with plaster (alabaster). The consistency of the composite material should be thick. After pouring into the pot, the improvised trunk is immediately inserted and fixed. Next, the floral material is cut. Its fragments are fixed to the ball using wire. The optimal diameter of the sphere is 12 cm. When the ball is completely covered, begin finishing with decorative elements. All that remains is to secure the crown to the axis. You will need glue, preferably hot glue.
Crown
To create the top of the topiary you will need wire and glue. The crown is decorated with decorative inclusions, emphasized with bows and bird figures. Among the variety of shapes, the most common are round and wide spreading. A spherical base is suitable in both cases. A spreading crown is made from several balls. The basics are done in different ways. One of them involves the use of threads and newspapers. First, one newspaper is compressed, then another one is added to it, and so a stable structure of the required dimensions is gradually formed. It is fastened with threads and, if necessary, with glue. Another way: the foam block is broken into small pieces, after which they are glued together. To use polyurethane foam, you will need a bag and a stationery knife to give it the desired shape, round or non-standard. Using the papier-mâché technique, a crown can be made from a balloon, glue and paper.
List of some elements that can be used to form a crown:
- cones;
- soft New Year's toys;
- balls.
Trunk
In addition to straight trunks, they also make curved and double ones. It is desirable that the width be small. An improvised trunk is usually made from thin wooden sticks. Such improvised means as twigs, pencils, sticks, and stems will do. Irregularly shaped trunks are made from crooked objects and strong wire. They are left in their original color or dyed and wrapped in colored fabrics.
The trunk is trimmed with artificial leaves, “fruits” or left without additional elements. An even trunk can be made from bamboo sushi sticks. To create a complex pattern that imitates a branching, several pieces of wire and tape are used. If you secure three pieces of wire with adhesive tape and turn them in different directions, you will get an interesting base for a wide crown.
Base
The lower part is a regular pot, its imitation or any other container. The role of the base can be played by glasses, jars, vases, bowls. Decoration and color are selected at your own discretion, but you must adhere to the main rule - the diameter of the base is made smaller than that of the crown. Gypsum is mainly used as a filler for containers and a barrel retainer. A small pot for a light topiary can be filled with sand. To fill a large container, small stones will do; the edges will need to be compacted with paper. Polyurethane foam is also used. There are other, less traditional filling methods. Examples: using papier-mâché, fastening the structure with clay, glass, plasticine, earth. Topiary containers with pasta of different shapes or cereals look original.
Gypsum filler can crack even a sturdy pot, so it's worth putting a small sponge or piece of foam in it!
Tools
Before you start creating a tree of happiness with your own hands, you need to prepare your equipment. When creating a topiary, certain additional materials may be required. To avoid unpleasant situations due to a lack of something, it is important to think about what kind of composition you want to create.
Tools you should always have:
- hot glue gun – consists of a heating element, glue tubes and a glue dispenser;
- stationery knife, scissors, needle, thread;
- container and spatula for mixing the solution;
- PVA glue;
- plaster, alabaster.
Decor and assembly options
All topiaries have common features. It is necessary to have a lower part as a retainer, the pillar itself and the top. The role of the base for the top part in the form of a crown is played by a ball or other structure. However, the top can also be made in the form of a flower, animal or abstraction. There may be several trunks. They are straight and curved. The container for attaching the barrel is filled with plaster or other composite materials and decorated with several decorative elements. Topiaries are decorated with various fruits, lionfish, twigs, beads, gold threads, gold leaf, colored ribbons, nets, and sticks. You can trim the crown using boxwood leaves, banknotes and coins, living plants and flowers, soft New Year's toys, sweets, paper, felt, various compositions, ribbons, napkins and tree fruits. The theme can be coordinated with certain holidays.
From coffee beans
You will need selected coffee beans, a barrel, containers for mixing and fixing, scissors, tape, a glue gun, a ball with a diameter of 8 cm. Despite the fact that it is easier to glue the beans with stripes down, it is better to direct them outward. Therefore, it is recommended to adhere to the following algorithm: first, lay the layer with stripes down, and lay the grains turned in the opposite direction into the formed dimples. The coating will have no gaps. The next step is to fill the container with composite and install the barrel. After the mixture has hardened, they begin to decorate the surface. It can be finished in a different manner or in the same way as the ball. First, one layer of grains is glued with stripes down, then the top layer in the opposite direction. The top of the trunk is lubricated with glue, and the crown is fixed to it. It needs to be wrapped in something light and decorated.
From the cones
The kidneys need to be collected and processed. Dirt is removed with a detergent; residual resin is removed using cotton swabs. A vinegar solution will help remove even the smallest insects. You will need all the main components that are used to create topiary and, in addition, thick threads, needles and branches of some plant (in most cases, thuja branches are chosen). The cones should be approximately the same size, round and fairly open (for example, pine). Those that have not opened sufficiently are corrected with pliers or placed in the oven. Using glue and thread, the buds are secured to the prepared ball. In the classic version, the cones “look” outward, but topiary with the opposite arrangement of buds looks no worse. The ball is decorated with golden elements, animal figures, as well as the fruits of other trees - acorns and chestnuts.
Cones that are most suitable for decorating topiary:
- Pine;
- Cedar.
From a decorative point of view, Siberian cedar cones look very beautiful.
From napkins
You will need a set of components such as a stapler, multi-colored napkins of different sizes, wire, one or more sticks, a spherical shape, a pot, beads, and ribbon. Napkins are usually used to make flowers, and less often - various figures.
You will need to pin several napkins together in the center (or one large one, folded several times). After this, a circle is cut out of them. The edges are made smooth or wavy. The irregularities will help create chaotic petals. The cuts will make them more voluminous and fluffier. As each layer is lifted, the shape will become more and more flower-like. To finish a ball with a diameter of 20 cm, you will need about thirty of these elements. They are secured with glue and wire. It should be remembered that to recreate the natural size of the flower, you will need circles about 10 cm wide. Green foliage from fragments fastened or glued in the shape of a leaf should be added to the flowers.
From satin ribbons
To design the crown you will need at least ten elements. A satin ribbon or several ribbons of different colors are cut into equal lengths. Material with a pattern will also work. The pieces are folded in half and placed on top of each other in the form of a symmetrical flower, the middle is fixed with a heat gun or stitched.
You can do this with one ribbon, gradually folding it in a circle into the shape of a flower. The free ends are left under the center. Creating a sunflower from ribbons is more difficult: 15-centimeter sections are folded in half and bent to form a loop when connecting the ends. Several dozen such elements will be required. After this they are connected to the center. It is recommended to make two rows of petals. The middle of the sunflower is decorated with seeds or coffee beans. The second option is better as it will take less time.
Corrugated paper
Strips about half a meter long and 3-5 cm wide are cut out of the sheets. To give the shape, the upper corner is bent, after which a second, full bend is made. You need to hold the top with one hand, and lift the bottom with the other. Twisting movements are made. When the strip is folded into a tube, all that remains is to remake this shape into a rose. The base of the crown is made from newspapers. They form a ball. The spherical structure is attached with twine; later you will need to do the finishing with roses. The next step is to install the trunk in the flowerpot. It must be inserted into polystyrene foam and filled with alabaster. The resulting surface is then decorated. You can choose small branches of living plants as decorative elements. The next step is to attach the roses to the ball using pins or hot glue. They can be placed in even circles or in chaotic rows.
From felt
You will need material of different colors for the flowers and green material for the leaves. Additional materials and accessories should include ribbons, braid, a can of acrylic paint, a beautiful container for the base, a stick, a foam blank in the shape of a ball, large beads and other decorative elements.
To decorate a large ball you will need seven sheets of felt, including two green, the rest in different colors. The leaves are cut out immediately into the desired shape, and the flowers are created from round fragments. Spiral cuts, glue and bead decoration will give the flowers their final look. A crown ball can be easily created from crumpled paper. Glue, thread or tape is enough to secure it. After this, fill the lower part of the composition - the pot. Then the bottom of the structure is decorated with decorative stones, the top is decorated with ribbons, and the rod connecting the two parts is spray painted.
To fill the pot you need:
- stones;
- cotton wool;
- gypsum.
From candy
Expired sweets can be used as topiary. If the idea is that fresh candies can be torn from the composition and eaten, then they need to be attached carefully and with a minimum amount of glue. To decorate the top of the topiary, any candies, marmalade, truffles, marshmallows, long candies, sweets on a stick (Chupa-Chups, etc.) will be useful. The optimal material for a ball under the crown is polystyrene foam; papier-mâché balls are suitable. The role of the base can be performed by a pot of plaster or polyurethane foam. The leg is fixed in it. The last stage of assembly is installing the crown. The rod is inserted almost to the center of the ball. The finishing stage is the most interesting. The trunk is decorated with shiny coatings, bows, sparkles, and ribbons. The pot is decorated with large beads, coins, stones, and live moss.
From fresh flowers
This product will be a great gift for Valentine's Day. You will need the flowers themselves, as well as ribbons, a floral sponge, decorative moss, a wooden stick, putty, a plastic bag, and a flowerpot. The inside of the pot is covered with a bag. Putty is poured there, the remaining space is then decorated with decorative moss. After installing the rod, the composition should be left for ten hours. When the composite material has completely hardened, it will be necessary to remove the protruding edge of the bag. Next, a small layer is cut off from the floral sponge. It is moistened with water and placed in a flowerpot. Decorative moss is laid out on this moistened surface. The remaining part of the sponge will serve as the basis for the crown. The trunk in the form of a wooden stick is fixed in its center. All flowers are attached to the crown using glue and tape. The composition needs to be decorated with decorative elements.
To use topiary as a gift, you need to collect an odd number of flowers.
From coins and bills
It is sometimes called the “money tree,” but topiary has nothing to do with the real plant with the same name. In order to create a tree, you will need: a foam ball, a piece of wire, strong wire, scissors, alabaster, a glue gun, a satin ribbon, sisal fiber, a vase, copies of banknotes (you can buy them in children's toy stores or order them online). The bills are folded in such a way as to create a petal with additional “internals”. The petals are arranged into flowers, five in each. They are glued or stitched, and coins are glued to the center. Then the “money” flowers are placed on a foam ball.
To fix the trunk, the vase is filled with alabaster diluted in water in equal proportions. The consistency of the mixture should resemble sour cream. Then several pieces of wire are inserted into the vase to imitate stems. The container is decorated with sisal.
From natural materials
In the process of creating such products, they implement their own creative ideas. In general, it is recommended to use the following ingredients: chestnuts, acorns, shells, stones, leaves, dried fruits, a large paper container with a beautiful design, twigs, gypsum, paper sheets. First, a crown is created - the paper is rolled into a spherical shape and secured with thread. A hole is made in the ball. Hot glue is poured there and a rod is inserted. The bottom part is formed from a large paper cup and the plaster with which it will be filled. The rod is fixed in the container and waited until it hardens. The next stage is decoration. It is better to decorate the trunk along its entire length. The crown can be decorated to match the theme of any season. It is recommended to bring together elements that symbolize different natural elements. Any shapes and textures combine perfectly:
- tree fruits;
- fragments of vegetation;
- parts of corals;
- colorful stones.
Using quilling technique
The following materials and tools are needed: tapes, napkins of different colors, toothpicks, polystyrene foam, glue, a piece of pipe, a spherical shape, a pot, a ruler, colored paper. The first stage is cutting strips from sheets of paper. The ideal length of the strips is 30 cm, width - 1.5 cm. Each piece is cut into tinsel and glued at the edges with another one. The color of the stripes may be different or the same. All strips are twisted around toothpicks into small scrolls. Each of them turns out on one side. The result is cut flowers, which is a characteristic feature of the quilling technique. Then they are glued to the ball using hot glue. You can make a ball for the crown yourself, or buy a regular plastic one. Before allowing the crown to dry, it is fixed in the air. You will need to install the ball on a piece of pipe and fix it in a pot with foam plastic.
Economical souvenir
A topiary made from napkins looks very colorful, reminiscent of an airy cake. A lace, lightweight souvenir is assembled in the same way. Differences in the decoration of the sphere. Napkins of different colors are alternately attached to the ball with a stapler or glue, after having been assembled into an accordion and bent in half.
Depending on the smooth or figured edge, we get flowers of different sizes and shapes. Volumetric and fluffy topiary is obtained from several layers of napkin flowers. More than 30 copies need to be made. You can decorate the resulting airy cloud of napkins with ribbons, decorative leaves, and beads.
Note!
Corrugated paper flowers: TOP 100 photos of ready-made options + instructions on how to make them yourselfDIY family tree: instructions for creating a family tree + DIY design ideas
Do-it-yourself sun lounger: photos with instructions for creating sun loungers + detailed diagrams of the stages of work
Topiary for the New Year
Such a tree can replace a holiday tree; blend harmoniously with it in the interior. The New Year theme is very bright and positive, so the base of the topiary is covered with expensive material, preferably shiny.
To create a crown, Christmas tree toys are usually used, spherical and elongated, regular and unbreakable, hard and soft. Other New Year's accessories will also come in handy: bells, pine cones, candies, deer, packaging. It is desirable that such a topiary does not fall, so the structure is securely fixed in the pot. To do this, you will need a dense filler for the base and a wide trunk made of thick cardboard. Using a regular foam ball as a base for the crown is not the best solution. It is necessary to purchase a floristic oasis. All elements are secured to it using pre-glued toothpicks.
How to choose the right element parameters
The optimal proportions of a topiary are when the height of each element (pots, trunk and crown) is one third of the total height. It is advisable that the crown be slightly wider than the pot.
It is acceptable if the trunk is slightly more than a third of the total height of the tree. The exception is when sisal topiary has an elongated cone-shaped crown and a short trunk. For a harmonious look, the thickness of the trunk matters; a thin one may not support the weight of the crown, and a thick one will give the product a rough appearance.
Artificial topiary with bird
If it so happens that the proportions are violated, you can make amendments to the craft using simple techniques:
- a flower topiary with a small crown can be further decorated, and with a large one, the composition can be installed in a massive flowerpot;
- a decorative bow at the base of the trunk will make the long trunk visually shorter;
- a crown in several tiers will distract attention from the short trunk.
Shell topiary
Autumn topiary
You need to acquire materials such as plaster, glue (or a glue gun), a small cardboard box, polystyrene foam, twine, paper napkins, a stick, old newspapers, decorative fabric. A ball is made from newspapers. It is rewound with threads and covered with napkins on top. You need to wait a few hours for the workpiece to dry.
The role of the trunk will be performed by a long stick. In order to improve aesthetics, it is wrapped with twine. The lower part, the stand, is made from a small square box. It would be better if it was a box of chocolates. A container with hard walls must be placed inside. It is filled with plaster, after which the trunk is fixed. Then the ball is put on a rod and covered with acorns, chestnuts, etc. The free space between the walls of the container and the box is filled with decorative elements.
The main materials for finishing the crown should be:
- chestnuts,
- acorns,
- yellowed leaves,
- lionfish.
Tree with paper flowers
Using scrap materials in your work does not make your creativity less attractive. How to make topiary with your own hands from napkins? Let's figure it out.
Let's prepare:
- napkins (can be colored);
- stapler, scissors, gun;
- ball (can be purchased);
- trunk, pot;
- wire;
- decor
The process of making flowers and leaves is simple:
- shoot a folded paper napkin in the center with a stapler;
- cut out a circle of the required diameter so that the bracket remains in the middle;
- add volume to the petals by crumpling the layers of the napkin: the flower is ready;
- You form the leaves from green napkins and lightly crush them.
Cover the base ball with roses, not forgetting to sometimes insert leaves between them. Use rhinestones to imitate dew on flowers. And you perform all subsequent stages of assembling the topiary.
Marine themed topiary
The outer shell of the crown should be created by beads, shells, stars, ribbons, and solid objects of organic origin (coral fragments). The trunk is made from thick wire, dry twigs or pencils. It is better to wrap it with colored material. The range of colors is not limited, but to preserve the association with the sea coast, it is recommended to stick to white and blue colors, less often green.
Materials such as polyurethane foam, silicone, pebbles, sisal fibers, organza scraps, sea salt, newspapers, threads will be useful. The base for the crown is made from crumpled newspapers. The walls of the base - the pot - are covered with a piece of organza. The trunk is wrapped with twine (then it is decorated). The upper end is lubricated with glue for subsequent installation of a ball made of newspapers. The lower part of the rod is fixed in the pot. After this, the crown is trimmed and the entire tree is decorated.
flower tree
You probably have dusty flowers made of fabric or plastic lying around your house. Don't throw it away, it will come in handy. DIY crafts made from artificial flowers are a great way to save money and update your interior.
- Cut off the plastic stem of the flowers (usually there is wire inside it).
- Attach the flowers to the base with glue, and form a trunk from the wire.
- Use floral tape of a suitable color to fasten the wire and glue the trunk to the finished crown.
- Decorate it with butterflies or dragonflies.
It’s not at all difficult to make topiary with your own hands, master classes and ideas for which can always be found on the Internet.
Topiary for a wedding
This decoration is usually placed on the wedding table. It is customary to make it from expensive materials corresponding to the status of the event. Recommended colors include white, blue and red. An important part of a wedding topiary is the stem. A white iron barrel with artistic forging should attract attention against the background of the rest of the decor. First, prepare the container: it is decorated with lace or the decoupage technique is used. The rod is inserted into the container, and after the filler has hardened, the surface is finished with beads, mother-of-pearl stones and artificial grass. Flowers are made from organza. They are decorated with beads and attached to a ball to form a crown. The top part is attached with a glue gun. From this moment, the final stage of decoration begins - decoration with small elements.
Color combinations
The tree of happiness should not look tacky or vulgar. In order to avoid such troubles, you should remember the rule: in our work we use a table of color combinations and use no more than three primary colors. Remember that attention should be directed to the crown, so for the base, choose neutral tones with a slight accent.
Easter topiary
The crown of such a product is decorated with artificial flowers, multi-colored eggs, greenery, butterflies, and balls of thread. The base for the top can be made in different ways: from newspapers, polyurethane foam, polystyrene foam; use a floral sponge. The first step is to prepare the base for the entire structure. It could be an empty tin can. A piece of foam plastic is placed in it so that the walls can withstand the pressure of the composite, which will be poured later. To create a trunk, wooden skewers or a more original blank - salex - will be useful. If you go with the first option, you will need twine and a hot glue gun to fasten the sticks into one stand. Before filling the jar with plaster, the lower end of the finished barrel is lubricated with glue and pressed into a piece of foam plastic. After filling the vessel with composite material, proceed to installing the crown.
Product proportions
Before we begin discussing the topic of how to make a topiary with your own hands, it is important to pay attention to one more component: the proportionality of the product. In order for your creation to look harmonious, you should make the crown blank 3 cm larger than the base.
The trunk should not look thin or thick in the overall composition, so its length will be slightly longer than the diameter of the crown. The cross-section of the trunk is usually from 1 cm to 3 cm. For the pot, choose a cubic or spherical shape.
Money Tree
To attract wealth into the home, they often make money topiary with their own hands, master classes for which are available in abundance on the Internet.
In addition to the basic materials, you will need gold paint and imitation hundred dollar bills. You can use coins for decoration. We make the main composition and paint it gold.
Then we proceed to the formation of money flowers: to do this, we roll the bills into a cone and glue them to the ball. We cover the entire crown in this way. We decorate with coins and bring a gift to our best friend.
You can make a tree with your own hands from literally scrap materials. And the beauty and originality of such a gift will earn the sincere admiration of your loved ones and friends.
What it is?
Topiary is also called the “tree of happiness.” This is a compact decorative tree made from natural or artificial elements. As a rule, such crafts have a round crown and a small thin trunk.
This type of needlework came to us from Europe. There are many themes used in making crafts. In this article we will talk about autumn topiary.
Anyone can make a bright and colorful product from artificial or natural material on the theme “Gifts of Autumn”. You don’t need to have special skills, the main thing is diligence and a creative approach.
Before you start, you need to prepare a special creativity kit.
Any handicraft involves the use of certain materials. An autumn-themed topiary can be made from leaves (real or artificial), berries, acorns and other items that are associated with this enchanting time of year. You can also use various decorative elements, such as beads, fabric ribbons, figurines and much more.
Experienced craftsmen who have been making “trees of happiness” for many years advise not to limit your imagination and experiment while working.
Possible breakdowns of a gas boiler
There is such a problem: after you release the start button, the igniter goes out. This malfunction is associated with a breakdown of the gas boiler automation system. But under no circumstances should you use the boiler with the automation switched off. This is due to the fact that if the flame goes out due to a strong air flow or if the gas supply is unexpectedly stopped, the gas supply may begin to flow into the room.
Thus, the igniter flame begins to come into contact with the thermocouple. The thermocouple heats up in 30-40 s, and an emf appears at its terminals. It is enough to trigger the electromagnet. Thus, the rod is fixed in the lower position. After this, you can release the start button.
The draft sensor is located in the upper part of the gas boiler, next to the pipe for discharging combustion products into the environment. Such a device consists of a contact and a bimetallic plate.
If a pipe becomes clogged, its temperature rises sharply. The bimetallic plate begins to heat up and the voltage supply circuit to the electromagnet breaks. Thus, the stem cannot be held by the electromagnet and the valve closes. This means the gas supply will stop.