Types of picket fences
Wooden fences differ in the type of picket fence and height, as well as in design features. For example, you can select fences with vertical and horizontal arrangement of parts. The spacing between the picket fences is also important:
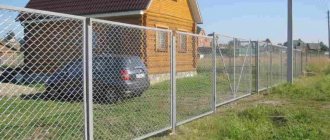
- tight (with a minimal, barely noticeable gap) - a classic option;
- with a large gap (approximately the width of one part) - for good lighting;
- checkerboard - goes in two rows (outside and inside), provides maximum shading.
Drawings and sizes of different types of wooden picket fences
First of all, you need to develop an accurate design drawing. Ready-made options are used as a basis, adjusting the parameters to suit your case if necessary:
- A classic wooden picket fence with supports placed at a distance of 2.5 m.
- The design features a loose picket fence and diagonal joists.
- Scheme with installation of intermediate additional support.
- Solid fence on a brick base.
Decorative fencing
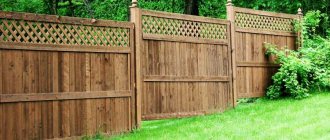
Fences around the perimeter of a summer cottage not only serve to protect and ensure safety. They also carry an aesthetic load. Anyone who wants to decorate their garden can safely install a decorative fence around the perimeter.
A small multi-colored fence will enliven a flowerbed or vegetable garden. You can also easily build an antique structure, transporting residents and guests of a country house to the past or a fairy tale.
You can see various decoration options in the presented photos of a wooden fence. For example, fences with patterns printed on the surface look effective. It is also allowed to combine wood and other materials when making fences:
- using corrugated sheets to look like wood;
- combination of wood and brick;
- combination of wood and stone.
A fence installed along the perimeter of a plot of land is an excellent addition to an interior designed in any style. You will not only reliably protect your home from uninvited guests, but also significantly decorate the landscape.
What tools and materials will be needed
Along with the picket fence and supports (metal or wood), you will need the following materials and tools for work:
- drill or shovel;
- transverse logs (veins) with a section of 50*100 mm;
- crushed stone;
- gravel;
- sand;
- cement;
- roulette;
- screwdriver;
- self-tapping screws;
- hammer;
- axe;
- hacksaw;
- nails;
- sandpaper;
- stain;
- dye;
- drying oil;
- brush;
- construction level;
- strong rope;
- pencil.
What type of wood is best to make a fence from?
When choosing a material, pay attention to its cost and durability. The wood must have a dense structure, so considering the price, pine can be called the best option. You can also use the following breeds:
- larch – very durable, but more expensive;
- aspen, alder - soft species, inexpensive, but less reliable;
- oak is the most practical (especially stained), but also more expensive than the others.
Calculation of a wooden picket fence
To calculate the required amount of materials, pay attention to the main parameters:
- picket fence width;
- total length of the fence;
- spacing between supports;
- presence/absence of gaps, their width.
Determining the amount per 1 meter is quite simple. To do this, 100 cm is divided by the sum of the width of the strip and the gap. For example, one plank is 10 cm wide, the gap is planned to be the same. Then 100/(10+10) = 5. To create such a design, 5 parts will be required.
Installing a wooden picket fence with your own hands
Installing a fence is not very difficult - it will take up to one week, since you first need to mark the area and prepare a cushion for supports. During installation, measurements should be taken periodically using a level. To adjust the height, simply pull the rope between the supports.
Preparing the site
Installing a wooden picket fence with your own hands begins with preparing the site. To do this you need:
- Go around the perimeter with a shovel and remove the turf.
- Uproot all roots along with cuttings that may germinate over time.
- If necessary, level the area by making artificial embankments in the lowlands. For reliability, measurements are carried out using a building level.
- Hammer pegs around the perimeter and string string around them.
- Mark places for support posts - the optimal interval is 2.5-3 m. This is enough to support the entire span of a wooden picket fence.
The easiest way to dig holes is with a drill
Installation of support pillars
Installation of supports is the most critical stage on which the strength and durability of the structure depends. It is advisable to work with a drill, but if you don’t have one, you can get by with a shovel. The pillars can be either wooden or metal. In both cases, they need to be impregnated - with an antiseptic or an anti-corrosion compound, respectively.
The sequence of actions is as follows:
- Dig holes where the posts will be installed. Standard depth is from 70 to 100 cm (including the drainage layer).
- Pour small stones (gravel, brick) onto the bottom, then sand. The total height of the pillow should be at least 20 cm. If the soil is sandy, the layer should be higher. Moreover, additional clay can be placed on the bottom.
- Thoroughly pour water over the pillow, let the liquid soak in and compact it. This will be the foundation for the wooden picket fence supports.
- Clean wooden logs from knots, bark and other defects. Soak with antiseptic or bitumen. You can also use a blowtorch - this will help protect the wood from rotting.
- Install the supports in the prepared holes and fill them with crushed stone and sand. The layers must be laid gradually, pouring water and compacting, moving until the very top.
- Check verticality by applying a level.
- Secure the wooden picket fence posts with spacers.
- Pour the concrete solution, adding crushed stone (proportions are determined depending on the brand of cement). Check the verticality again by level.
- Wait until the solution sets (at least two days) and begin installing the wooden picket fence.
Supports are installed at intervals of 2.5-3 m
Attention! First, fix the first and last pillar. A nail is nailed to them from above and a rope is pulled. With its help, the required height of other wooden supports is determined.
Installation of a picket fence
The picket fence is secured using self-tapping screws. It is not advisable to use nails as they are a less durable option. The installation technology is as follows:
- Prepare two grooves 30 cm deep in each column. Mark their location using a building level.
- Insert a vein into each groove and secure it with self-tapping screws. The result will be a future strapping for the fence.
- The picket fences are cut into equal pieces of 125 cm (standard parts come exactly this length - they can be immediately attached to the posts).
- First, attach the outer picket fence. It should form a perfectly right angle (90 degrees) with the vein. In this case, the parts should move 4-5 cm away from the ground so as not to come into contact with wet soil.
- Fix other wooden fence pickets with self-tapping screws. The interval between them can be determined independently. If you need to ensure complete closure, the parts fit closely (but a minimum distance should still be left). If it is necessary to provide access to the sun to the site, make a medium or large gap.
Attention! If metal rather than wooden supports are used, the veins are attached to them using bolts and staples. If you weld, scale will appear, which will quickly cause rust.
Painting the picket fence
After installing the wooden picket fence, all that remains is to paint and decorate. First, drying oil is applied to the wood and allowed to dry. Then they are coated with high-quality paint that will withstand frost, humidity and temperature changes. You can use decorative varnish or stain.
The last stage is decorating the wooden picket fence. You can use different options for this:
- cut off the top at an angle;
- make it semicircular;
- design in the form of “cat ears”;
- make tiers, ladders.
Schemes for decorating a wooden picket fence will help you choose the best option.
Attention! The decoration is made on the basis of a plywood template. It must have precise contours, so it is recommended to work with an electric jigsaw.
Decoration
The following techniques will help you decorate a picket fence:
- wood carving. More often they decorate the top of the plank by cutting it with a jigsaw in the shape of a tulip, dome or arrow;
- varying the length of the pickets so that the top of the fence represents, for example, a wavy line;
- fastening in the middle of the flight “nickels” cut from a thick tree trunk;
- installation of a “house” over the fence. It looks interesting and, in addition, protects the most vulnerable part of the picket fence - the ends - from rain;
- aging. A special coating is applied;
- decoration of the surrounding area. For example, on the fence there is a seascape with seagulls and yachts, and sand, shells and plastic starfish are scattered on the ground.
Stylized shoes, clay pots, etc. are also placed on the picket fence.
Advantages and disadvantages of a picket fence
Wooden picket fencing has many undoubted advantages:
- durability;
- environmental friendliness;
- the ability to create a variety of shapes;
- affordable price;
- big choice.
There are not many disadvantages. If you choose the right type of wood, the material will last for decades. Although installing a wooden picket fence is in any case more difficult than a metal one, since the parts must be carefully treated with an antiseptic.
Recommendations and common mistakes
Installing a fence is not very difficult, but even experienced professionals can make mistakes. In practice, the following mistakes most often occur:
- Wrong time of year - best to work in late spring or summer, when the ground has fully warmed up.
- Insufficiently thorough control, from marking to installation of poles (maintaining verticality and height).
- Weak foundation - this error occurs when the soil is sandy. It is quickly washed away by water.
- Often, wooden supports are simply immersed in concrete, as a result of which they quickly rot due to moisture. To prevent this from happening, the bases should be thoroughly impregnated with bitumen.
- Gates and gates need to be planned in advance to take into account the driveway, distance from the entrance to the house and other factors.
Original ideas for a wooden picket fence
The picket fence allows you to create original wooden fences - below are several interesting options with photos:
- Classic fencing.
- Diamond pattern design.
- Picket fences with tiers.
- A combination of horizontal rows and vertical slats.
- Horizontal rows with vertical landscaping.
Another 25 interesting options for a wooden picket fence that you can easily make with your own hands are shown in the video. Following the instructions exactly will help you build a long-lasting fence.
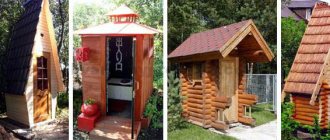
Where can I use it?
In addition to the traditional use of picket fences for arranging a fence, they very often separate a flower bed or front garden from another part of the yard.
As a fence structure for a garden, a height of 30 to 60 cm is sufficient. After all, its main purpose is zoning the site.
If you assemble the picket fence using a through method, the plants will harmoniously fill the gaps between the wooden elements.
The picket fence, painted in different colors, looks original.
A beautiful decorative option is carved material. It is decorated with geometric shapes, lace patterns, and shaped along the contour. You can process wood this way with your own hands or buy ready-made planks. For carving, pear and black rocks are often used. At the final stage, the structure is painted or varnished.
The planks are also useful for finishing open pergolas and gazebos. Having given their original shape, they will become a replacement for walls.
Users often search for:
- How to make a fence from slab
- Fence-blinds made of wood