Phalaenopsis is a wonderful and beloved type of orchid, which nowadays can be easily purchased in specialized stores. If you already have this exotic plant at home, you can propagate it yourself.
One of the simple and affordable ways to grow phalaenopsis is vegetative propagation by children. This article is devoted to how to separate a baby from an orchid.
Why is it important to separate the child from the parent?
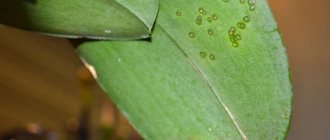
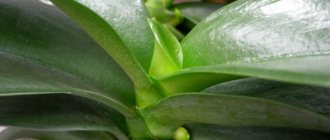
A baby is a young plant that has grown on a stem. It may appear on the peduncle, trunk or roots. In most cases, young shoots grow on the peduncle. First, a compaction appears, then a bud forms, and after that a young shoot grows from it. Sometimes a daughter shoot may have its own roots, stem, or peduncle. Occasionally it happens that it blooms directly on the mother plant.
Orchid with young shoot
It is necessary to separate the baby from the mother orchid so that the parent does not die. The daughter shoot takes a lot of nutrients, so the mother plant receives them in insufficient quantities, which is why it may get sick and not survive. There are difficult situations when either a daughter or a parent can die. In this case, they need to be planted urgently.
Attention! If the baby grew up on the stem of an orchid, then under no circumstances should it be separated from the mother flower. It feeds from a common root through the stem, so it will not survive on its own.
Daughter shoot on a peduncle
Reproduction by lateral layering
Orchid babies are young shoots of the plant that periodically appear on the stem and roots, but more often on the peduncle. They have their own miniature stem, nascent roots and leaves.
Reference! With proper care, babies can appear on their own, but you can wake up the “sleeping bud” on the peduncle - remove the protective scale and carefully treat it with cytokinin paste.
The role of children in the life of an orchid is difficult to overestimate, since it is their continuation. Propagating the plant by lateral layering is quite simple - this is the fastest way.
When can I drop it off?
You can remove the shoot from the parent only when it is ready for this. There is no need to rush: the branch should get a little stronger.
How to understand that the shoot is ready for separation
How to take a shoot from an orchid: transplant options and examples at home
The florist will understand that the daughter is ready to separate from her parent by several signs:
- 5 leaves appeared on the young shoot. Thanks to the leaves, the plant feeds and breathes independently.
- It has grown healthy strong roots (at least three). Do not replant before the length of each root reaches 5 cm.
- The shoot should mature on the mother flower within 5–6 months. It is not recommended to separate it earlier.
A strengthened and healthy shoot can be separated and transplanted into a new pot to grow a new orchid. This is one of the main methods of propagation of this flower.
The optimal temperature for transplants is 20–25 °C, suitable air humidity is 50–60%. It is best to separate the shoot in summer or spring, but this depends on the condition of the adult orchid. As a rule, an orchid does not produce shoots in winter.
Young shoots rarely grow on an adult orchid. His appearance can be considered a stroke of luck. This will allow you to grow another flower in the room. Most often, the shoot appears in the warm season - in summer, late spring or early autumn.
Important! A child with weak roots cannot be planted; it may die. You need to wait until the roots get stronger, otherwise the shoot will not take root in the new place.
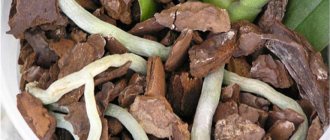
Daughter shoot near the root at the base
Is it possible to separate the baby if the orchid is blooming?
Inexperienced gardeners have difficulty noticing that an orchid has a baby on its trunk. Not every flower lover knows what to do if an orchid is blooming at this time. In this case, it is advisable not to replant the young shoot, but to wait until flowering ends. Separation of shoots is a serious stress for a flowering plant. In addition, during this period, the daughter’s roots have not yet formed, so she will not survive on her own.
Important! You cannot cut off and replant several children from one mother plant at once. This can destroy the parent.
Daughter shoots need to be separated so that they do not destroy the parent
If it grows on a peduncle
Very often there are situations when an orchid gives birth to a baby on a peduncle. How to transplant a young shoot is described below.
Detailed instructions on how to remove a baby orchid from a peduncle:
- Using a sterile pruner, cut off the young shoot, capturing part of the peduncle, but leaving 1–2 cm on the parent branch.
- The cut area for disinfection is sprinkled with crushed activated carbon and allowed to dry.
- The base of the shoot is cleared of scales to allow roots to grow.
- Expanded clay, tree bark and wet moss are placed in a plastic cup with a hole in the bottom.
- A horizontal support is installed on top that will support the plant. Additionally, you can install a vertical support to hold the stem.
- The branch is attached to the support so that its lower cut does not touch the ground. The shoot should hang in the air, this will allow the plant to take root.
- The plant is covered with a large plastic bottle or eggplant with the bottom cut off, placed in a warm place and watered regularly.
Important! You must wait until the roots grow. Then the branch can be transplanted into the ground.
This rooting method is widespread among gardeners because daughter shoots often grow on the peduncle.
Tools must be disinfected
Where do the buds appear?
Children can appear on different parts of the plant:
On the peduncle , after the plant has faded, a young sprout appears.
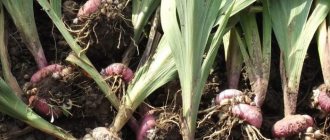
It is worth noting that not one baby may appear, but several, and they can be located anywhere on the peduncle, both in the middle and at the very end. But usually only one process appears. Do not rush to remove the peduncle; create the correct temperature and proper air humidity so that the orchid sends out shoots that can later be planted. At first, the shoots are very small, but over time, small compactions will appear on the sides - roots will begin to form.- At the roots , children also appear quite often; in this case, when separating, you need to act with the utmost caution, since there is a possibility of damaging the roots of an adult plant.
- On the trunk – it is not recommended to remove these shoots.
They do not have their own root system. In addition, when separating, you can damage the stem of the plant, which can simply cause it to die. A baby may appear on the stem if the growth point begins to freeze. After the mother plant dies, the baby will continue to grow.
Tools for separating and transplanting Orchids
How to grow roots of an Orchid at home
Before separating the baby and transplanting it into new soil, you need to prepare the following tools:
- garden pruner;
- activated carbon (1 tablet) or ground cinnamon;
- alcohol for disinfection;
- a thin plastic pot with a diameter of 8–10 cm, there should be holes at the bottom;
- a sharp stationery or kitchen knife, you can use scissors;
All instruments must be thoroughly disinfected before use.
The soil must be prepared from three components:
- sphagnum moss;
- finely ground tree bark (pine);
- charcoal.
You can buy ready-made soil for orchids in the store.
For an orchid, a substrate is prepared from pine bark, sphagnum and charcoal
Stimulation of root emergence
Some baby orchids do not produce roots; in such situations, plant lovers are interested in the question of how to deal with this problem.
First of all, you need to take sphagnum moss, strong thread and cling film.
In order for the moss to swell, it must be soaked in water for 30 minutes.
From the resulting moss we make a nest, which is attached to the peduncle with the baby using a thread. You need to secure it so that it does not fall apart.
To ensure that the orchid does not tip over and the baby does not break off the peduncle, the “nest” of moss can be additionally attached with a stick with clamps.
To create a greenhouse effect in a dry room, the moss “nest” is additionally wrapped with cling film.
Important! When wrapping with cling film, remember that the plant must be ventilated every day.
The moss “nest” is sprayed with water every day. To stimulate root growth, Kornevin is added to the spraying water.
How to properly separate
You need to know exactly how to remove a baby orchid from an adult plant. Occasionally, a shoot grows at the base of the parent, then the baby has roots.
Baby orchid on a peduncle: examples of how to grow and root
If a root baby has formed on the orchid, then the procedure is a little simplified:
- Check the presence and condition of roots. They must be strong, strong, long;
- Using a disinfected knife, pruning shears or scissors, cut off the baby and disconnect it from the roots of the main orchid.
- Sprinkle the cut area with activated carbon powder or cinnamon.
- Prepare the substrate: place expanded clay at the bottom of the pot, then mix moss and pine bark. It is advisable to water the substrate with a solution of potassium permanganate.
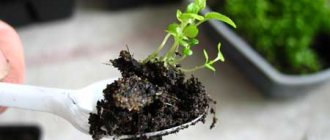
- Make a hole in the ground and place the cut baby there. Gently sprinkle the roots with the substrate so that they are completely covered with soil.
- Cover with a plastic bottle (greenhouse).
Important! The transplanted baby can be watered with clean water after 2–3 days, not earlier. This will protect the wounds from infections and the roots from rotting.
A young orchid will grow quickly in warmth and good humidity. It needs to be watered regularly. The soil should not be dry, but it should not be flooded either.
The shoots are transplanted into cups with holes in the bottom
Is it possible to separate the baby from the flower if it is blooming?
When the plant blooms, it is not advisable to separate the shoots.
Having disturbed a flower, it is not known how it will react to such actions. But there are hybrids that bloom endlessly. A flowering plant grows children that develop, and the peduncle, shedding some flowers, immediately forms new buds. If the cutting is already more than 4-5 months old, it has formed roots 6-7 cm long, has 4 leaves, then it can be disconnected from the mother bush even during the budding period. You should also pay attention to the condition of the adult flower; if it is sick, it is better not to disturb it and wait until it recovers.
You don’t have to separate the shoot from the mother bush; it won’t “eat” the parent. The layering root system is already capable of feeding on the substrate on its own. We must not forget to feed and water the orchid. It is advisable to transplant the overgrown plant into a larger pot so that everyone has enough space and soil.
Where is the best place to transplant?
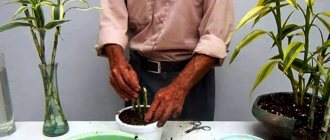
The separated orchid branch needs to be transplanted into new soil. Beginning gardeners should remember well how to plant an orchid shoot at home.
The orchid shoot can be transplanted into a greenhouse or polystyrene foam. If the baby has its own root system, it is planted in new soil. If it does not have roots, then it is suspended above a pre-prepared substrate and wait for the baby to take root. In both cases, the orchid needs to be grown in a greenhouse, which can be made from a large plastic bottle. A greenhouse will keep the orchid warm and moist.
There is another way to root an orchid shoot: the baby is planted in polystyrene foam. A hole is made in a piece of polystyrene foam and the base of the process is inserted there. The entire structure is placed in a glass of water and secured. You can cover it with a greenhouse or plastic wrap.
Important! The root of the baby should be under water until roots begin to appear. After this, the plant is transplanted into the ground.
The cut shoot is germinated in polystyrene foam
Negative consequences for the flower
The appearance of babies on an orchid is an important part of the life of a flower. Their appearance may have different locations:
- children at the root;
- stem babies;
- babies on a peduncle.
If a baby forms on the trunk, this can lead to the death of an adult plant. In this case, the formation of offspring occurs due to division and formation of new cells, and not from a dormant flower bud. This subsequently leads to the death of the plant.
When a stem baby appears, its further growth cannot be provoked. The stem offspring of an orchid does not produce roots after injury. Such a plant should be fertilized and given the most usual care. In the future, the plant may even bloom along with its offspring.
In other cases, the presence of babies on an orchid is safe for it. It must be remembered that the appearance of new shoots depletes the plant’s resources, so flower care must be intensified.
Read more about how orchid babies appear and grow on the trunk, at the base and root, and what care is needed here.
Caring for a transplanted baby
Proper care will help a young orchid grow into a beautiful adult plant. The florist must provide the necessary conditions for both the transplanted child and the parent. Then the flowers will survive and will delight the owner with their beauty for a long time.
Additional Information! The orchid loves a warm shower, so in the summer months the flower can be placed in the shower for 5-7 minutes.
The condition of the transplanted appendage must be closely monitored. If the leaves turn yellow, the flower withers and dries up, it means that the grower violated the rules for transplanting the shoot or did not properly care for the plant. Secateurs and soil must be disinfected to avoid infection. The cut site is also treated with activated carbon or mustard.
Yellowing leaves are a sign of dry soil or sunburn. It is necessary to water the plant and place it in the shade. If the orchid is watered too often and abundantly, rot will form on the roots, and then the flower will need treatment. Root rot and leaf wilting can be caused by pests. Then it is necessary to use insecticides and special preparations to treat plant diseases.
The root is grown using wet sphagnum
Stimulation of root emergence
It happens that a young orchid does not grow roots. There are several ways to grow the root system on a separated child. Good methods are to float the scion on foam and suspend it above the ground. But there is another effective way to help your child develop a healthy independent root.
How to grow roots on a daughter shoot of an orchid:
- Moss (sphagnum) is soaked in water for half an hour.
- The soaked and swollen moss is rolled into a ball and tied with thread.
- They make a small greenhouse: put drainage in a plastic glass with a hole in the bottom, and then moss (sphagnum).
- A support for the sprout is placed outside, which will not touch the moss.
- The underside of the baby is treated with a root growth agent (for example, “Kornevin”), which is added to the water for irrigation. It is necessary to alternate the use of water and the product: today they water it with water, and after 2 days - with Kornevin.
- The baby is placed in the moss, pressed tightly against it, secured from below and tied to a support.
- Sphagnum moss is watered and sprayed daily.
- The entire structure is covered with plastic film or a greenhouse and placed in a bright place, protected from the burning rays of the sun.
This method can be used even for children growing on the mother plant. The wet moss is fixed to the base of the parent's peduncle and the roots of the daughter shoot are waited for.
The roots will grow no earlier than after 3 months. Sometimes the extension process can take six months.
The reason for the lack of roots lies in insufficient lighting, inappropriate fertilizer or lack of moisture. First you need to eliminate the cause, and then grow the roots. If the flower does not have enough light, you can install a phytolamp. The plant needs regular, but not excessive watering and fertilizing. An orchid will not survive without roots, so the grower should begin growing the roots of a young flower as soon as possible.
The orchid must receive enough heat, light and moisture, but their excess can be harmful.
Temperature and watering
You need to care not only for the children, but also for the mother’s flower. After the appearance of offspring, an adult orchid needs increased attention and careful care. It needs to be fed with nitrogenous or complex fertilizer and provided with a warm, moist environment.
Necessary conditions for a parent:
- temperature 20–23 °C;
- air humidity 50–60%;
- muffled light;
- protection from direct scorching rays of the sun.
Caring for the mother flower:
- regularly water the dried soil;
- Spray the leaves with water every day;
- the flower can be fertilized at the root or sprayed with fertilizers;
- Make sure that water does not accumulate in the pot.
The transplanted baby does not require special care. It must be kept in a greenhouse for a year. The temperature inside the greenhouse must be at least 25°C. For the first time after transplantation, the baby is watered on the 4th day. The soil should dry out a little, so the plant should not be watered daily, but once every 2-3 days. For irrigation you will need filtered or settled water.
After a month, the baby is fed with nitrogenous fertilizers. Then it needs to be fertilized every two weeks. A young plant requires 2 times less fertilizer than an adult flower. Only a healthy plant with strong roots can be fertilized. Before fertilizing, water the soil abundantly.
After transplantation, the young shoot is placed in a greenhouse
The greenhouse should be placed in a well-lit place, but direct sunlight should not fall on it. It is best to place it near an east or west window. The baby is growing quite slowly: in three years she will become an adult orchid and will look incredibly beautiful.
Growing a young orchid at home on your own is quite difficult. If a baby appears on a flower, it must be planted. This is one of the main methods of orchid propagation. The flower of this species is very whimsical and requires good care.
Coffee capsule Nescafe Dolce Gusto Chocochino, 3 packs of 16 capsules
1305 ₽ More details
Hot chocolate capsules Nescafe Dolce Gusto Chococino, 8 servings
334 ₽ More details
Greeting cards
Possible problems and ways to solve them
- Long absence of children. If a healthy plant does not produce children for a long period, you should reconsider the environmental conditions and provide proper care, or, on the contrary, try to create a stressful situation.
- The young shoot does not send out roots for a long time. The shoot does not always produce roots. For their appearance, the following activities are carried out:
- take sphagnum moss, strong thread and cling film;
- moss is soaked in water for 30 minutes to swell;
- a nest is formed from moss, which is attached to the peduncle with the baby using a thread;
- wrap the nest with cling film to achieve a greenhouse effect.
- Babies appear on a sick orchid. In case of such a problem, first of all, cut off the peduncle and place it in water with activated carbon. After the flower stalks wither, the young plants are transplanted onto moss.
Some experienced gardeners do not recommend growing roots using special methods, but advise waiting for them to appear naturally.
Transplanting a plant into a separate substrate
Transplanting a new plant into a separate substrate is quite simple, but you still need to know some details. First you should prepare for this procedure. To do this, the separated cuttings (described above on how to properly trim the baby) need to be soaked in water for at least 15 minutes. If desired, you can add a growth enhancer to the water (any one is suitable, but you need to dilute it correctly - following the instructions). Why is soaking necessary? Wet roots are more flexible and less susceptible to being placed in a pot.
Now take a container for the plant. You need to lay a drainage layer on its bottom. You can use vermiculite, expanded clay or ceramic shards. Choose the option that is convenient for you. Next, the plant is lowered into the pot and held so that the leaves are higher than the top point of the pot. The substrate is carefully poured so as not to injure the roots. In this case, you need to lightly tap on the sides of the pot so that the soil is evenly laid. But do not pack the soil mixture too tightly, as aerial roots need access to carbon dioxide for nutrition. Leave the plant in this form for two to three days, after which you can water the plant.
What can be used to speed up the formation of the root system in a baby orchid? A good choice would be one of the following drugs, which can be purchased at a specialty store:
"Ribav-Extra". The manufacturer positions the composition as a root former. It is used to treat flowers, as an anti-stress agent and to accelerate the formation of roots in young plants, ensuring their better survival. The composition is diluted on the basis that two drops of the product are needed per liter of water. "Zircon". This drug is universal. That is why, when diluting it, you need to make a weaker solution than indicated in the instructions, so as not to harm the orchid. For a child, it is enough to add four drops of the product to one liter of warm, settled water. The drug itself belongs to the group of phytohormones, so it can be considered one of the best feeding options. The basis of the product is an extract of Echinacea purpurea. "Radifarm". The drug is developed on the basis of various plant extracts. It is able to actively stimulate the growth of the root system, ensure better survival rate and guarantee the survival of plants
For an orchid, it is important to dilute the composition correctly: add one drop of the product to a liter of water. "Etamon." The product has positively proven itself as a stimulator of root system formation
The main advantage of the product is the presence of phosphorus and nitrogen in the composition, which are necessary for the orchid. Correct dilution of the composition requires that you add one ampoule of the product to a liter of water.
As you can see, separating a baby from an adult orchid is a simple procedure. To ensure everything works out exactly, you need to follow the recommendations given. This is a guarantee that the plant will take root and no problems will arise. Remember that you cannot separate the baby while the orchid is blooming. Wait until the flowers fall and the plant enters the resting phase. Pruning small plants from the mother specimen during the flowering period is stressful for the plant, which can lead to a deterioration in its health: lethargy, falling leaves, and stunted growth.