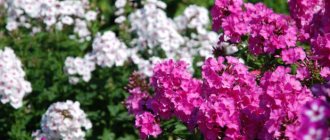
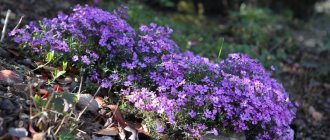
Phlox Drummond is an annual plant belonging to the Blue family. The height of the bush, as a rule, is 30 - 50 cm. The plant is quite low in comparison with other phloxes. Its shoots are decorated with bright flowers of various shapes and colors, collected in inflorescences in the form of an umbrella or shield. Flowering usually begins in June and lasts until late autumn.
Types and varieties of Drummond phlox
In its family, Drummond's phlox is the only species. All plant varieties included in it can be divided into several groups:
- star-shaped;
- large-flowered (flower diameter up to 4 cm).
There are many different varieties of Drummond phlox, differing in the shape and color of the flowers. The most popular of them are:
- Chanel is a variety distinguished by double pink buds that form lush inflorescences. Bush height – 20 cm;
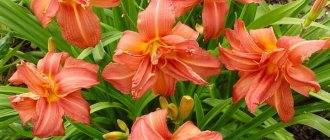
- Promise (peach) is another terry variety with flowers of a delicate peach shade that do not fade in the sun. Characterized by extremely abundant flowering. The diameter of the flowers reaches 3 cm. Plant height is 15 - 20 cm;
- Shustrik is a variety of Drummond phlox with unusual star-shaped flowers, painted in various shades: snow-white, pink, red, lavender and sky blue. Stems length – 30 – 50 cm;
- Etni - Drummond phloxes 10 - 15 cm high. Large flowers with a diameter of about 4 cm can be painted in a wide variety of colors;
- Edmond is a variety of Drummond phlox with large creamy yellow flowers collected in corymbose inflorescences. The length of the stems can reach 45 cm;
- Caramel is a variety with highly branching shoots 40 - 60 cm long. The flowers have trapezoidal petals of a golden caramel hue, the middle of which is raspberry-cherry, and the edges of the petals are rounded.
Description of an annual plant
Phlox Drummond is an ornamental annual. The plant got its name thanks to Thomas Drummond. This Scottish botanist traveled through Texas from 1833 to 1835, and from this expedition brought a new species of phlox to Great Britain. Since then, the plant began to gain popularity.
Phlox Drummond is quite miniature - it grows to a maximum of 50 cm. It has pubescent stems and no creeping shoots. The leaves are light green, whole. The inflorescences are loose, the corolla has 5 petals. Stamens are formed in the same number.
Based on the phlox brought by a Scottish botanist, various varieties were developed over time. They differ in color and flower shape.
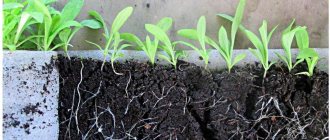
Growing Phlox Drummond seedlings
Phlox Drummond seeds in warm regions are sown directly into open ground, but in central Russia due to the threat of return frosts this is not possible. That is why in cold regions it is recommended to grow Drummond phlox from seeds and seedlings.
How to collect and prepare seeds
Phlox Drummond seeds ripen in mid-summer. They are large and located in small spherical boxes. After full maturity, these capsules are collected, dried, laid out on a flat surface in a dry and dark place, and then the seeds are removed from them. They remain viable for 3 - 4 years.
Immediately before planting, the seed is sometimes germinated. To do this, the seeds are placed on a damp cotton pad, covered with film, and then put in a warm place. As a rule, if the seeds were of high quality, they should germinate in a couple of days.
Advice! To prevent the seeds from starting to rot, it is recommended to make several holes in the film.
Container selection
You can grow phlox seedlings in various containers:
- It is convenient to do this immediately in small separate pots. Thus, there will be no need to pick the seedlings; during transplantation, they can simply be dumped into the ground. This significantly reduces the risk of damage to the fragile root system.
- Using seedling boxes made of wood or plastic, you can significantly save space. You can even make such a box yourself.
- The most convenient way is to plant in peat pots, which can decompose in the ground over time. The plant is placed in the soil along with the pot, and the roots grow into the ground through its walls. In this case, the risk of injuring them is completely eliminated, and seedling survival rates reach almost 100%.
Soil preparation
For planting Drummond phlox seedlings, a loose soil mixture is ideal, including:
- humus;
- peat;
- sand;
- lime;
- mineral fertilizers.
All components are mixed, placed in selected containers, and then watered with a moderate amount of water and sowing begins.
Drummond phlox planting technology
Despite the fact that the seeds are large and dense, there is no need to deeply bury them. For Drummond phlox seeds, good lighting is important, so they are simply scattered over the surface of the soil, lightly pressing with your hand. After this, the seedlings need to be sprayed with water from a spray bottle, and the container should be covered with film and placed on the windowsill, at a temperature not lower than +23 degrees.
Important! Future seedlings will subsequently need to be ventilated and sprayed daily.
After the sprouts that have hatched from the seeds begin to attach to the ground and take root, the film is removed. If the planting technology is followed, the first shoots should appear in 7 - 10 days.
Further care of the seedlings consists of moderate watering as the top layer of the soil mixture dries. It is recommended to maintain a temperature in the room of about +20 degrees. Picking is done 2 - 3 weeks after the first true leaves have formed; the plant should be planted at a distance of at least 15 cm from each other.
On the eve of planting, the seedlings are hardened, gradually lowering the temperature to +15 degrees. It is advisable to increase the frequency of watering at this time, and combine the watering itself with mineral fertilizing.
Advice! After the first 4-5 leaves appear, the top of the plant can be pinched: this will make the Drummond phlox bushes more lush in the future.
Landing location
Drummond phloxes bloom well in flower beds and mixed borders. It is advisable to plant them with spring flowers. When the primroses fade, the phloxes will cover the empty space with their lush blooms. It is useful to plant phlox near the porch or in a portable planter.
In cool climates, it is better to plant phlox in a well-lit, sunny place. In the southern regions, Drummond phlox is best grown in partial shade. In addition, in the south, plants can be insulated with non-woven material for the winter, and the next summer they will grow and bloom, only less abundantly.
On a note!!!
Despite the fact that the plant is cold-resistant and is not afraid of cool weather, it is advisable to plant it in a well-lit area with light shading.
Planting seedlings in the ground
The site where it is planned to grow Drummond phlox should be located in light partial shade. The soil should be moderately acidic, sandy and non-clayey, light, fertile, saturated with vermicompost or compost. Too heavy soils are lightened with peat, sand and organic fertilizers. Good drainage is also extremely important.
The recommended distance between plants is 20 cm. Planting algorithm:
- dig small holes;
- sprinkle them with ash (up to 150 g);
- place seedlings in the holes, straightening the roots to a horizontal position;
- cover with earth.
The soil
Land for planting can be taken from the garden bed, adding a little river sand and peat to it. If the soil is acidic, you will have to add lime or ash. In sandy soil, plant roots can overheat in hot weather.
Moisture can stagnate in clay soil, which will lead to rotting of the roots. For the same reason, an area with high groundwater levels is not suitable for planting phlox.
Fertile and well-drained soil is ideal.
Sowing Drummond phlox with seeds in open ground
When growing annual phlox Drummond from seeds directly in open ground, the first step is to form shallow grooves, after which they are watered and wait until the water is absorbed.
2-3 seeds are placed in one hole; a distance of 15 cm is also maintained between holes. In cases where several seeds sprout in one hole at once, the weakest of them should be pinched off. For about the first 2 weeks, before shoots appear, the plant requires shelter that retains moisture.
Advice! When sprouts appear, the soil needs to be loosened and nitrogen fertilizers applied. After a week, nitrogen fertilizing must be repeated.
Reproduction methods
Drummond Phlox can be propagated in two ways:
- seedlings grown in advance on the windowsill;
Young leaves of hatched plants are vulnerable to direct sunlight. They should not be placed on the windowsill to avoid burns. - seeds, which are placed immediately in open ground.
It is impossible to obtain high-quality seeds at home from F1 hybrids or tetraploid varieties, since they do not retain parental characteristics
The second option is the most preferable, as it makes life much easier for gardeners. When sowing seeds, there is no need to care for the seedlings and subsequently replant them. In addition, seedling propagation will require seed stratification, which can be avoided when planting in open ground.
Caring for Drummond phlox in open ground
Further care for phloxes in the open ground is pleasant and easy. Even novice gardeners can cope with growing these unusually beautiful flowers.
Watering
In summer, the plant requires regular watering. Prolonged drought contributes to overheating of the root system and a lack of nutrients, as a result of which the plant becomes weak and susceptible to disease, and may even die.
Top dressing
Over the entire season, plants are fertilized 4 times:
- fertilizing with manure - in the last days of May;
- fertilizing with a mixture of liquid manure and superphosphate - in early June;
- application of liquid manure - in early July;
- fertilization with potassium salt and phosphorus - at the end of July.
Advice! To make flowering more abundant, it is allowed to fertilize the plant with ammonium nitrate several times a season.
Weeding and loosening
Periodically, the soil needs to be carefully loosened, trying not to touch the roots of the phlox. Loosening improves soil breathability. During the second half of the growing season, the plants hill up the soil around the bushes. It is also important to promptly remove weeds growing near the planted flowers.
Removing flowers
Phlox Drummond flowers must be removed as they wilt and dry out. Otherwise, flowering will not be as abundant.
Shelter for the winter
Phlox Drummond is an annual plant and does not need shelter for the winter. However, next year it will always be possible to grow new phlox from seeds collected with one’s own hands from last year’s plants.
Care
Watering
Overmoistening during watering and long breaks during drought should not be allowed. If there is a lack of moisture in hot summers, phlox will produce fewer buds and flowering will be poor.
You can reduce watering and reduce moisture evaporation by mulching the bushes with peat and humus. The soil around the plant is regularly and shallowly loosened so as not to damage the surface roots.
Feeding
Phlox Drummond loves regular feeding. When caring for seedlings, mineral complexes are used once every 10 days. Then, during the summer, starting from the stage of bud formation, the plants are fed 2-3 times with solutions of mineral fertilizers. Removing faded flowers promotes the formation of new ovaries.
Diseases and pests of Phlox Drummond
Phlox Drummond can be threatened by many pests and diseases, including:
- Jaundice is a rare disease that manifests itself as greening of the inflorescences and is spread by insects. It will not be possible to save diseased phlox; it is better to destroy them immediately so that the infection does not spread to other, healthy plants.
- Variegation is another dangerous, incurable disease in which light stripes appear on flower petals. Infected plants should also be removed.
- Spot is a fungal disease that can be recognized by dark spots on the leaf blades. You can save phlox with the help of fungicides or a drug such as Topaz.
- Powdery mildew is also a fungal disease and can be treated with fungicides and Topaz. Signs of the disease are a decrease in turgor in the leaves and a white coating.
Varieties
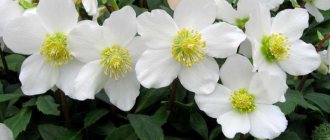
• “Carnival” - a mix of flowers of different shades with contrasting eyes and “Strawberries and cream” with magnificent double flowers.
• “Large-flowered” – large-flowered white-purple variety;
• “Star Scattering” is an impressive rainbow mix of flowers whose petals look like starry lace.
• “Beauty in Yellow” and “Sunny Bunny” are bright yellow.
• "Grammy" - a rich pink shade with white stripes in the center of the petals.
• “Isabelina” is a delicate light orange shade.
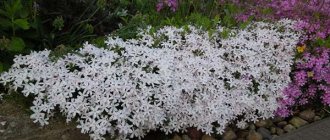
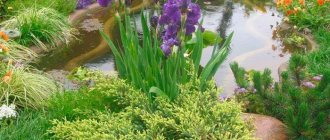
Drummond phloxes in landscape design
Drummond phloxes are famous for their variety of varieties, differing in shape and color of flowers, so they are often used in landscape design. Annual phloxes are used to decorate borders, flower beds and rock gardens. Due to its compact size, the plant can be grown even in a container.
Different varieties can be planted either individually or combined with each other. The bright flowers of Drummond phlox look interesting next to silver and blue coniferous plants.
General information
The amazing lush bushes of Drummond can reach a maximum height of 40 cm. The flowers are not large (2 cm) and are collected in crowded inflorescences. In some varieties, the number of flowers in an inflorescence can reach 90 pieces.
The flowering period lasts all summer and early autumn, until frost. This crop can withstand frosts down to -50C. If the crop is propagated through seedlings, flowering will begin in May. The resistance of Drummond's inflorescences to sunlight is also high; they do not fade and retain their colors.
Drummond bush is branched, with elongated leaves located opposite each other. The culture reproduces well by self-sowing. Due to all these qualities, with the help of Drummond, you can create dense carpet meadows.
This crop is also used as a container crop for decorating loggias, terraces and balconies, especially low-growing terry varieties (“Promise Lilac Blue”, “Tapestry”, etc.).
When can you plant plants in the regions of the Russian Federation?
Having decided on the date, novice gardeners have a new question regarding choosing the optimal month for planting. The situation is aggravated by the fact that there are no uniform recommendations in this regard, since everything depends on the climatic characteristics of the growing area.
Phlox seeds have good germination You may be interested in: Planting dates and features of growing osteosperm from seeds for 2022 Dates and rules for planting eschscholzia from seeds for 2022 Dates and rules for planting statice from seeds for 2022
In outskirts of Moscow
Russia is the largest state in the world by territory, so it is not at all surprising that different parts of it have their own planting dates, which may vary depending on weather conditions. So for the Moscow region, located in the middle zone, its own rules apply, and the optimal month for planting phlox seeds in this region is March.
In the Urals
In the more northern zone, which includes not only the Urals, but also the Leningrad region, it is recommended to sow phlox no earlier than the end of March. If spring turns out to be very late, then you can postpone the process to the beginning or middle of April.
In Siberia
Since the soil takes the longest time to warm up in Siberia, experts strongly advise germinating seeds at the end of March. In particularly cold regions with record short summers, sowing is carried out in May and planting in July.
The situation with gardening is easiest in the southern regions, although they also fall under the “Risk Farming Zone” classification. In this area, sowing of phlox seedlings begins at the end of February, although there are many gardeners who, at their own peril and risk, plant the seed directly into the ground, choosing the moment when the soil has time to warm up well under the May sun.
Step-by-step instructions for planting annual phlox seedlings
In order for incredibly beautiful flowers to appear in your garden or vegetable garden, you must know how to properly plant phlox seedlings. You can learn all the secrets and tricks from us; below you will read step-by-step instructions.
Selection of capacity
There are no strict restrictions in choosing a container for seedlings; any container is suitable for these purposes; you can take a cut bottle or milk carton.
There are also no special restrictions on whether to produce seedlings in a common container or individually. Phlox will grow well in both cases.
When preparing and choosing a place for planting Phlox, you should pay attention to the groundwater level: it should be low, since the plants do not welcome
Seed selection and preparation
The further growth and development of the plant depends on the quality of the seed, so you need to buy seeds from reliable producers. You need to ensure that the seeds are of high quality.
Phlox seeds do not necessarily need to be treated before planting, but if this is important to you, you can soak them in a soluble growth preparation. The dosage should be indicated on the drug packaging.
Growth stimulating drugs help plants sprout faster and young shoots to be stronger.
Soil preparation
To grow phlox, you need to prepare loose soil into which air and water can easily penetrate.
If you don’t want to bother and prepare the soil yourself, then you can buy a universal soil that is intended for flower crops. But if you want to make the soil yourself, then you need to mix the following ingredients:
- peat
- humus
- sand
- perlite
Direct sowing
Before sowing, you need to make sure that everything you need is ready: container, soil and seeds.
- Place drainage at the bottom of the container
Drainage will help avoid waterlogging of the soil; you can do without it, but the roots will definitely not rot. You can use broken brick or expanded clay as drainage.
There is no need to put too much drainage material, a layer of 1 cm will be enough.
- Fill the container with prepared soil
Place the prepared soil in a container, making sure there are no empty spaces. Also, do not fill the container to the very edges, leave 2-3 cm.
- Moisten the soil in the container
Watering is best done from a sprayer, but this is not the main thing, the main thing is that the water is clean and infused. Never water the soil and sprouts with tap water.
You can only use clean water, it should be a little warm and settled, and in no case from the tap.
- Planting seeds
Here it is necessary to evenly distribute all the seeds over the surface, it is best if the distance between them is a couple of centimeters.
You can distribute it with your fingers, since phlox seeds are quite large in size. If you are not comfortable with your fingers, you can use tweezers.
Phlox seeds
- Soil compaction
After planting the seeds, you need to compact the soil a little; this can also be done with your fingers.
- Watering
Water the seeds with clean, infused water in a thin stream.
- Greenhouse effect
To prevent moisture from evaporating too quickly, you need to create a greenhouse effect, this can be done using a regular plastic bag.
The main thing is that the material with which you cover the container is transparent; not only a bag, but also a piece of glass is perfect
- Transferring a container
After all the procedures, you need to move the container closer to sunlight, for example, to a windowsill. The main thing is that the temperature is within 25 degrees.