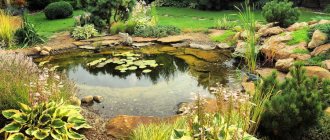
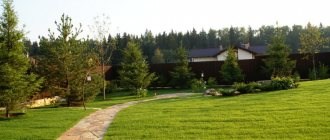
It’s hard to imagine a well-groomed area without comfortable, beautiful paths. While preserving the charm of the surrounding landscape, they try to abandon the continuous covering of pedestrian paths, using step-by-step paving. Let's figure out what a walking path is and how, using available materials, you can make an original path in the garden and lawn.
Stage 2
We begin it when the concrete is completely dry - that is, no earlier than in a month!
Let's do the final sealing of the seams, because... while the concrete in the seams is still noticeable.
In hot sunny weather, thoroughly wash the path (I used Karcher) and let it dry completely (3-4 days in dry, sunny, hot weather).
We select small pebbles with a diameter of 10-15 mm for backfilling, after also thoroughly washing them in a basin or under a hose. I recommend the very beautiful and textured smooth “Caspian pebbles”. Place the washed pebbles on film in the sun or under a canopy and, stirring occasionally, dry until 100% dry.
It is very important!
We take reliable glue. I chose Stonegrip - a 2-component translucent polymer adhesive that grips very tightly. One set is enough for 20 sq.m of track.
Pour the glue into a bottle and spread it in a thin layer along the seams onto open concrete over an area of up to 5 sq.m. Don't stain the stone and then you won't be able to wipe off the glue!
We pour the backfill “with a heap” on the areas that have been spilled with glue and after an hour, sweep away the unadhered residues with a brush.
You need to work with glue in dry, hot weather, with a completely dry surface and materials, otherwise it will foam and will not be able to harden completely.
Let's look at the resulting masterpiece and rejoice! I got it like this:
Other interesting ideas for landscape design can be found on Konstantin Ovcharov’s page.
How to lay it?
Laying lawn gratings does not require any special construction skills, and therefore anyone can install them with their own hands. The installation technology will consist of several successive steps. Let's look at how to lay a plastic grill yourself.
- Initially, the amount of material is calculated and raw materials are purchased based on the purpose of the future lawn.
- Mark the area for installation of the grating.
- A layer of soil (up to 28 cm) is removed from the marked area, taking into account the thickness of the gravel cushion (10-20 cm), leveling layer (3 cm), and lawn grid (5 cm).
- After removing the soil layer, the boundaries of the dug area are strengthened and the bottom is compacted.
- A cushion of a mixture of sand and gravel is poured onto the ground. The use of sand will prevent crushed stone or gravel from being crushed during operation.
- Geotextiles are laid on top of the cushion, which will prevent the proliferation of weeds, prevent soil from sinking and maintain the drainage of the lawn.
- A leveling layer of sand is poured on top of the geotextile.
- They begin to assemble the connecting elements of the lattice and assemble them into a monolithic fabric.
- If somewhere the lattice module does not fit entirely into the base, trimming is performed.
- A cellular fabric of the desired shape is placed on top of the leveling sand layer.
- The canvas is covered with soil up to the upper boundaries of the plastic cells.
- The site is watered with water, due to which the soil will settle somewhat.
- After this, you can begin sowing lawn grass or rolling out the finished lawn.
Assembling the modules is not difficult: usually their installation involves assembly from left to right. Trimming the modules is simple and does not take much effort. Due to the ease of working with the material, you can use it to create not only straight or linear shapes of paths and lawns. It is quite possible to create curvilinear and even fantasy shapes from this material, which will improve the local area and decorate the landscape.
For example, thanks to this feature, you can put a grate around the hatch, along the house, from the gazebo to the house. Also, using this building material, you can limit flower beds to triangular shapes. The installation process is quite exciting and allows you to show maximum imagination, especially when a person with taste gets down to business. Any summer resident can install a plastic lattice.
Laying options on the lawn may vary. For example, you can combine a lawn with paving slabs, decorating paths on both sides with a lawn or forming flower beds.
Advantages of using flagstone as a road surface
Modern paving materials are varied. To lay paths, rubber and ceramic tiles, wood, crushed stone of different shades, paving stones, etc. are used. But no artificial surface can compare with the decorative effect of natural stone.
Flagstone is the name for shale rock - sandstone or limestone, which independently splits into tiles of different thicknesses during mining. Flat stone elements require virtually no processing and are used for finishing walls and floors, as well as garden paths intended for pedestrians.
In addition to its decorative appearance and variety of shades, flagstone has many advantages that make it in demand among homeowners:
- smooth and non-slip surface of the slabs;
- environmental friendliness of the material;
- frost resistance;
- minimal moisture absorption;
- strength;
- color fastness;
- ease of processing and installation.
Flagstone is easy to purchase from construction companies, it is inexpensive and accessible to different segments of the population. In places where it naturally comes to the surface, you can extract the stone yourself by choosing tiles of the right size.
Options and types of coatings
The formation of a pedestrian path depends on the purpose, style of landscape design, size and topography of the site:
For comfortable walking, the minimum size of each laid fragment of a walking trail must be comfortable for the human foot. The optimal width is more than thirty centimeters, the length is at least forty - you can stand on such a platform with both feet.
Reference. To reduce construction costs, it is allowed to lay two or three smaller slabs, tightly joined to each other.
Paving material is selected based on financial capabilities:
Important! Wooden dies for the path must be impregnated with an antiseptic to protect against rotting and fungus.
The color and shape of the covering elements must be in harmony with the overall style of landscape design:
Adviсe
To ensure that the creation of paths goes without surprises, you should take into account the recommendations of experienced builders
If you plan to further regulate the height of the grass using a lawn mower, then you need to understand that the slabs or stones of the path should not rise too much above the level of the lawn. They will interfere with the movement of the lawn mower; in this case, cutting the grass is only possible by hand.
The thickness of the material to form the path must exceed 4 cm
Thin elements should be removed immediately, since such slabs often break during operation and cracks form on them.
You need to pay attention to the surface of the material. For example, the stove should not be slippery in winter so that it can be used all year round without the risk of falling
It is better to give preference to materials that are characterized by a rough surface, then in any weather conditions the trail will be stable and safe for use.
You need to choose the right distance between the elements of the trail, then it will be quite convenient to move along it.
The correctness of the path paving can be checked using a building level. As a result, the trail will have an ideal surface.
Why is it necessary to cover paths?
There are several reasons for high-quality arrangement of paths with one or another coating. Most of them are well known to the owners of the plots, but still they are worth identifying again.
Properly equipped passages between garden beds solve several important problems at once
- The first reason is that the paths are constantly overgrown with weeds that grow into the beds or drop seeds that fall into the territory of cultivated plants. All this eventually turns into an endless struggle for the harvest.
- If you completely remove the weeds, but then leave the soil open, then in rainy weather it will be impossible to approach the beds without wearing rubber boots, which will then take a long time to clean from the wet soil stuck to them. Otherwise, the soil stuck to the shoes will spread throughout the remaining covered areas of the yard, and then will certainly end up in the living areas of the house.
- In addition, strips of uncovered soil completely cleared of weeds contribute to the very rapid evaporation of moisture from the beds. Therefore, water consumption for irrigation increases significantly.
- Another reason to arrange paths between the rows is to obtain absolute maximum comfort when working in the garden, and as a result, a significant increase in the productivity of this noble work.
- A vegetable garden with neatly decorated paths always looks more aesthetically pleasing than one with ordinary earthen or densely overgrown weeds.
All the negative aspects mentioned above in no way improve your mood, since even having vegetables, berries or herbs “at hand”, it is quite difficult to collect them from the garden both during rain and for quite a long time after it. Therefore, you will have to wait until the soil dries and is not slippery and sticky.
In a word, high-quality paths between the beds should be the goal of any self-respecting gardener.
How to choose slabs for a path
If you are attracted by the opportunity to build a slab path in the garden, choose the type that corresponds to your region in terms of frost resistance. Winter temperatures below the permissible level can lead to further delamination of the stone, that is, to its destruction (and quite quickly). It is possible that in two or three years the slabs will come to be replaced.
Pay attention to the size of the stone elements. Especially the thickness
Flagstones of different thicknesses are used for different jobs. Thus, cladding walls, foundations, and other similar structures will require a slab thickness of about 4-10 cm; for paving paths and areas in the garden, it is recommended to take thicker slabs (thin ones can crack under load). Landscape structures are often constructed from plates of flagstone, which are even thicker, such as decorative wells, retaining walls, alpine slides, etc.
We choose the dimensions of the flagstone used for the garden path within reasonable limits; landscape experts recommend choosing side sizes of 30x45 cm - they are convenient for a person’s step.
Decorative filling
As for the stones used, there is a huge range. The most durable are granite elements. In addition, this stone has a wide range of colors: red, black, greenish and blue. Granite is expensive.
Sandstone tiles provide a unique warmth to landscape design. If you decorate the path with additional crushed stone or gravel, then the garden will have a Mediterranean style filling. A rough, large stone overgrown with moss will highlight the English style. Wooden poles are a purely Russian national trend.
Step-by-step sandstone path Source perfect-garden.ru
Garden paths made of wild natural flagstone
Flagstone is layers of natural stone that have strength and a natural pattern.
The ideal building material for the construction of garden paths is torn unedged stone, in other words, flagstone. It is easy to process, relatively inexpensive, and resistant to the external environment. This is an absolutely environmentally friendly material. This natural stone can be used to make not only garden paths, but also entire areas. To properly make a garden path, you need to know the laying technology, which, by and large, is not at all difficult.
Popular articles How to make a fireplace on the veranda with your own hands
Preparing the base for installation
Preparing the base for laying flagstone involves filling the entire contour of the pre-marked garden path with concrete, i.e. a concrete screed is made. While the concrete hardens, you can proceed directly to preparing the stones themselves, in our case flagstone.
Preparing flagstone for laying
After the concrete has set and hardened, work must be carried out directly on the path. Using a stiff brush and a strong stream of water, the stones are thoroughly washed to remove clay and sand. Then they are dried and laid out next to the path so that each flagstone and its configuration are visible.
Marking the flagstone will allow you to avoid wasting time matching them to each other when laying garden path elements.
Then they begin to “dry” lay the flagstone on the path. Having determined a place that will be visible on the path, not covered by trees and bushes, they place the thickest, most beautiful and regularly shaped stone on it. Thick - because with the help of glue, all the other elements that will make up the future garden path can be brought to its height. The number “1” is written on this stone with chalk. This will be a kind of starting element. Then, as in a mosaic, the next stone is selected, which ideally matches the number “1”. It is placed next to the first number with a gap and “2” is written on it with chalk. Then, perpendicular to the line where the stones meet, they draw a line with chalk and write “2” on number “1”, and, conversely, write “1” on number “2”. This is done so that later, based on this risk, it can be understood that stone “1” borders on stone “2”.
Next, using the same principle, numbers “3”, “4”, “5”, etc. are selected. And each one is marked with its number and marks are drawn on the stones with which it borders. Then, when laying the elements of the garden path, time will not be wasted on matching them to each other. If necessary, the workpieces can be corrected using a grinder and special cutting wheels.
Proper laying of flagstones
To properly lay out the stone, special glue is used. We must admit that this glue is quite expensive. When all the blanks have been received, they are carefully removed in the reverse order. The reverse side is lubricated with glue. To do this, use a hard brush. Then the concrete path is thoroughly swept, vacuumed and washed. The glue is mixed with sifted sand and cement, approximately in a ratio of 1:2, mixed and a mixture is obtained in the state of thick sour cream.
A mixture of glue and cement is applied to the path with a special trowel, leaving no cavities. If water gets into this cavity, it can crack the stone when it freezes. You need to lay the first workpiece on the solution and press it down as hard as possible so that there are no cavities left and all the excess glue is squeezed out, after which it needs to be collected with a trowel and sent back to the bucket. Then the same procedure is done with number “2”. Risks help us here; we don’t waste time, because the glue sets within a few hours. It is imperative to ensure that the surface of neighboring stones is at the same level. So gradually, stone by stone, you will get a very beautiful and living path.
The next day, use a brush and plenty of water to clean the path. It is advisable to spray the path with water for several days until the glue completely hardens.
By and large, it is possible to lay such a path from natural stone yourself. The main thing is to do everything correctly, following the technology, and have the desire. And then everything will work out!
Author: Ivan Andreevich Borodin
1stones.ru
- Arranging garden beds at the dacha
- DIY flagstone
- Paving paths in the garden
- Do-it-yourself flagstone laying
- Flagstone garden paths
- DIY flagstone path
- DIY flagstone garden path
- Arrangement of paths in the garden
- Construction of garden paths at the dacha
- Arranging a warm bed
- How to make paths in greenhouses
- Paths made of plastic
- DIY paths in the garden made of stone
- Do-it-yourself paths in the country
- DIY paths in the greenhouse
- Garden path material
Lawn laying technology
The step-by-step path on the finished lawn is made “dotted” in order to preserve the well-groomed appearance of the green lawn to the maximum.
The installation technology is not complicated, but has its own nuances:
Attention! Before and after grass germination, it is necessary to control soil moisture and ensure that the soil does not dry out.
A walking path is an interesting idea for decorating a city or suburban area. There are no limits to your imagination: you can experiment with paving materials, creating your own unique landscape design style, or use the options given in the article. It is easy and simple for even weak women to make a garden or walking alley with their own hands, because there is no heavy construction work here.
Source
Advantages of flagstone for laying paths
Flagstone is a natural stone, therefore it is environmentally friendly and does not emit toxic substances when the temperature changes. This material is also durable, reliable and has a long service life.
The flagstone has an original natural appearance, its surface is rough, that is, in frosty times, it will not be slippery. The stone has no pores, so it does not absorb moisture; it is also resistant to frost, that is, at low temperatures, it does not crack or deform.
The material is not prone to fading and wear, therefore it is reliable for use. All work can be done independently, this helps to save on costs; if this is not possible, then you need to seek the help of specialists.
Popular articles How to clean a pond with a dredge
Stone allows you to create a path of any size and unusual shape; this material fits into any landscape solution. The base on which the flagstone is planned to be laid is selected depending on the load and type of soil. To preserve the original appearance of the constructed path, it must be isolated from the germination of weeds, which constantly retain moisture.
Flagstone can withstand various types of loads, but it is necessary to choose the right base on which it will be laid.
Thanks to the strength and natural coloring, you can create an original design on the site, cut slabs of the required shape with a grinder, and perform both even and shaped installation.
Garden parquet or decking
The so-called garden parquet - decking - can also be installed on the lawn. Very often, for this option, WPC (wood-polymer composite) flooring is used.
This is the most labor-intensive of the proposed options and the most expensive due to the high cost of the material. The coating looks expensive and looks great in the garden, but the high cost limits its use. There are cheaper options from the same WPC, but, alas, they show poor resistance to weather anomalies and do not last long. To extend the service life of WPC flooring (to eliminate the risk of deformation), high-quality installation on a concrete base laid on a sand cushion using special guides is necessary.
WPC flooring is not the easiest (and at the same time expensive) option. Photo from mosparket.ru
A worthy alternative could be natural wood flooring, which is installed in almost the same way. The rather labor-intensive installation process does not allow us to call this method fast and easy. This story is more about the construction of the main garden paths connecting the main zones and objects on the site.
Source
Flagstone garden paths: stages of construction
Getting started, as always, is planning. We think over the shape of the path and its appearance. We make sketches on paper - it is possible that they will tell you new options that you have not thought of and will help you not to make mistakes.
Marking garden paths is an important step. You can draw on the ground or use pegs with ropes stretched across them.
We dig a trench under the path. If a small load is expected on it (only walking), we make the depth 30-35 cm. If we are building a platform or access road, we deepen the trench to 50-60 cm.
We fill the trench/pit with sand and crushed stone alternately. We make only a few layers of 7-10 cm each. At the same time, we compact each layer, sand, and, on top of everything, water it with water. If possible, we lay geotextiles between the sand and gravel - with it, the sand will not be washed out by rain, and the crushed stone layer will not sink into the sandy layer. For grass, the geotextile will serve as a barrier - it will not grow through it (but it can through sand and crushed stone).
We lay out the base of the path with layers of flagstone. If it is assumed that the slabs in the garden path should lie close to each other, leave a small distance between them - approximately 0.5 cm.
We fill the seams with dry cement, compact it if possible, and fill it with water. As the wet mixture settles, we repeat the procedure. You can get by with sand filling the seams. Grass will inevitably grow through it later, but many people like it. In this case, you can enhance the effect by pouring lawn grass seeds into the seams.
Types and materials
Conventionally, the entire range of lawn gratings can be divided into 2 types: light and heavy. Products of the second line are designed for significant weight loads; they are often used to strengthen slopes and embankments.
Today, concrete and high-strength plastic are used in the production of lawn gratings. Each type of material is characterized by its own practical performance characteristics, which is why it is selected based on the assigned tasks. Depending on the calculation of the permissible load on the grating and its material, they can be equipped with additional stiffeners.
Concrete
Concrete products appeared earlier than their plastic counterparts. Today they are used less frequently, although their performance characteristics are quite high. They are quite durable, designed for high weight loads, which is why they are excellent for parking trucks. Such gratings are inexpensive, easy to install and have a long service life. When using them, waterlogging of the lawn is excluded, and therefore there will be no dirt on it even after rain.
Under such gratings you can carry out various communications (sewage or water supply). The material itself is heavy and requires special transport to transport it to the installation site. In addition, concrete gratings are massive and their walls are thick. Because of this, they almost always peek through the grass. Such blocks are made by casting or vibrocompression.
Plastic
Plastic products have a number of advantages over their concrete counterparts. Their weight is significantly less, while they are quite durable and provide quick connection to each other. Their service life can be up to 25 years or more; when purchasing them, no special transport is required. The disadvantage of the material is the high price, which is charged not per square meter, but for each cell.
Flexible analogues are designed for weights up to 120 tons per square meter. m, they are used in such areas as strengthening slopes, creating lawns in horse riding arenas and grounds in equestrian clubs. Polymer-sand parking requires the use of options with high strength. Heavy-duty gratings can support heavy weights and strengthen moving soil.
Peculiarities
To make a beautiful lawn near your home, you will first need a fairly large amount of money. Many owners of such vegetation already know how much it costs to buy grass, further cut it and constantly irrigate it. Over time, various defects from walking appear on the lawn, which leads to grief for the owners. To avoid this kind of emotion, you need to initially think about creating paths on the lawn.
Paths on lawns have the following advantages:
- aesthetic appearance;
- ease of installation;
- long service life;
- look beautiful in tandem with garden decor;
- suitable for both classic and modern landscape design;
- low cost of creation;
- can be given the desired shape and configuration;
- The paving of the trail is done quite quickly.
A stone path on a lawn also has some disadvantages. So, it cannot be moved after creation, so you should initially think about where it will take place. And only after that turn the idea into reality.
Stones and mulch - for a path that is not used often
Pros . A good solution for a path in the style of naturalism. Flat stones placed between plants will create the illusion of untouched nature. Meanwhile, such a path is very practical and functional.
Minuses . Mulch needs to be added every year. The stones may move over time, so they will have to be returned to their place.
Laying tip : For paving, choose large, flat stones and install them at such a distance that they are comfortable to walk on.
Do-it-yourself paving
Made from hot asphalt before the resin begins to harden. The asphalt lies on a bed of crushed stone, which for paths can be made 2-3 cm thick. For a sidewalk, an asphalt layer 5 cm thick is sufficient
It is important to note that for paths it is better to use medium grade asphalt, so that the surface is rough. On such a surface the likelihood of slipping is very low.
When paving, it is necessary to provide for water drainage from the surface of the path.
During laying, the asphalt is evenly distributed along the path and leveled by “movers”. “Engine” is a road mop designed to smoothly level asphalt without breaking. After obtaining a smooth surface, the asphalt is rolled using a hand roller. The denser and better the hot asphalt is rolled, the less likely it is for water to appear in microcracks.
When paving paths, it is advisable to set the side curbs to the required height before laying the asphalt layer. The direction of water flows should be taken into account and, if necessary, provide drainage slots in the curbs where water may accumulate during rains. Correctly made curbs have a chamfer on top, on one side with a height of 3 cm. With this chamfer, the curb is installed towards the sidewalk.
Paving paths with paving stones: technology and schemes
The width of the seams between granite bars should be 2-3 mm. Laying paving stones is technologically similar to laying paving slabs. You can pave both on a sand cushion and on a paving stone. The process looks like this:
- bars are laid on the finished base, starting from the curb;
- using a rubber hammer, each block is pressed into the base and tightly adjusted to the adjacent one;
- the seams are stripped and rubbed out;
- The path is carefully watered, covered with polyethylene and left to dry.
If there is a need to trim any block, you can do this using a grinder with a diamond blade. When cutting the stone you need to water it.
Flagstone for paths is an ideal solution for a country house or cottage
There are no small details in the design of a site for a country house or dacha. Every design detail emphasizes the chosen style, which should be uniform. Quite often, in addition to the main paths, which are constantly used, owners lay out so-called walking paths, and they can be made without special preparation of the base.
The advantages of this material are obvious - durability, aesthetics, practicality. The combination of natural stone and a bright green lawn always looks very impressive.
Popular articles Description and features of hydrangea variety Little Frize
Garden paths made of flagstone, when the stones are laid out in a chain one after another (wooden saw cuts can also be laid out), are called step-by-step by landscape designers. In addition, this can be done using stone in the form of a mosaic. In this case, the seams between the elements are at least five centimeters. This is done to ensure normal grass growth. Typically their width ranges from eighty to one hundred centimeters.
Many people are interested in the question of how to lay flagstone on paths correctly, and whether it is possible to do it yourself. The main condition for creating such an alley is a perfectly flat lawn without bald spots. If your site does not meet these requirements, then first you need to put it in order.
The flagstone for the paths should be quite large, at least four centimeters thick.
First you need to create the outline of the track. To do this, you can use a rope or a watering hose. Then the mosaic is laid out according to the previously listed requirements. Then the turf should be cut along the contour of each stone. The material is removed and this part of the lawn is cleaned. The soil is also removed to the depth of the stone, and the bottom of the resulting excavation is covered with a thin layer of sand, on top of which the material being described is laid directly. It should be level with the ground or protrude above its surface by a maximum of one centimeter. If it rises significantly above the surface or, conversely, turns out to be recessed, it is removed and excess sand is added or removed.
Flagstone for paths is an ideal material. The rough surface will not allow you to slip on it in wet weather, and its height can withstand significant loads. It is especially necessary to highlight granite flagstone for paths. It differs from other types of stone in its very dense composition and perfectly smooth surface.
Stone paths are an interesting landscape design solution that creates harmony among all elements of the site. Flagstone is a durable road surface. Its use in the design of lawns will radically transform the area. Such paths will create an individual, special flavor on your site and will aesthetically complement the landscape design.
fb.ru
Backfilling on the lawn
Such a path can even be made from wood chips or bark (choose the largest fraction), or pine nut shells. These materials have a peculiarity - they can stick to shoes, and with a thick layer, pits will appear on the coating. A coating made of crushed stone or stone fill (any aesthetic and reliable type) will be more reliable; it will also withstand the movement of a garden wheelbarrow. All backfill options require restrictions in the form of curbs or special tapes dug into the ground. Otherwise, the coating will have an unfinished appearance, and the material will quickly crumble to the sides, sinking into the lawn.
Installation of a stone walkway
When installing a stone fill path, it is extremely important to follow the recommendations for selecting a fraction from 5 to 40 mm. It is inconvenient to walk through too large or very small screenings. Therefore, it is better to lay larger stones downwards; they will create a strong base. And the voids among them need to be filled with a fine fraction.
When calculating the depth of the trough, it is necessary to take into account that the surface of the finished path should be at soil level, that is, excavation should be carried out to the thickness of the layer of future filling. You can also arrange it on a sandy base, in which case you will have to increase the thickness of the compacted layer of sand. If the path is recessed, then water will accumulate on it - if it is above the surface of the soil, then the curbs may not hold up and will stick out onto the lawn (this is especially true for the curb strip).
When laying the backfill, it is necessary to use geotextiles to prevent the germination of weeds, and also to prevent part of the covering from sinking into the ground.
A backfill path without a base or border will quickly “sink” into the ground and spread out to the sides
Curbs
There is a wide variety of borders on the market. Of the entire assortment, those that are relevant for such paths are those that allow you to maintain a straight edge, emphasize a graceful curve, hide geotextiles and are quite easy to install (do not require planting on cement).
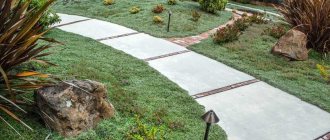
Step-by-step paths
When choosing the style in which our garden plot will be planned, we often try to get closer to natural landscapes. After all, it is nature that gives us relaxation, inspiration and harmony. In order for the site to look natural, and not wild and abandoned, you need to take into account everything: the selection and arrangement of plants, the specifics of the soil and the existing topography, the design of garden buildings, the type and configuration of paths. It is step-by-step paths that are best suited for a garden in a natural style.
Such a path is a harmonious “coexistence” of stones (or any other material from which the path is made) and plants. Rain or melt water will not stagnate on step-by-step paths; in addition, they are quite economical. It will take several times less material than with continuous paving. Often there is no need to make a base for the entire path - it is enough to make a base for individual tiles.
The most common material for step paths is slabs of natural or artificial stone. When choosing material for a step-by-step path, remember that the paving elements should not be too small - each stone (or tile) should comfortably accommodate a person’s foot. It is desirable that the length of each tile be at least 40 cm and the width at least 30 cm. Limestone, slate, granite cuts (the thickness of such a cut must be at least 3 cm), as well as concrete tiles are most often used to construct step paths .
If we are installing a step-by-step path on an existing lawn, then the base is made for each individual tile. After marking the path, you need to lay out all the tiles along it so that the distance between the centers of adjacent tiles is about 60 cm. Having laid out the tiles, walk along the path and check how convenient it is for movement.
After adjusting the position of the tiles, outline the contours of each of them by cutting deeply into the turf around the tiles with a knife or small spatula. Next, you need to remove the layer of turf at the locations of the tiles and carefully remove the soil to a depth of 20-25 cm. In order not to spoil the appearance of the lawn, it is better to immediately put the removed soil in a bag or wheelbarrow. We fill the prepared hole with layers of crushed stone, fine gravel and sand. We lay stone tiles on the sand. In some cases (for sandy soils) you can do without a gravel bed and lay the coating slabs directly on the sand.
If you are making a step-by-step path not on a lawn, but on a new site, it is still worth making a base over the entire area of the path. Firstly, such a path is guaranteed not to “go” into the ground. Secondly, the spaces between the stones of such paths can be decorated not only with lawn grass or ornamental plants (Pozharsky's bell, sedum, white sedum), but also with fine gravel, pebbles or special glass granules.
For example, you can make a step-by-step path using Japanese “rock garden” motifs. To do this, you need to mark a path 1.2-1.4 m wide and arrange a base for the path, the so-called “trough”: remove the soil to a depth of 25-30 cm, fill in coarse crushed stone (10 cm layer), a layer of fine gravel (7 cm ) and a layer of sand (5 cm). We cover the sand with geotextiles, and mark the places in the center for the slabs of our future path. In the designated places we cut the geotextiles and lay the stones. We fill the rest of the path with small river pebbles or fine gravel. We carefully level the backfill and draw “patterns” with a small garden rake. For example, wavy lines on both sides of the stones or concentric circles around them. The feeling of the “river” can be enhanced by choosing the right color scheme for the path. Light gray gravel or pebbles will create the impression of water, while dark, almost black slate stones will appear wet against this background.
Another effective and fairly inexpensive material for creating step-by-step paths is log cuts. If you have the necessary tool (chainsaw), you can prepare the cuts yourself. Experience shows that cuts with a diameter of 300-400 mm are best suited for paths. Typically, dies 10-15 centimeters high are used for paving.
Along the contour of the path, you need to remove the soil to a depth of 20 cm, line the resulting trench with geotextiles and pour a ten-centimeter layer of sand. We install dies on the sand and compact them with blows of a special hammer with a rubber head.
In order to extend the service life of step paths made from log cuts, it is recommended to treat them once a season with an antiseptic impregnation, which prevents the development of putrefactive fungi.
The construction of step-by-step paths is an excellent field of activity for creative people. After all, even by combining the same material with different plants, we get a new effect every time. If you are not satisfied with the shape and appearance of commercially available concrete tiles, you can make the paving material yourself. Formwork for square and rectangular slabs can be easily made from wooden beams or boards. Formwork for round or oval slabs can be easily made from iron strip.
Step-by-step paths can be created not only on land. An original step-by-step “bridge” path will decorate a shallow pond. In this case, the track elements are cast from concrete using removable formwork.
Advantages and disadvantages
Lawn trellises have many advantages. For example they:
- are considered the best protection for lawn grass;
- are a means of preventing soil sliding and erosion;
- prevent mechanical destruction and deformation of the lawn;
- help create optimal conditions for grass growth;
- characterized by ease of installation and durability;
- increase the aesthetic qualities of the lawn, are not visible after overgrowing;
- allow installation in the form of various geometric shapes;
- do not emit toxic substances;
- help strengthen the soil;
- maintain proper air circulation in the soil;
- visually level the lawn area.
The undoubted advantage of the material is that its installation does not require a set of special tools. The material is frost-resistant and easy to maintain, while one type of frame can be recycled after dismantling. Thanks to the use of trellises, it is possible to grow a dense grass cover. However, along with the advantages, lawn gratings have several disadvantages.
For example, if lawn trellises were used as a parking lot, to restore the plants after the wheels of vehicles pass, you have to cut the grass to the height of the modular sides. In addition, laying the material requires careful preparation of the base. In itself, it is simple, but if the modules are laid on an unprepared base, due to precipitation and the weight of transport, the coating will shrink.
Mesh filters for lawn grass must be selected taking into account the weight load they must withstand. The varieties are by no means universal in terms of weight; the load is distributed due to the walls of the lattice modules. A drawback is the likelihood of cutting off sprouts in some varieties when driving over a traffic grid.
As for using gratings as parking, there are some nuances here. For example, the car should not be allowed to stand in one place. If you do not place it in different places, the grass under it will very quickly turn yellow and wither. It will not look attractive, because the grass needs constant access to natural light.
Another disadvantage of parking lots created using gratings is the difficulty of cleaning the cells from technical vehicle fluids.