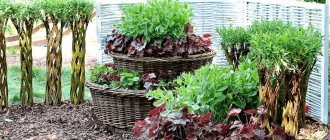
Let's take a closer look today at how to make a beautiful flower bed with your own hands in the country house or in the courtyard of a private house. Below will be posted photos of the most beautiful and original, but at the same time simple flower beds, most of which can be made, you won’t believe it, from scrap materials: stones, bottles (both plastic and glass), tires and tyres.
We will touch in detail on creating flower beds made of brick and wood (from boards), design ideas and ways to create borders and fences for flowers near the house. All of the listed flower beds are also suitable for kindergartens. Basically, these are very interesting models for both landscape design professionals and novice summer residents. See step-by-step guides in photo galleries, as well as a selection at the end of the article.
High flower bed made of concrete blocks
This is what a flowerbed looks like, which you can make yourself.
To do this, first of all, we outline the contours of the future flower bed on the ground and dig a ditch.
We install the concrete blocks evenly and carefully, checking from time to time for correct installation.
We concrete around the installed blocks and level them well.
We wait for the concrete to dry completely and fill in the prepared soil.
The high flower bed is ready, you can plant suitable plants. Due to the fact that it is tall, the flowerbed will be a clearly visible, bright decoration of the site.
Slough show: the story of one flowerbed
How the flower garden in the city has changed - through the eyes of a high-rise building tenant
Practical nuances of a children's flower garden
The flowerbed that they plan to create together with the child is laid out on sunny, cozy, warm areas. You shouldn’t hide it in a distant corner - the flower garden is positioned so that you can quickly get to it and easily approach it. Such sites on a hill are preferable. The choice of the place itself, if the size of the garden allows, is better to let the child do it himself (or offer him at least several alternative options). Most often, children's flower beds are placed near the playground, recreation area or on the lawn. The flowerbed is laid out so that it can be walked around from all sides.
The shape of the flowerbed can be chosen by the child himself, but it is better to control its size. A flower garden for children should not be large and bulky: it is a mini-flower bed, sufficient for experiments, but easily covered by the eye. Working in a flower garden should not be exhausting or turn into a routine. It is best to choose a strict and cheerful shape - not only a simple square, circle, triangle, but also a snail, butterfly, bird, car, any silhouette that your child will like.
A few more points to consider when designing a flower garden for a child:
- A beautiful border or small fence, wattle fence, decorative edging around. You shouldn’t use expensive fences: simple and colorful plastic fences will look just as good. Of course, you can always work with bricks or stones together with your child, but here you need to take into account the age and wishes of the child himself.
- Dig up the soil at the site of the future flowerbed and prepare it yourself to make it easier to work with children's tools, but do not break up the flowerbed without the baby and do not remove all the rhizomes, stones and weeds - you will complete the final touches together with the child.
If desired, you can find many educational opportunities in arranging a flower garden. Study the orientation of the parts of the world with a compass, try to lay out a flower bed strictly from north to south, play with geometry - the possibilities are, in fact, limited only by your imagination. Of course, the real and fun learning begins while working with plants. Ranking from high to low, keeping a simple and planned planting pattern, practicing even rows of sowing and creating patterns when planting seedlings open up so many interesting possibilities.
If you decide to introduce your child to gardening, you should stock up on a special set of children's tools. A mini-shovel, hoe, and rake (usually with a replaceable handle) are included in standard sets. When working in a flower garden, a child will also need gloves, an apron, special shoes, a watering can, a bucket, and a scoop. Choose bright colors and turn even routine work into a game.
There is nothing complicated in the process of creating a flower garden:
- Start with the contours, using bright twine to outline the boundaries of the future flower bed.
- Even if the soil is in perfect condition, help your child dig up and fluff it up, explain how to choose weeds and pebbles.
- Carefully level the soil in the future flower garden with your child.
- Fill the flowerbed with plants, moving from perennials to seedlings and seedings and from the center of the flower bed to its edges. Individual holes and furrows for sowing, careful digging of plants and sparse sowing of seeds - everything should be explained and demonstrated with an example.
- Water the plantings together and be sure to place pegs or flags that will indicate where each plant was sown or planted. Simple pegs or strips, painted with bright paint and signed by the child himself, will complement the appearance of the flowerbed and give it additional charm.
- Don't rush to throw away empty packaging. If your child wants, start a flower garden diary together, write down important information and glue pictures of the flowers that should grow on it. It will help you remember all the moments of working in the flowerbed and a family photo report.
If there is no desire to create a separate flowerbed just “for games”, or there is simply not enough space in the garden, a flower garden for children can be arranged in a mobile, portable version. A large container or flower bed will allow you to play with growing plants yourself and study them no worse than a full-fledged flower garden in open soil. But this option will require more careful care of the plants. Caring for a flowerbed can be turned into a real adventure. Weeding, watering, loosening the soil or using bright decorative mulch will not only teach your child the art of gardening, but also teach discipline. A little care, explanations, encouragement, fun and laughter will help maintain interest in the flowerbed even among the most restless. After all, a reward in the form of a flower or the desire to become an exemplary gardener are so tempting.
Summer plants should dominate the children's flowerbed. © mildenhall
Laying a brick flowerbed with your own hands
A brick flowerbed near the house is a good solution for landscaping the yard . It’s not difficult to make one yourself, especially one as small as in the photo. Although, of course, you need to have some skills. If you make a higher masonry, then everything must be done correctly so that it does not fall apart. But even without the skills, you can try laying out masonry for a flower bed using these instructions.
Before you start work
Choose bricks that tolerate moisture well; ordinary ones are not suitable for the long term. For decoration, facing bricks with a beautiful texture are best suited. For a small flower bed like in the photo you will need about 50 bricks and 30 kg of mortar. If you want to make more, say six rows, one and a half meters long and half a meter wide, then one hundred bricks and 80 kg should be enough. solution.
Making masonry
Make markings, drive in pegs with stretched twine. Prepare the trench.
Step 1 Lay out the bricks without mortar at even intervals. This will tell you if you need to insert a short brick at the end of the masonry. If necessary, you can increase the space between the bricks, in case there is just a little missing, so as not to insert a very small piece of brick. Mark the location of the first and last brick.
Step 2 Install the first bricks. Mix a small portion of the solution. Install the first two bricks at the beginning and end of the future masonry. Check the level in both directions, tapping the handle of the spatula to make adjustments.
Step 3 Place the first row. Grab a trowel full of mortar and apply it on a row of three bricks across the entire width, the layer thickness is approximately two centimeters. Smooth the solution from the front side up.
Step 4 Align the corners and check them with a plumb line. Having completed the first row, begin laying the second one overlapping the first. Constantly check the horizontal surface of the masonry with a level and the thickness of the seams.
Step 5 Complete each row completely. Use twine to keep the line flush with the front side. If the required piece is missing, you can cut it with a grinder; if not, then file it to the required size and then chop it off with a hammer on a wooden plank.
Step 6 Check the masonry again with a level. Continuously tap with a hammer to adjust the level. As you go, remove excess mortar from the trowel. To form a nice seam, you can remove the excess with a piece of garden hose.
Do not miss such a moment as waterproofing the flower bed. After the masonry has dried, about a day in dry weather, treat the internal walls with bitumen emulsion, then the bricks will not absorb moisture from the ground.
It is also necessary to provide drainage holes in the masonry ; for this, do not fill the three vertical gaps in the first row of bricks with mortar. At the base of the future flower bed, remove five centimeters of soil and fill it with a layer of fine gravel. Lay the turf that you removed to cover the gravel on top. To allow the soil to sag, let the flowerbed stand like this for about ten days, after which you can fill in the fertile layer of soil and plant flowers or other plants.
Read more about how to make flower beds from bricks here
In autumn...
Be sure to collect seeds from your plants. Please pay attention to the child that all seeds differ in size, shape, and color. Eschscholzia, nasturtium, (and definitely calendula) can self-sow and, without warning you, grow spontaneously next year.
In an empty flowerbed, lay the foundation for the early spring holiday that bulbous plants will give you. Plant tulip bulbs, and on the next May holidays they will greet you with their bright, joyful blooms. If you visit your dacha in cool April, plant small bulbous plants (muscari, pushkinia, chionodoxa) in groups. And they will be the first to delight you with their touching tender beauty. In August, bulbs will be sold in many stores. Before planting, it is advisable to “bathe” the bulbs in a solution of any fungicide (potassium permanganate, “Maxim”). Then plant to a depth equal to the height of three bulbs. Be sure to check the box so as not to damage the awakening bulbs in the spring.
Collect flower baskets from calendula and, drying them in the shade, you will receive excellent raw materials for preparing a healing decoction. It should be used to gargle during colds in the winter.
If we talk about the pedagogical function of creating flower beds for a child, then there are many positive aspects in this process:
- regular care of plants disciplines;
- plants help the child get acquainted with new shades of a color he already knows.
- by planning a flower bed, working with various tools, he gains a variety of practical skills;
- The toddler receives basic biological knowledge about the growth and development of plants. Sees wonderful transformations from the seed, through growth and flowering, back to the seed;
- by working with soil, sand, peat, seeds, water, the baby receives new tactile sensations and develops fine motor skills;
- Having learned to understand the needs of another, the baby will grow up to be a caring and kind person; the fascinating process of growing a new plant will instill in the child a caring attitude towards nature.
Flowerbeds under a tree
How to make a flower bed under a tree
If there are trees on your site, a flower garden around the trunk will be a good solution to save space. Let's look at how to make a flower bed under a tree, so to speak, a classic version of a round flower garden. . The pictures below clearly depict the entire process. The photo, of course, is from a bourgeois website, but they know how to draw beautifully, even film a cartoon.
First, in the area around the tree where you are going to plant a flowerbed, you need to remove the turf. Then it can be used for other purposes; there will probably be a place on the site where grass does not grow well.
Buy at the store or make your own metal strip with spikes to mark the edge of the flowerbed with a border. In principle, you can use anything for temporary fencing, but a strip is more convenient.
Fill the prepared area with soil to a height of eight centimeters so that the top roots do not protrude from the ground.
Level the top layer of soil and place a layer of sawdust on it so that the ground is completely covered.
You can first plant flowers and then add sawdust, but practice shows that it is better to first plant sawdust and then plant plants.
We plant flowers, which ones and how to plant them depends on what you have chosen. This issue needs to be studied in advance; there are many nuances here. Not all flowers can take root under a tree, depending on what tree it is under.
Making a border. There are many options here too. At the bottom of the article, in the gallery, you can see what types of flower beds there are and what they are covered with. The easiest way is, if you find paving stones, and you already have a temporary fence installed, it won’t be difficult to simply cover it beautifully with paving stones or, say, brick.
The flowers have been planted, all that remains is to organize regular watering, at least for the first month, and then, depend on the weather.
When the flowers grow, you can show off to your neighbors.
Plant selection
To buy flower seeds for a flower bed, go to the store with your child and let him select the ones he likes. Or, having purchased the seeds yourself, lay out a colorful fan of annuals in front of your child at home and invite him to select the plants he likes for his first flower garden. When purchasing seeds, be sure to pay attention to the expiration date. Alas, be prepared for the fact that until July the flower bed will be without flowers. If you want to see a children's flowerbed blooming at the very beginning of summer, buy ready-made seedlings. For example, purchase low-maintenance violas or petunias. And next year try growing seedlings yourself - you will see how interesting and entertaining it is!
And a few more flower beds
A selection of beauty in your eyes
Theoretical preparation
Garden sculptures have had a special meaning for quite some time now. Figurines for the garden or a completed small composition must be in harmony with the green landscape and the chosen style.
A great idea for a garden would be furniture with elements cast from epoxy resin. Such furniture will become a beautiful decoration and functional part of your garden.
Their images are taken from the folklore of different countries: Lesovichki, or goblin, house-elfs, kind Shubin - the joker of miners (Slavic mythology), nymphs (Greek brides, good forces), gnomes (Western European dwarfs, guardians of the subsoil).
The latter had consonant or identical names - Gloin, Balin, Dvalin or Dori, Nori, Ori. Children quickly remember them like nursery rhymes.
And more often than others, it is gnomes who are “settled” in gardens. If you can’t make their own plaster figures, buy them at garden supermarkets.
Imagine yourself as a sculptor
The romance of the garden, even with an abundance of flower beds and a gazebo in the center, will be lost if you do not place monochromatic sculptures of people or elegant crafts with subtle contours.
Do you miss country life? Learn how to make figurines for the garden, and arrange wooden homemade livestock and birds.
Crafts for kindergarten. Zebra made of tires and logs.
Just like a giraffe, you can make a zebra, and the African savannah will be filled with another animal.
You will need:
1 tire
2 logs
Eyes from an old toy
Plastic bottle
1. First dig the tire in halfway.
2. Make a muzzle and neck from logs. The body of the craft in the image is about 70 cm long, and the head is 25-30 cm.
3. Dig in a log next to the tire.
4. Make ears from a plastic bottle and attach them to the face.
5. You can make eyes from plastic bottle caps or use parts from an old toy.
6. Make a tail from the spout of the watering can, and insert a brush made from an old tire inside.
7. The nose can be made using thick rubber.
8. All that remains is to color the craft.
