Author: Tamara Altova. December 06, 2017
Category: Garden plants.
Iris, or iris (lat. Iris) is a genus of rhizomatous perennials of the Iris family, or Irisaceae, found in nature on all continents. According to various sources, the genus contains from 250 to 800 species of plants of various shapes and colors. The word “iris” is translated from Greek as “rainbow”: the flower was named by Hippocrates in honor of the goddess Iris. On the fresco of the Knossos Palace in Crete, a priest is depicted surrounded by blooming irises - this picture is 4 thousand years old! In Arabia and Ancient Egypt, irises were bred in the 15th-14th centuries BC. In ancient Japan, amulets were made from irises to instill courage in young men. In the Middle Ages, elite irises were grown only in monasteries and castles, and later they became available to ordinary citizens. Currently, there are many species, forms, varieties and hybrids of cultivated irises.
Iris flower - description
Iris flowers have two types of shoots: generative and vegetative. Vegetative shoots are perennial underground rhizomes located in the ground or on its surface and consisting of annual links bearing bunches of leaves. Thread-like or cord-like fibrous roots are formed on the lower part of the rhizome. Generative shoots, that is, flower stalks, are formed on the plant singly or several at a time. The leaves of irises are thin, flat, xiphoid, double-rowed or linear, covered with a waxy coating and formed at the base of the plant in fan-shaped bunches. There are few or no stem leaves. Iris flowers, solitary or collected in few-flowered inflorescences, are distinguished by a bizarre, elegant structure and a rich palette of colors: from white, yellow and blue to almost black. The colors of the petals are also varied. The flowers of the iris are large, often fragrant, simple, consisting of six petals, which are actually perianth lobes. In some species they are reduced. The three outer lobes that are lowered down usually differ from the three inner lobes that are raised in color and shape. The perianth lobes grow together at the base to form a tube. Irises bloom from May to July, and some varieties bloom again in the fall. Each flower lives from one to five days, and in the inflorescence the upper flowers open first, then the middle ones, and only at the end the lower ones. The fruit of irises is a three-lobed capsule with seeds.
Irises are divided into rhizomatous and bulbous. In this article we will tell you about growing rhizomatous irises.
Planting irises in open ground
Soil for irises
To grow irises, you need to choose a sunny place, located on a slope or hill and protected from wind and drafts. The soil on the site should be well-drained, and groundwater should not lie too close to the surface. Most irises prefer medium to light soils, fairly fertile, cultivated to a depth of at least 20 cm, with a pH of 6.5-7.5. On overly fertile soils, irises often suffer from fungal diseases, do not have time to finish growing by autumn, build up green mass, and flowering is usually sparse. The best soil for iris is sandy loam or loamy soil, for each m² of which, before planting, 15-20 g of potassium and phosphorus fertilizers and 8-10 kg of humus are added for digging to the depth of a shovel bayonet. Sand and peat will have to be added to heavy soil, and acidic soil will be neutralized with chalk or ash. Site preparation must be completed at least a week before planting.
When to plant irises in the ground
The optimal time for planting rhizomatous irises in the ground is August and September. If planted at a later date, irises may not have time to take root before frost begins and will simply die in the ground.
Sometimes irises are replanted while simultaneously propagating them by dividing the rhizome. When to replant irises in this case? You can dig up, divide and plant them during flowering or within a month after the irises have finished blooming, that is, until the beginning of August. If you are able to preserve an earthen lump on the rhizome of the transplanted iris, then you can replant it at any time during the growing season, but no later than September.
How to plant irises
Planting irises in the ground, if we are talking about tall varieties, is carried out at a distance of 70-80 cm from each other; for shorter plants, the interval between holes is reduced. Rhizomes treated with growth stimulants (Zircon or Ecogel) are laid out in holes in which a mound of fertile soil is poured in the center. The location of the rhizome in the hole should be horizontal or at a slight angle. The adventitious roots need to be straightened. In order for the bush to develop symmetrically, the fan of leaves should be directed south. The hole is filled with soil so that the upper part of the blade remains on the surface. The soil is lightly compacted and watered.
When planting, beardless species and varieties of irises are buried several centimeters deep, and after watering, the planting is mulched with pine litter or peat to preserve moisture in the soil.
Preparation of planting material
Transplanting irises to another place in summer
Before planting any irises in the summer, you need to select high-quality planting material. It must meet the following requirements:
- the tuber must have at least one fully formed link;
- In no case should the rhizome show signs of rot or the presence of other diseases;
- the root should be dense and elastic;
- light tubers are uniformly colored, they have tubercles that later serve as rudiments for the formation of roots.
It is recommended to dry the newly dug planting material for one day and cut the length of the leaves by a third. After this, the roots are cut to 10 cm in length, and damaged ones are removed altogether. The cut areas are treated with a solution of potassium permanganate.
Caring for irises in the garden
How to care for irises
Planting and caring for irises is not labor-intensive: the irises will need to be watered, weeded, carefully loosened the soil around them and removed withered flowers. If necessary, plants are treated against diseases and pests. That, in fact, is all the troubles that await iris lovers.
Watering irises
For the most part, irises in open ground do not tolerate excess moisture in the root area, so regular and abundant watering will only be needed during the period of bud formation. In the future, it will be necessary to moisten the soil only when it is very dry. You will have to remove weeds from the area manually, since irises have a superficial root system. For the same reason, you need to loosen the top layer of soil very carefully and shallowly. When the irises grow, they will no longer need loosening or weeding.
Feeding irises
If you added fertilizer to the soil when planting, you no longer need to fertilize the irises this season. Perennial varieties are fed with potassium-phosphorus fertilizers in liquid form in early spring. A solution of mineral fertilizers is poured under the root after loosening the soil, trying to ensure that the drops do not fall on the iris leaves. Before intensive leaf regrowth begins, nitrogen fertilizers must be applied at the rate of 10 g per m². After two weeks, the irises are again fed with the same amount of nitrogen fertilizer, adding 15 g of phosphorus and 20 g of potassium fertilizers for each m². During flowering and immediately after its end, 20 and 25 g of phosphorus and potassium fertilizers are applied to the irises for each m², respectively. The last time perennial irises are fed is in September or early October with phosphorus (15-20 g/m²) and potassium (10-15 g/m²) fertilizers, so that the plant forms generative buds and has a full rest in the winter. Fertilizing is carried out in the form of solutions and only after watering or rain, on already wet soil, otherwise the iris roots may get burned.
How to Improve Alkaline Soil
Soil alkalization is not as long a process as soil deoxidation. If you do this in the fall, then in the spring you can already get the desired result. However, soil improvement activities will have to be carried out periodically to maintain an appropriate pH level.
If the soil is slightly alkaline (pH 7.5), then it is necessary to take effective measures to acidify it. This can be done in several ways.
- The addition of high-moor peat will help not only acidify, but also improve the structure of the soil. It makes the soil receptive to fertilizers, more loose and breathable. You should apply 1.5-3 kg per 1 sq.m.
- Among organic fertilizers, fresh manure is the most acidic to the soil. Due to its high activity, the application rate is three times less than rotted one. It is added only for digging, no more than 3 kg per 1 sq.m.
- Rotted needles gently and gradually acidify the soil, which decomposes well and mulches the soil. You can also use pine sawdust or leaf compost for these purposes. Application rate – 3-5 kg per 1 sq.m.
- Some mineral fertilizers (urea, ammonium sulfate and ammonium nitrate) also acidify the soil. They should be applied during digging in early spring, without exceeding the dosage specified in the instructions.
- Sowing green manure also helps improve the soil. Rapeseed, oats, white mustard, rapeseed, lupine, clover, soybean and vetch maintain the balance of acids, make the soil loose and moisture-permeable, and enrich it with nitrogen.
When and how to sow green manure correctly - all the information in one article. What do some weeds, grains, fodder and ornamental crops have in common? All of them can become excellent fertilizers with the right approach!
Irises after flowering
Pruning irises
Do irises need to be pruned for the winter? If you do not plan to plant irises this year, after they have bloomed, cut off all the flower stalks, and when the leaves begin to turn yellow at the ends, cut off the yellowed part in a semicircle: this measure will prolong the life of the irises, and they will continue to decorate the garden for some time , and at the same time they will save up strength and nutrition for the winter. When the irises wither in the fall, their ground part is cut off at a height of 10-15 cm and burned to destroy pest eggs or pathogens remaining on the leaves.
Preparing irises for winter
Before the onset of frost, the bare rhizomes of perennial irises are covered with dry soil, and a layer of peat or sand mulch 8-10 cm thick is laid on top of it. If a cold and snowless winter is expected, the irises are additionally covered with dry leaves or spruce branches.
Tips from experienced flower growers
Sometimes novice flower growers are perplexed why irises planted in summer delay flowering, and few leaves form in the fan. Experienced comrades say that the reason for this may be possible rotting of the roots or a violation of basic rules of agricultural technology.
According to experienced summer residents, the reasons for the lack of flowering of irises are often deep planting of tubers, insufficient light, freezing of a flower bud in winter, or too much growth of bushes. Solving these problems is not that difficult.
Iris is easy to grow
Anyone can grow irises in their own flowerbed, because this flower will forgive an inexperienced gardener small flaws and will delight you with beautiful, long-lasting flowering. The variety of colors and varieties, adaptability to different climatic conditions contribute to the fact that an increasing number of summer residents decorate their plots with irises. With minimal requirements for care and cultivation, they bring enormous pleasure to owners and their guests, delighting them with unusual flowers.
0 0 votes
Article rating
Propagation of irises
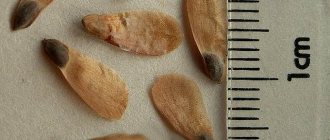
Irises are propagated vegetatively (by division of rhizomes) and by seed. Perennial species of plants are mainly propagated by seeds, since seedlings grown from seeds do not retain the varietal properties of their parents. Seeds are sown in a training bed in a loose nutrient soil mixture to a depth of 1.5-2 cm in the fall, immediately after collection. Shoots appear in the spring and are planted at a distance of 5-10 cm from each other. Irises are planted in a permanent place after two years, and they bloom in the third or fourth year.
If you decide to sow irises in the spring, then the seed must first be stratified for 1.5-2 months, for which the seeds are placed in a bag of wet sand and kept in the vegetable drawer of the refrigerator.
Perennial irises can grow in one place for 10 years or more, but at the age of four or five it is advisable to dig them up, divide them and plant them . The best time for replanting and dividing is the first month after the irises have faded, but if necessary, this can be done until the end of summer. Iris rhizomes are dug up, cutting off the leaves at a height of 10-15 cm from the base, and divided into parts 3-4 cm long, each of which should have 2-3 growth buds and 2-3 links. The sections are treated with crushed coal. The cuttings are planted in holes or grooves 3-4 cm deep a day after division, so that the sections have time to dry and do not rot in the ground. The distance between divisions and rows when planting depends on the height of the plants: 50x50 cm for tall varieties, 30x30 for plants of medium height and 10x15 for dwarf irises.
How to prepare soil for hydrangea: soil composition and proportions
Soil requirements vary depending on where the hydrangea will be grown.
If this is a garden, it will be important to take into account lighting, moisture availability and other factors. An indoor flower is less dependent on the surrounding microclimate
The moisture and fertilizing needs of such plantings are much easier to satisfy.
In this regard, ready-made soil for indoor hydrangea can be used. This option will allow you to avoid mistakes if you do not have sufficient experience in making a soil mixture. To create your own substrate, you need to know what ingredients need to be mixed and in what ratio. You need to prepare the following components:
- well-rotted peat;
- leaf mixture or turf;
- coarse sand.
Nutritious soil for home growing
The ratio of components is affected by the size and age of the flower - young plants need more humus, older plants need sand.
The bottom of the container is covered with a drainage layer to prevent stagnation of moisture and ensure the removal of excess moisture.
When creating a mixture, most often, one part of peat is taken with two parts of sand and three parts of leaf humus or turf.
Attention! The prepared mixture is poured with boiling water or heated in the oven. This will get rid of pests and pathogenic bacteria.
You need to preheat for an hour at 180 degrees or 10 minutes if the oven is heated to 200 degrees Celsius. The disadvantage of this method is that in addition to harmful substances, most of the useful ones are destroyed.
The soil required for garden hydrangea has its own characteristics. It should not contain a large amount of organic matter. In addition, watering is carried out with hard water, which is harmful for ornamental plants.
The composition of the soil for growing hydrangea in the garden should include:
- black soil;
- turf;
- peat;
- rotted leaves;
- coarse sand.
But it’s not enough to know how to prepare the soil for planting hydrangeas.
Popular articles Hydrangea variety Magical Flame - description and cultivation features
It is important to take into account a whole range of factors that can affect the development of a plant.
It is necessary to ensure good lighting of the bushes. This will allow it to bloom long and luxuriantly. It is better to plant hydrangea in a place protected from strong winds.
Diseases and pests of irises
Diseases of irises
Irises in open ground can be affected by gray rot, sporiosis and heterosporiosis, rust, bacteriosis, fusarium, ascochyta blight, ramularia and viral mosaic. Let us make a reservation right away that it will not be possible to cure plants from mosaic, so specimens with leaves speckled with yellow streaks must be immediately removed and burned to avoid infection of neighboring plants.
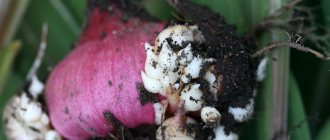
Bacteriosis, or soft rot, spreads to the inside of the rhizome. The bases of the stems emit an unpleasant odor, the fan begins to bend, turn brown and dry from the tips of the leaves, which eventually fall out easily. As a result of the development of the disease, the roots are completely destroyed, turning into a fetid mass. To prevent the disease from spreading to healthy plants, affected specimens are removed and burned. During transplantation, foci of disease found on rhizomes are cut out to healthy tissue and disinfected for half an hour in a strong solution of potassium permanganate. Mechanical damage and freezing of rhizomes should not be allowed, as this can lead to the development of bacteriosis. The most important preventive measure against the disease is crop rotation: irises after irises can be grown no earlier than after 4-5 years.
Fusarium rot also affects the roots of irises, and subsequently the vascular system of the plant, as a result of which it ceases to receive nutrition and moisture. External signs of fusarium are rapid yellowing and drying out of ground organs and a grayish-white coating on the affected rhizomes. This disease can only be combated using preventive methods.
Gray rot can develop against the background of high humidity, excess nitrogen in the soil and the presence of mechanical damage on plants: the leaves first turn pale, then turn brown and begin to rot, becoming covered with a gray coating. Severely affected plants or parts thereof are removed, and those that are not yet affected by the fungus are treated with a solution of a fungicidal drug. Prevention of the disease consists of treating planting material and disinfecting the soil.
Heterosporia on irises can develop in the second half of summer. First, white-gray spots with a watery yellowish border appear on aging leaves, growing and becoming covered with black dots. Diseased leaves dry out. The disease then attacks the younger leaves that are inside the bunch. Spotting does not cause much harm to irises, but it sharply reduces the decorative value of plants. To prevent heterosporiosis from taking effect, remove old leaves in a timely manner, and at the first signs of disease, treat the irises and the soil under them with fungicides containing copper and zinc.
Rust is also a fungal disease that appears on the leaves as dark brown small powdery spots, which lead to drying and death of the leaves. Rust must be combated with preventive measures: compliance with crop rotation, timely phosphorus-potassium fertilizing and removal of affected leaves. They destroy rust pathogens with fungicidal preparations or a suspension of colloidal sulfur.
Signs of septoria are small, round, pale gray spots with a brown border on iris leaves. Over time, black dots of pycnidia appear on the spots.
With ascochyta blight, the spots on the leaves are brown, without borders, but with numerous black dots.
Ramulariasis is characterized by small round brown or black spots that fade over time in the center. A yellow coating of mycelium appears on these necrotic foci.
All these fungal infections are destroyed by fungicidal drugs.
Pests of irises
The most dangerous pests for irises are beetles, wireworms, mole crickets, gladiolus thrips and cutworms.
Cutworms most often damage bearded and Siberian irises: at the beginning of the growing season, they eat away the bases of flower shoots, causing them to turn yellow and fall. Cutworm caterpillars can also damage the rhizomes of irises, after which they become easy prey for bacterial infections. The cutworm is destroyed by twice spraying the irises and soil in the flower garden at the beginning of the growing season with a ten percent Karbofos solution at intervals of a week.
Gladiolus thrips is a small insect that settles in the leaf sheaths of iris and feeds on cell sap. Leaves affected by thrips turn brown, dry out and become covered with brown crusts, photosynthesis is disrupted in them, and this has a detrimental effect on the health of the entire plant. In one season in warm areas, thrips produce up to 9 generations. In pest control, a ten percent solution of Karbofos is used, with which irises are treated twice at intervals of a week.
The mole cricket is a large flying and swimming insect, covered with a reliable shell, living underground and posing a serious danger to the rhizomes of irises. To repel the pest, plant marigolds around the perimeter of the area. If the mole cricket does appear in the flower garden, pour a soap solution into its earthen passages: dilute 4 tablespoons of washing powder in a bucket of water. The mole cricket will either crawl out and you can easily destroy it, or it will die underground.
Khrushchev is a larva of the May beetle that gnaws the rhizomes and roots of irises. Khrushchi grow in the soil for several years, and all this time they pose a danger to irises. To prevent larvae from entering the area, be sure to sift the manure before adding it to the soil.
Wireworm is the larva of a click beetle that eats holes and passages in the rhizomes of irises, in which fungi and bacteria then settle. These narrow, long larvae are covered with a dense protective shell, which makes them practically invulnerable. In winter they are underground, and with warming they rise to the surface. In the fight against larvae, deep autumn digging of the soil is used, as well as treating irises with insecticidal plant preparations - a decoction of red capsicum, for example. An effective remedy against wireworms is Pyrethrum, the powder of which is used to pollinate irises. You can infuse 100-200 g of Pyrethrum powder in 10 liters of water for 10 hours and then spray the irises and the surface of the flower garden against wireworms with this infusion.
Slugs are gastropods that make large holes in the leaves of irises and damage delicate flowers. There are especially many slugs in rainy summers. As bait, wet rags or burdock leaves are laid out around the area, under which the slugs crawl, and then they can be collected and destroyed. An effective remedy against slugs is granular metaldehyde, which in dry weather is scattered over the area in an amount of 30-40 g per m².

